Moths Ate My Flower Scarf

This Scarf started out life as a plain old rectangle. I drew up my design and it was too perfect. Too symmetrical! My mind kept looking at ways to make it a little more unique!

Moths Ate My Flower Scarf. Made using Scheepjes Whirl in Night Time Bubbles.

Then the idea of a scarf that had been eaten by moths popped into my head. So this is my take on a shawl attacked my moths.

The result is a rather unique scarf which drapes nicely around the shoulders due to the Moth Eaten sections.

Designed for use with one cake of Scheepjes Whirl.

The pattern is now available on Ravelry (click here), Etsy (click here) and Lovecrafts (clickhere).

Materials:

3.5mm Hook

1x Scheepjes Whirl Night-Time Bubbles. 215-225 Grams = 1000m/1093yd per ball.  Approx 150m/164yd of one whirl left over.

Finished Measurements:

63inches/160cm long.

13 ½ inches/34.2cm wide. Measured across widest section of the shawl.

This scarf has been in the hands of my capable testers and as usual they produced some fabulous test scarves. These testers make my patterns what they are, without them, those making this Scarf really could end up with a dress or jumper instead of the intended scarf. I feel it very important to show off their efforts and I also do so in my patterns. Some of their makes are shown below. As you can see, the scarf can take on so many different looks depending upon yarn choice.

christy-allen-moths.jpg

One of my incredible testers, Christy Allen, rocking her Moths Ate My Flower Scarf. Made using Lion Brand Mandala in the colour Wood Nymph!

michelle-westwood-moth-col.jpg

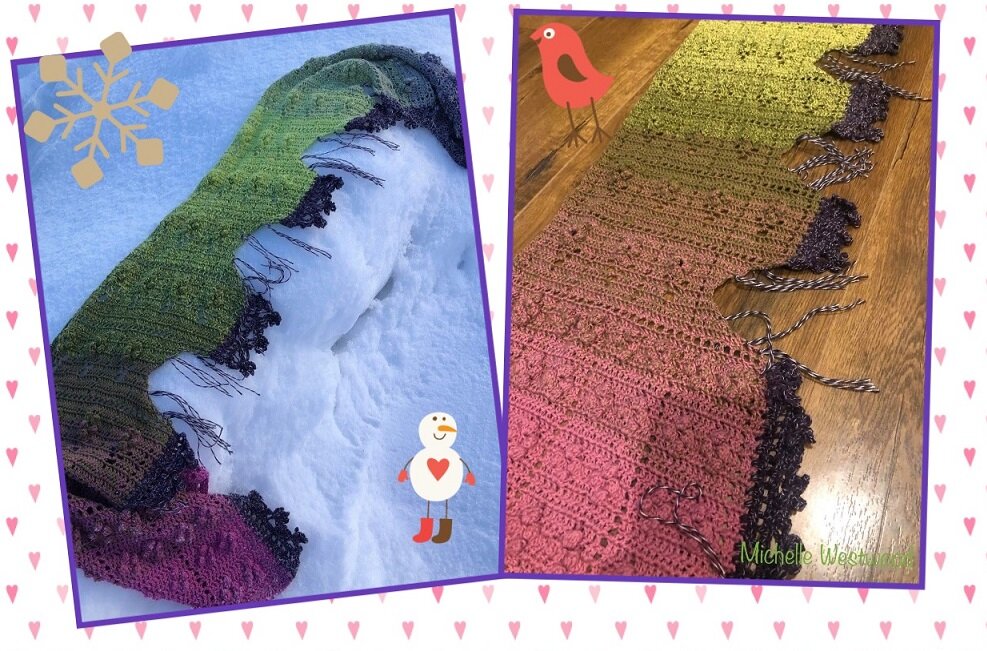
Looking great in Scheepjes Whirl, Black Forest Zinger. By Michelle Westwood

bethany-moth-col.jpg

Bethany Colhoff models her ve

rsion of 'Moths Ate My Flower Scarf'. Yarn: Redheart It's A Wrap in Rainbow. Bethany did less repeats of the pattern due to the yarn amounts she had available.

kelly-and-jeannette-moth-1.jpg

Taking on a beautiful Spring look here. Left: Jeannette Cripps used Scheepjes Whirl for her test Scarf. Right: Kelly M. Titus used Lion Brand Cupcakes.

hannah-moth-col.jpg

Looking very Autumn! Test Scarf by Hannah Schmuker. Yarn: Lion Brand Cupcakes.

Now to the boring stuff! You are welcome to sell items made from this pattern, but please credit me as the designer and add a link to purchase my pattern in your sale.

Many hours of work has gone into the designing and producing of this pattern.

You are purchasing/downloading this pattern for personal use only. Please note my patterns and my images are copyright protected, please do not use my images to sell your items. No pattern or photograph may be reproduced or distributed — mechanically, electronically, or by any other means, including photocopying, without written permission of Auburncraft Design. Please do not copy, rewrite, or redistribute this pattern as your own or otherwise. Just because you can copy does not mean you should. Please do not resell my patterns.

This post may contain affiliate links!

The Dragonfly Patch Crochet Blanket

The Dragonfly Patch Crochet Blanket

What could be better than a patch of dragonflies? I love dragonflies and am always looking at new ways to incorporate them into my designs.

I really have a thing for Dragonflies! I love days where you see them! A buzz of wings and they are gone on their way, about their day! You can try to chase them but they are not going to be caught!

I have to say I am pretty pleased with the end result of this design. The motif squares measure roughtly 25.4cm/10 inches (depending upon hook, yarn choice and tension).

The sky is the limit for how large you want this beauty to be, as it can easily be made larger with more motif squares added.

I used Bendigo Woollen Mill 8ply Cotton for this. The BWM cotton is a super soft yarn which is lovely to work with. Many different yarns could be used as a substitute.

The pattern can be found on Ravelry (Click Here), Etsy (Click Here) and on Lovecrafts (Click Here). I also have a pattern giveaway happening on my Facebook group, Two Redheads Crochet (Click here).

Materials
3.5mm hook
C1=1 x Bendigo Woollen Mill 8ply/Dk Cotton in Daffodil 485m/530yd per ball. Approx 400m/437yd used.
C2=1 x Bendigo Woollen Mill 8ply/Dk Cotton in Honeydew 485m/530yd per ball. Approx 400m/437yd used.
C3=1 x Bendigo Woollen Mill 8ply/Dk Cotton in Kiwi 485m/530yd per ball. Approx 400m/437yd used.
C4=2 x Bendigo Woollen Mill 8ply/Dk Cotton in Parchment 485m/530yd per ball. Approx -650m/710yd used.
Scissors
Tapestry Needle

The pattern comes with separate copies for Uk terms and USA terms. It has many photos to help along the way.

Pattern testing is a huge part of getting a design ready to publish. I am lucky enough to have some really incredible people who test for me. They have amazing patience and tolerance to my errors, or what I like to refer to as my boo, boos. Below is a few examples of their work.

Test Blanket: Made by Cindy Cary using Bendigo Woollen Mills 8ply Cotton in Daffodil, Pink Rose, Artic and Teal.

Test Blanket by Debbie Schell Kirkland, made using Bernat Baby Sport in Lavender and Cream.


left: Test Blanket by Kathy Mant.  Made using Bendigo Woollen Mill 8 ply cotton in Artic, Daffodil, Cream and Pine Lime.
Centre: Test Blanket by Lindsay Broussard Silvestrini. Made using Caron Simply Soft.

Right: Test Blanket by Elika Rivera. Made using Red Heart with Love in Grape Jam, Boysenberry, Lilac and White.


Test Blanket by Michelle Westwood.  Made using Paintbox Simply Dk and a 4mm hook

Yarn Suppliers:

Bendigo Woollen Mill 8 ply Cotton. This was used in the main design and by two of the testers, (click here).

Caron Simply Soft. This was used by one tester, (click here)

Red Heart With Love. This was used by one tester, (search google for closest supplier).

Bernat Baby Sport. This was used by one tester, (click here).

Paintbox Simpy Dk. This was used by one tester, (click here).

Now to the boring stuff! You are welcome to sell items made from this pattern, but please credit me as the designer and add a link to purchase my pattern in your sale.

Many hours of work has gone into the designing and producing of this pattern.

You are purchasing/downloading this pattern for personal use only. Please note my patterns and my images are copyright protected, please do not use my images to sell your items. No pattern or photograph may be reproduced or distributed — mechanically, electronically, or by any other means, including photocopying, without written permission of Auburncraft Design. Please do not copy, rewrite, or redistribute this pattern as your own or otherwise. Just because you can copy does not mean you should. Please do not resell my patterns.

There will be a giveaway of one copy of the pattern in the next few weeks in my crochet group Two Redheads crochet on Facebook (click here).

This post may contain affiliate links.

Winter Snowflake Keyhole Head Warmer Crochet Pattern.

Winter Snowflake Keyhole Head Warmer.

I few weeks ago when I started making keyhole head warmers, I had no idea that I would end up doing 5 different stitch designs. It just sort of happened.! I'd finish one and then there would be another stitch idea in my head that was clammering to get out.

This is the final in the series of five and I have to say I rather like this one.

Winter Snowflake Keyhole Head Warmer uses many of the design features of the other Head Warmers in the series, but its main body is done in Waistcoat Stitch. This give a fabulous basis for the Cross-stitch snowflake pattern that is worked on it.

Easy Level

The pattern is available on Ravelry (click here). You have the option of purchasing all five of the series at a discounted price if you wish. Add all five to your basket and use the code ‘five’.
Five patterns included in this.
Autumn Snowflake Keyhole Head Warmer
Not for Summer Keyhole Head Warmer
Spring Arrows Keyhole Head Warmer
Winter Snowflake Keyhole Head Warmer
Winter Sunset Keyhole Head Warmer.

and Etsy (click here).

Series of Five: All pattern available on my ravelry store Auburncraft Crochet.
Centre Top: Winter Snowflake Keyhole Head Warmer
Left Top: Winter Sunset Keyhole Head Warmer
Left Bottom: Spring Arrows Keyhole Head Warmer
Right: Autumn Snowdrops Keyhole Head Warmer
Bottom: Not For Summer Keyhole Head Warmer

This pattern can worked in varying yarns due to its nature. Size is determined by the length of the head band and the amount of rows worked. While size can be adjusted easily for the circumference of the head and height can be adjusted by omiting rounds, due to the snowflake pattern this head warmer is best suited to teen or adult sizing.

Two contrasting yarns are used to gain maximum impact with the cross stitch that is worked over the Waistcoat Stitch to form the Snowflakes

It is assumed that you have prior knowledge of cross stitch. A small graph is included with the Snowflake pattern, instructions for stitch placement are included.

Materials
4.5mm
C1=1 x Lion Brand A Touch of Alpaca Purple Aster. Available here (click). Approx 70m/76yd used.
C2= 1 x Lion Brand A Touch of Alpaca Cream. Available here (click). 150m/164yd used.
Tapestry Needle
1 x 40mm/1.5-inch Button
Scissors
Stitch Markers.

Lion Brand A Touch of Alpaca. Links to yarn available in the Materials section.

As usual with my patterns, getting them through the test process is always a process. This could not be achieved without the input and work done by my pattern testers. Below are a few examples of their work.

Top Left: Test Head Warmer by Michelle Rose. Made using Caron Simply soft
Bottom: Test Head Warmer by Mirjam Annaars. Made using Zeeman Royal in Vintage Pink and Cream.
Right: Test Head Warmer by Cindy Cary. Made using Caron Simply soft.

Caron Simply Soft is available here (click here).

Now to the boring stuff!

This pattern contains affiliate links.

This pattern has been tested by a large group with varying abilities in crochet.

You are welcome to sell items made from this pattern, but please credit me as the designer and add a link to purchase my pattern in your sale.

Many hours of work has gone into the designing and producing of this pattern.

You are purchasing/downloading this pattern for personal use only. Please note my patterns and my images are copyright protected, please do not use my images to sell your items. No pattern or photograph may be reproduced or distributed — mechanically, electronically, or by any other means, including photocopying, without written permission of Auburncraft Design. Please do not copy, rewrite, or redistribute this pattern as your own or otherwise. Just because you can copy does not mean you should. Please do not resell my patterns.

How many W.I.Ps are too many?

I refuse to count how many designs I have in progress at present. Surely a girl CAN'T have too many!

I truly must finish some of them, one day, maybe!

Yesterday I saw a post where someone was asking about all things Holly Hobby. I popped up a picture of a little blanket I did ages ago. A couple of people asked about the pattern and while there is one, I never got around to completing it.

I had only been designing a short time and it got away from me, so I placed it in the 'I must finish one day' basket. There is really not a lot of room left in that basket. It is quite full.

The idea for the design came from a very old doily that I spotted in a Op/Thrift shop one day. I snapped a picture of it and 'Bonnets and Bows' was born.

Today I found myself looking at my yarn stash. I spotted some Bendigo Mill Luxury, and it occurred to me that I could re-work that blanket. Fix the few things that were bugging me. I have the yarn and it is only a smallish blanket! It shouldn't take long!

So keep an eye out for 'Bonnets and Bows' soon.

Woo,Hoo! Leadlight Afghan Done!

Excitement plus! It may have taken me a forever from idea to completion, but it is finished.

My Leadlight Afghan is done and I can move on to one of the dozen, other designs I have partly done.

What a feeling of achievement! You know how it is when you can see that finish line looming. You only have a few more stitches to do and a few ends to sew in. You find yourself trying to work faster, and that feeling when you put that last stitch in place!

The border on this gave me some headaches. Being round I felt it had to have increases. I took three goes to get this and each time I frogged it, I considered heaving it off the balcony and pretending it did not exist. My darling husband just looked at me and stated he was amazed at my persistence. By these last few rows, I had almost 900 stitches per round.

I finally came to the realisation that, although this is round, the increases became unnecessary in this section as each bit of colour was over a section that seemed almost straight. Yes, the blanket had become so large. It ended up being 62 inches across.

When I first began this beauty, I had envisioned that it would be around 52 inches across. That was not to be.

The initial idea had sprung to life in my head after looking at Stained Glass mandalas on Pinterest. I saw this one in greens and blues and thought to myself 'This would make a great crochet afghan!'

I spent quite a while mulling around in my head, as to how I could get this idea from my head into a workable crochet blanket.

The Colourwork sections are done with bobbins, but I used cut cardboard. Yes, I am cheap and didn't want to spring for all those bobbins. Each time I did a colour section I was kicking myself for not getting the bobbins. At times I had a tangled mess and even my beloved Stella (dog) was looking at me thinking I was crazy!

Middle section of Colourwork.

I am now in the process of organising my test group. Testing will begin in a couple of weeks, and I have some very keen (or crazy) people signed up for testing.

I hope to have this pattern published by mid year 2019.

This uses Stylecraft Batik yarn (available here) and a 5mm hook.