



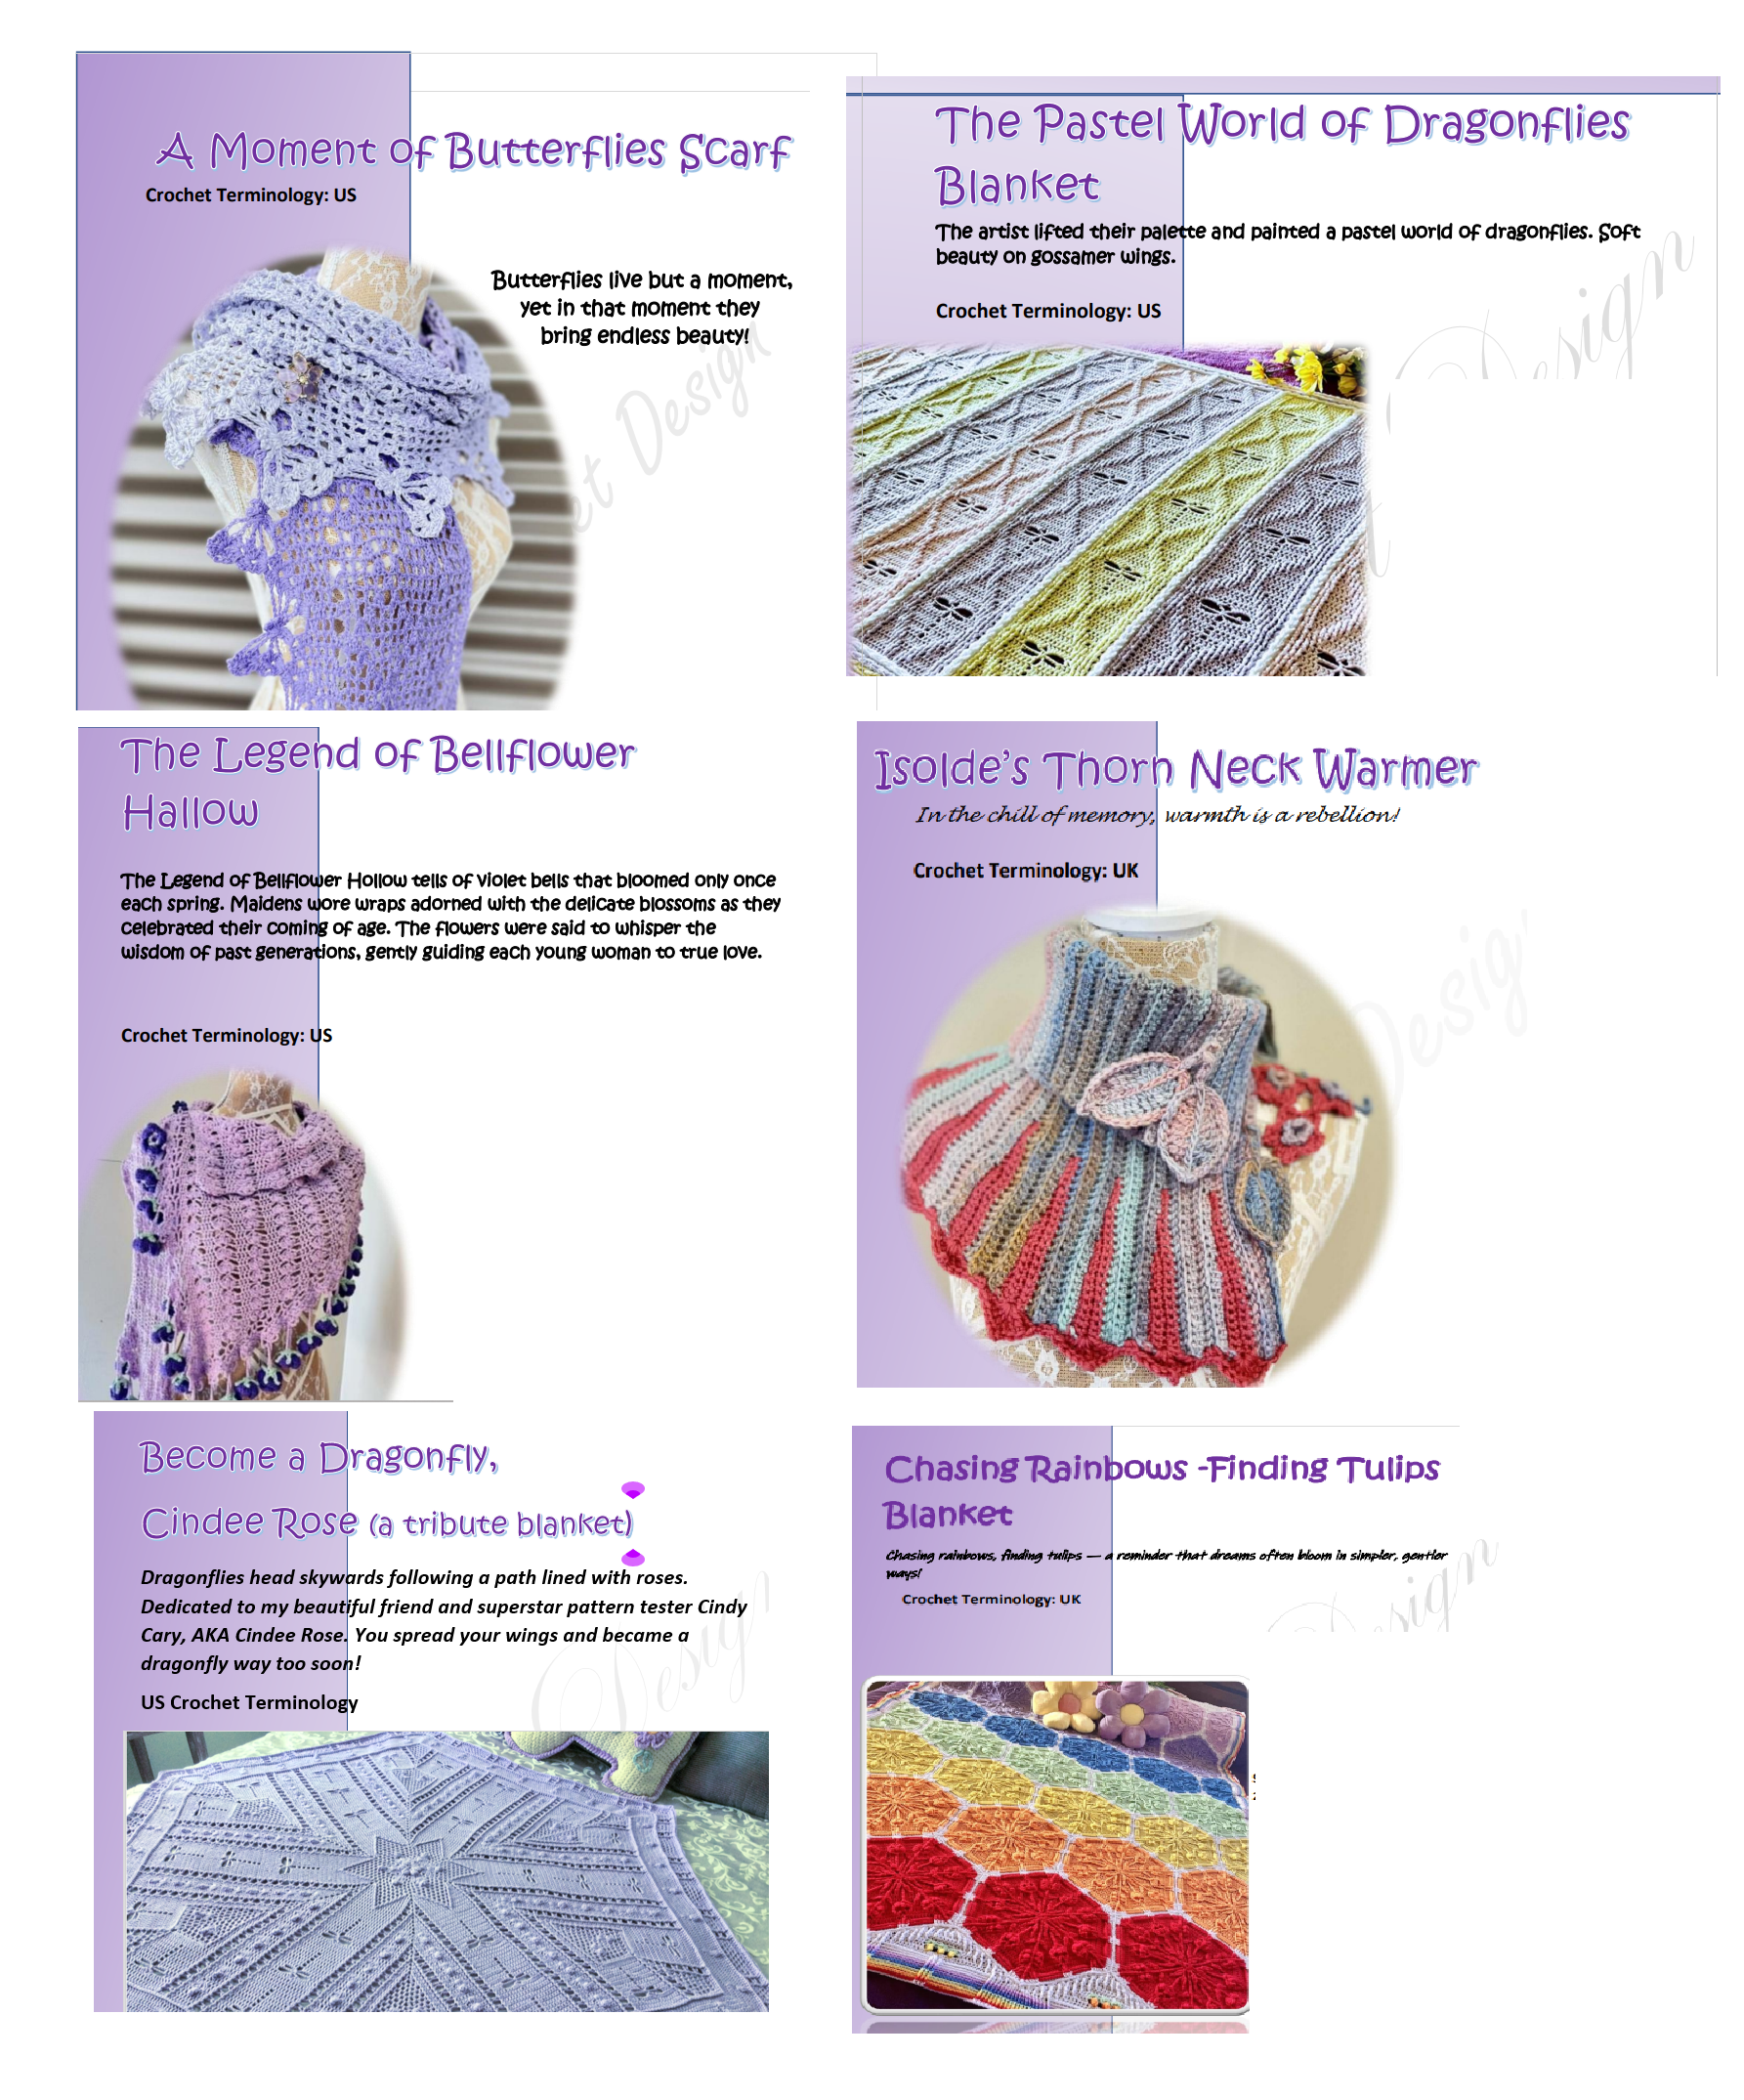

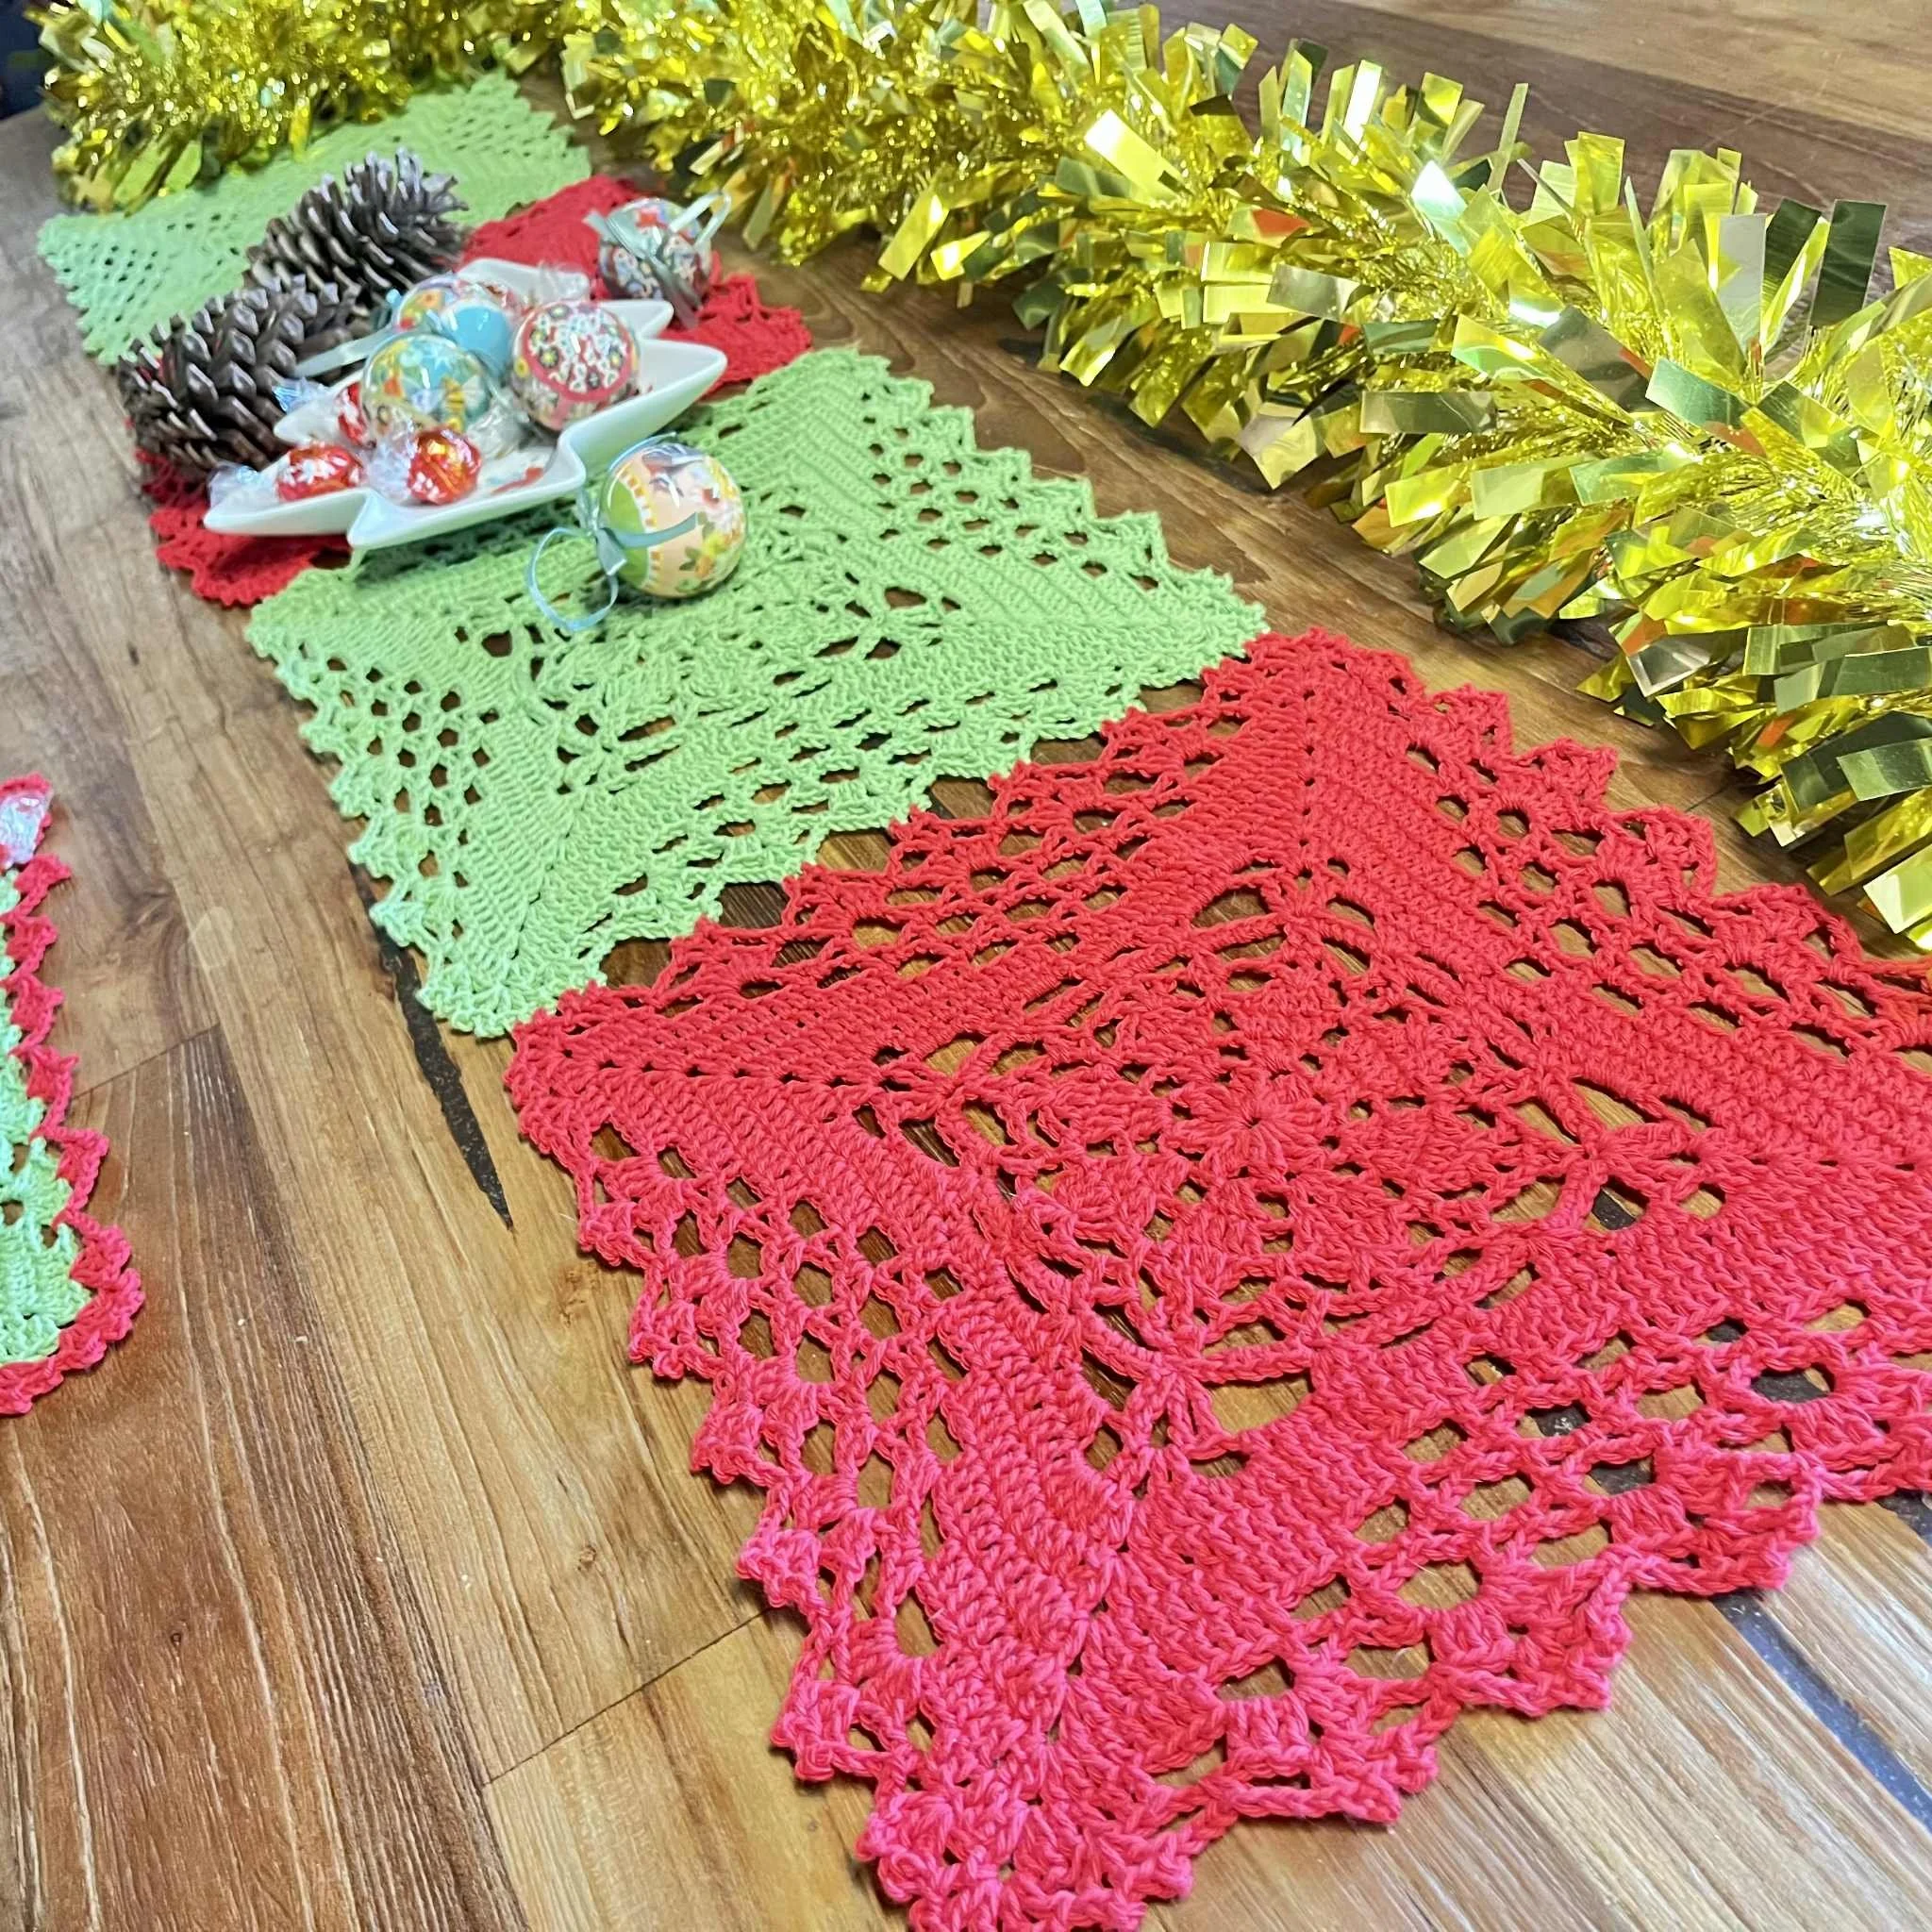
Life’s like a ball of yarn. Sometimes you end up with a beautiful scarf, sometimes things unravel and you must start again. Either way, it’s all part of the pattern!
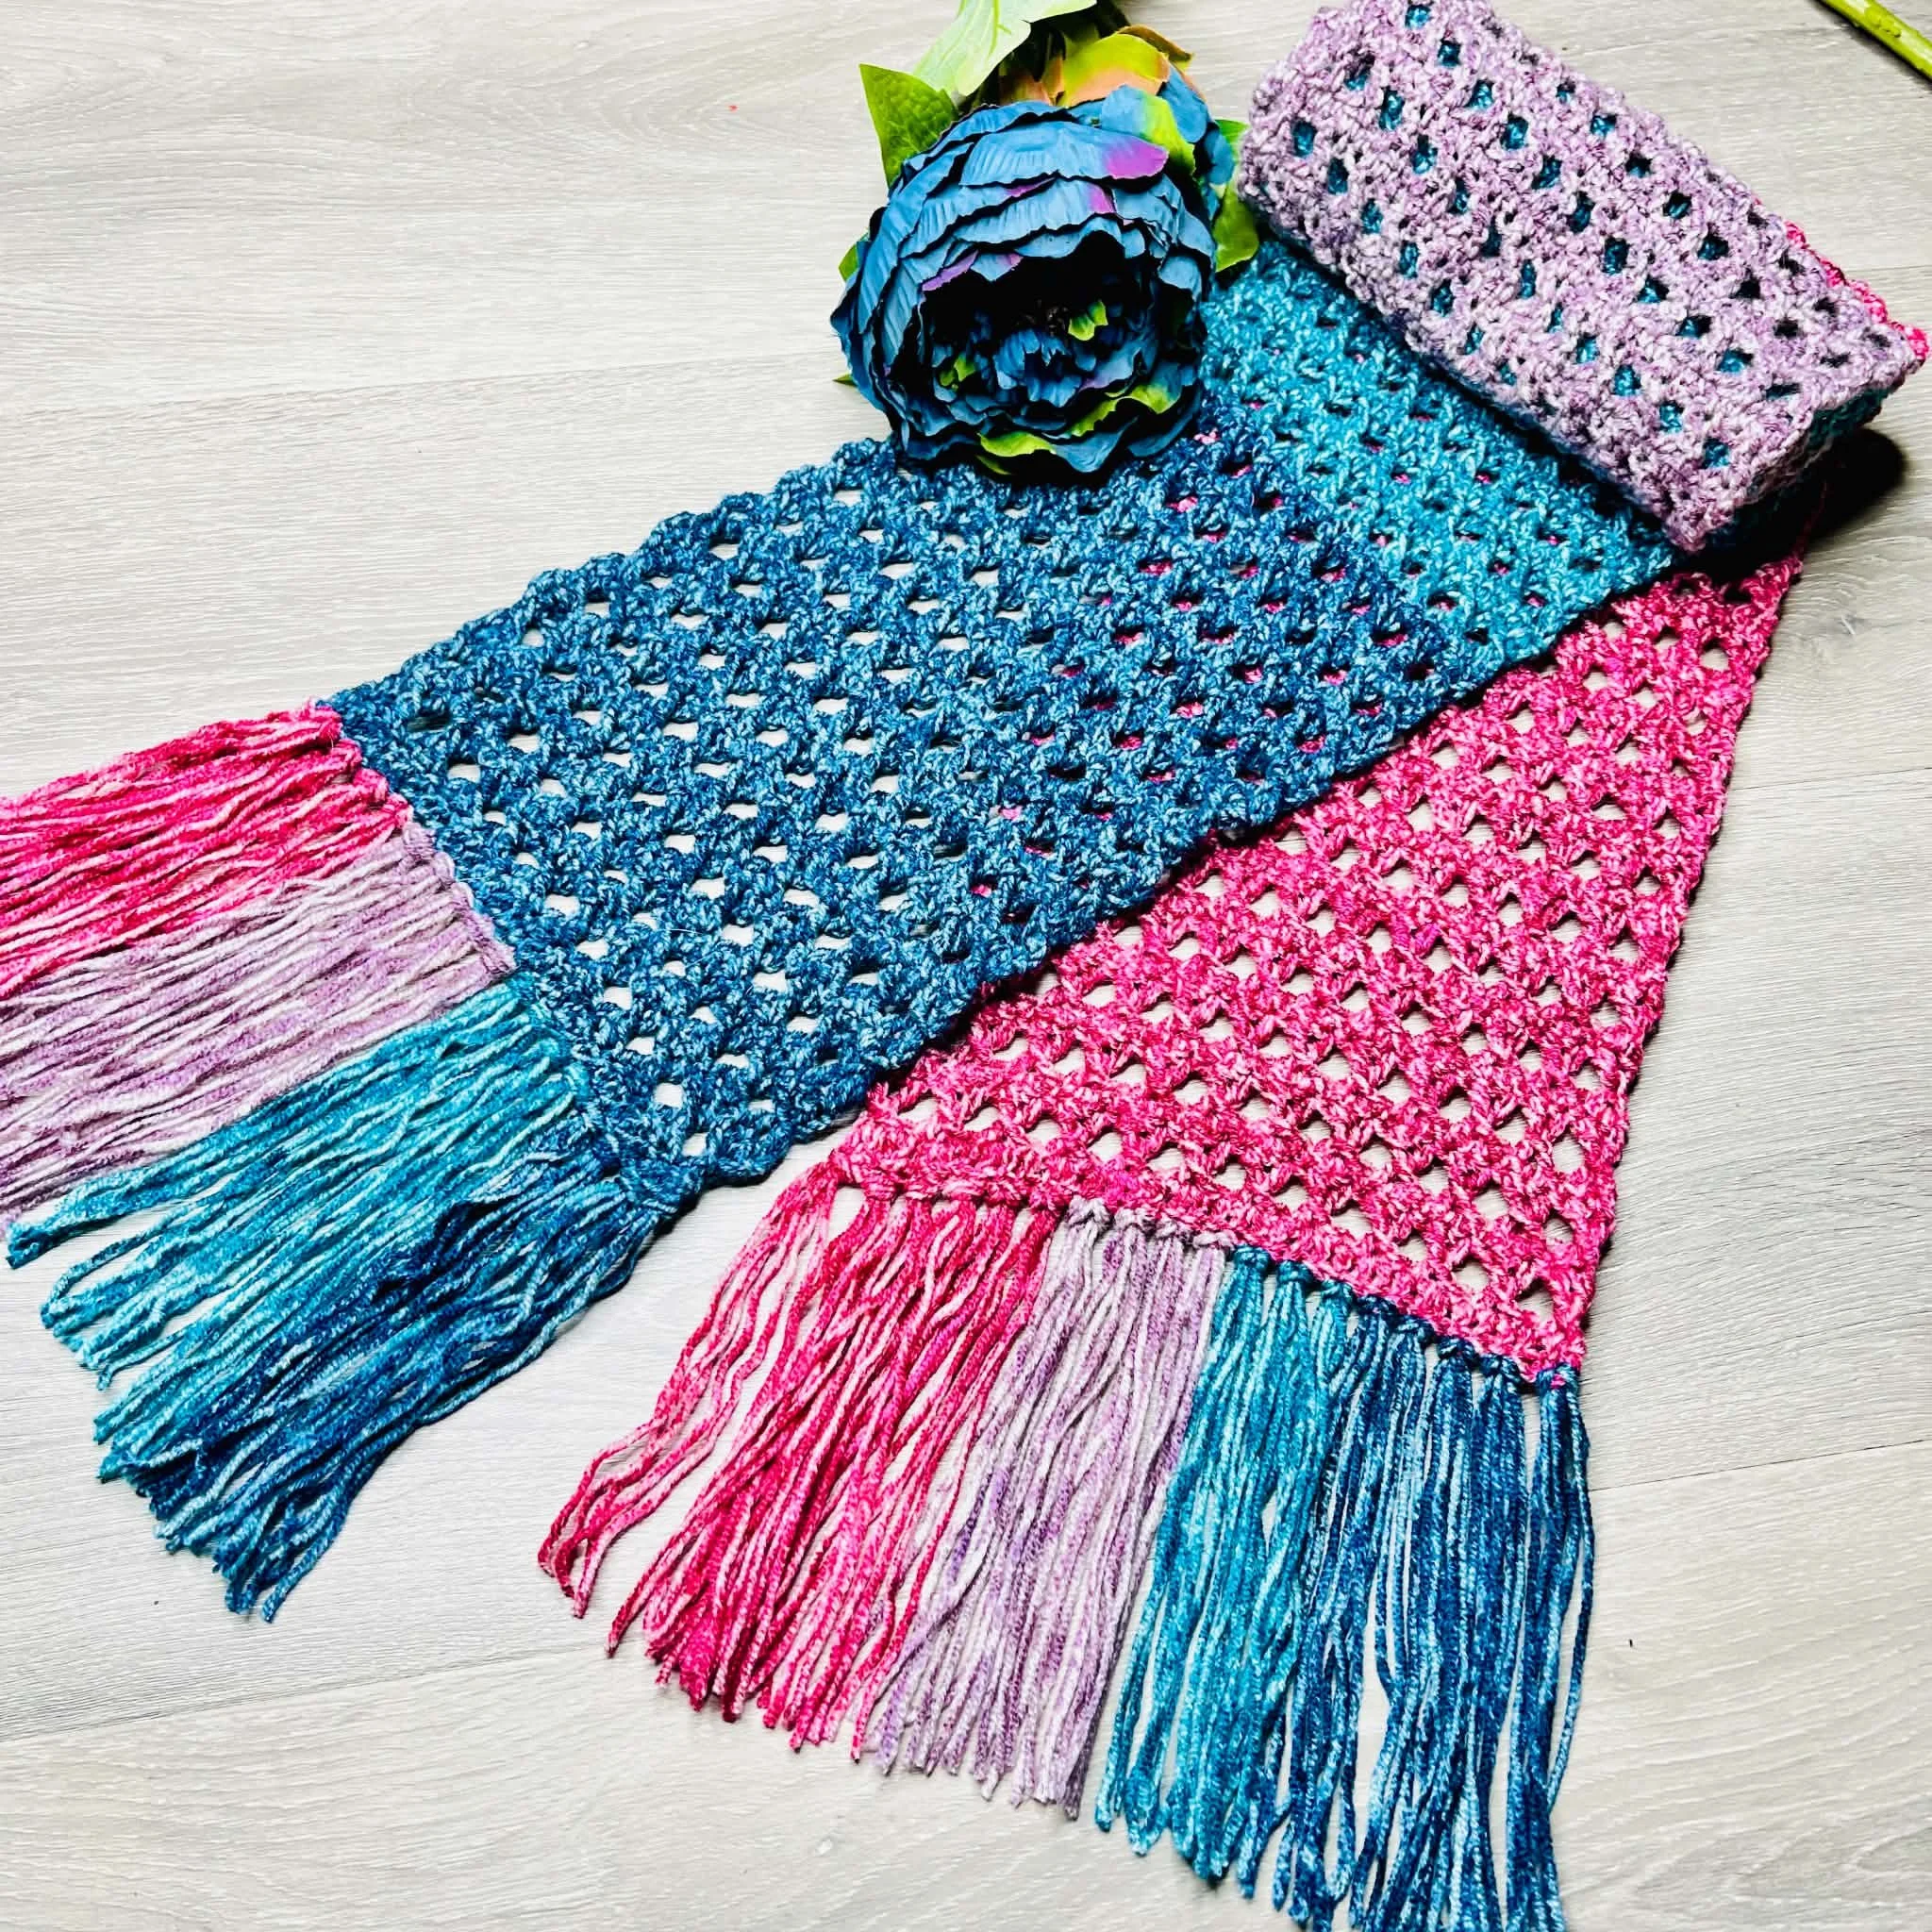
Life's a Batik grew from my love of playing with stitch combinations. The scarf features my own cross-stitch pattern, creating a lovely textured design that works beautifully with the colour variations of Stylecraft Batik DK.
It's a lovely stash-friendly project and a chance to enjoy something a little different from the usual crochet stitches.
I've included the basci written instructions below, written in US Terminology and a YouTube video detailing the stitch is also available to help with the stitch combination. Please give the video some love.
If you prefer a downloadable pattern, the complete PDF, including the stitch graph and additional pattern support, is available free to Yarn Stalker Gold members in the Auburncraft members area. MEMBERSHIP IS FREE. Sign up on the Homepage.
Supporting independant designers helps too keep the unique patterns coming.
Materials
· Hook: 4mm (G/6)
· Yarn: Stylecraft Batik DK
o 50g (1.76 oz) per ball
o 138m (151 yds) per ball
· Colours used:
o Heather (1906)
o Indigo (1914)
o Teal (1909)
o Raspberry (1905)
The quantities of each colour used are not specified, as scrap yarn was used for this design. The total yarn used was approximately 185g (511m / 559 yds).
Additional Supplies
· Tapestry needle
· Stitch markers
· Scissors
Measurements:
Length without fringe: 167 cm (65.7 in)
Length with fringe: 201 cm (79.1 in)
Width: 20 cm (7.9 in)
Gauge: 20 sts and 10 rows = 10cm/4”, measured over double crochet.
Gauge Swatch
This pattern uses a unique stitch combination. To correctly judge gauge a double crochet stitch is used for the swatch.
Ch26.
Row 1: Dc into 4th Ch from hook (counts as 2 sts), Dc23 across. [24 sts]
Row 2: Ch3 (counts as Dc). Dc23 across. [24 sts]
Repeat Row 2 until you have 10 rows.
Place your tape measure across the centre of the swatch, avoiding the outer stitches, and check that 20 stitches measure 10cm/4”. Check that 10 rows measure 10cm/4” in height.
Notes:
· This scarf is worked in rows, turning after each row. The Cross Combo and Starting Cross Combo stitches are each made up of several steps worked together. See Special Stitches for instructions on how to work these combinations. They are referred to throughout the pattern as Cross Combo and Starting Cross Combo.
· This pattern has been designed as a stash/scrap buster project. Colour placement is not specified in the pattern, allowing you to use your yarn as you wish. The total yarn required is listed in the Materials section.
· For a neater transition of colours, add the new colour in at the beginning of a row 2 in the repeats.
· Repeat sections are shown inside square brackets [ ]. Starting sections and instructions indicating what a stitch counts as are shown inside round brackets ( ). Stitch counts appear in bold square brackets [ ] at the end of each written row. Picture references appear in bold square brackets [ ] at the beginning of the relevant row.
Abbreviations
· Hk- Hook
· Ch- Chain
· Cross Combo – Cross Stitch Combination
· Dc- Double Crochet
· FpDc – Front Post Double Crochet
· Sc- Single Crochet
· Sk - Skip
· Sp- Space
· Starting Cross Combo – Cross Stitch Combination used at the start of a rows.
· YO – Yarn over
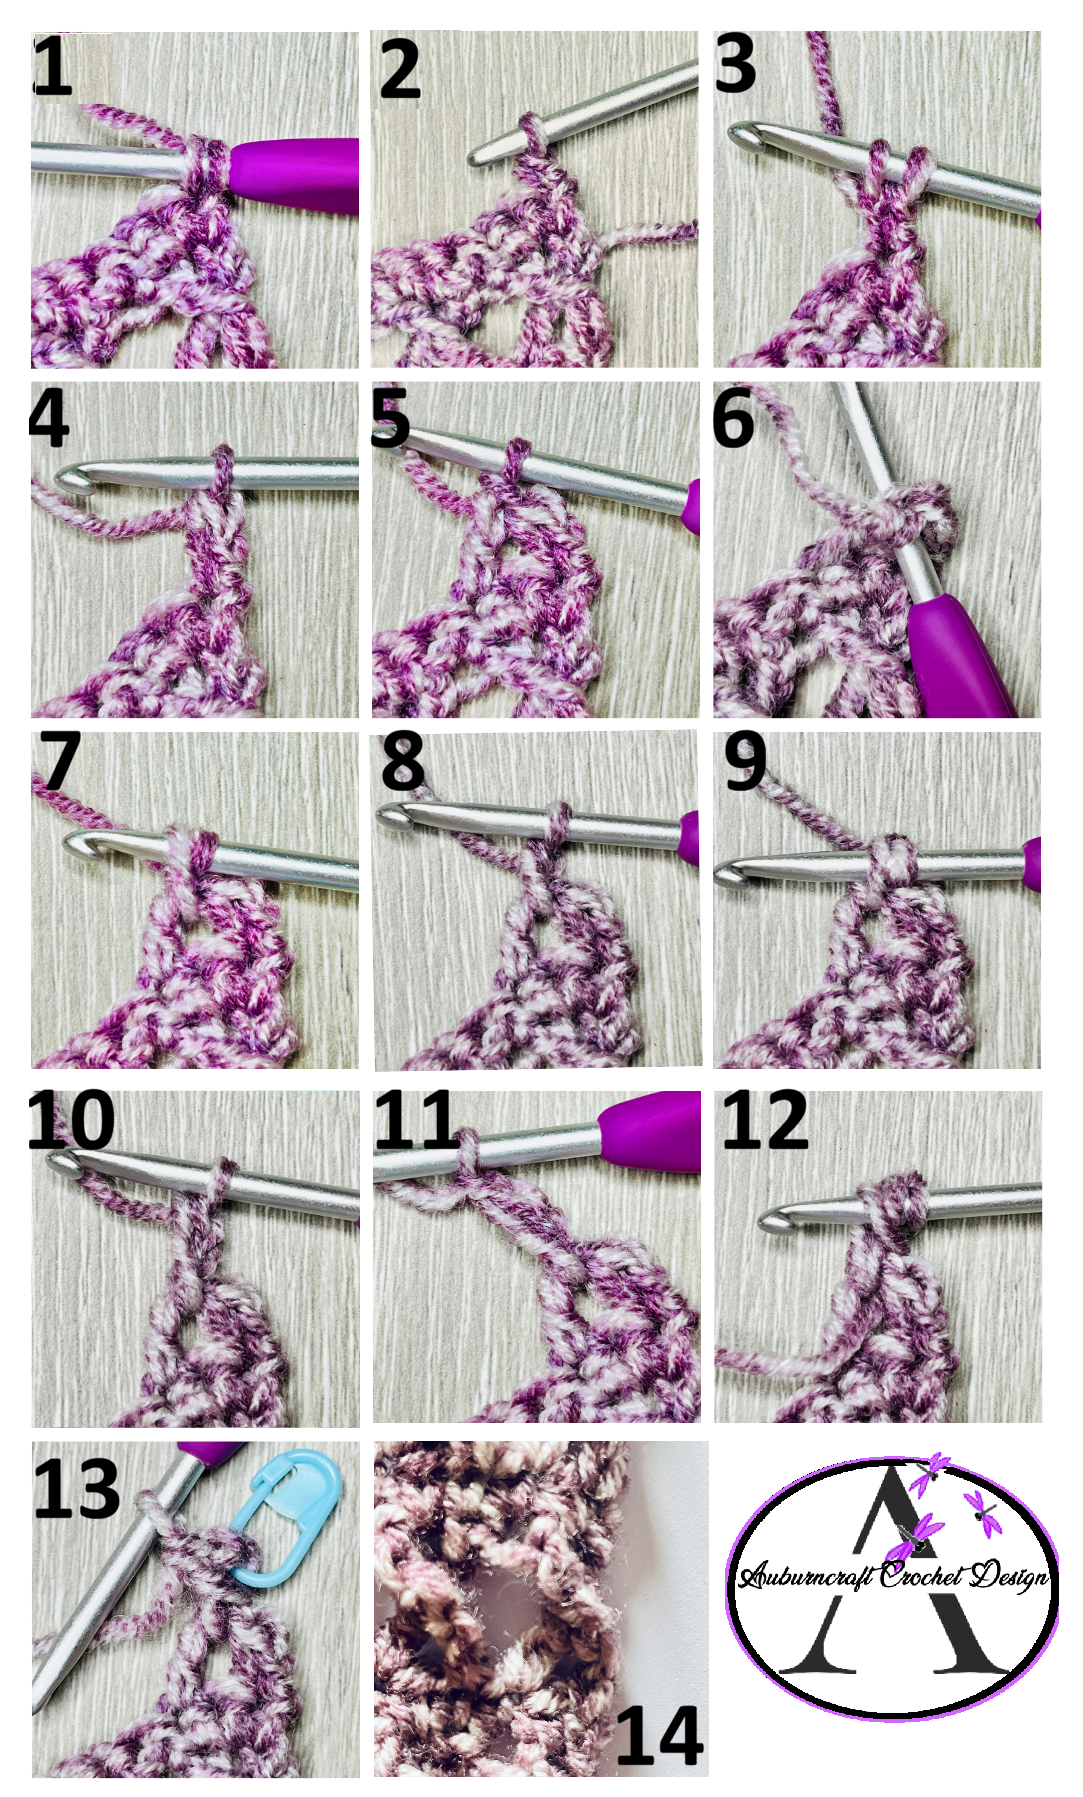
Special Stitches and Instructions
Starting Cross Combination (Starting Cross Combo)
This is the stitch used for each cross to be created at the start of a row. This spans 3 stitches.
1. [1, 2] Without creating a chain, insert the hk into the 1st st of the row and pull up a loop (2 loops on the Hk). YO and pull through all loops.
2. [3, 4] Stack the second single crochet: Look at the single crochet you just made. Find the left vertical leg (or side bar/loop) of that stitch. Insert your hook under that left vertical leg. Yarn over and pull up a loop (2 loops on the hook). Yarn over and pull through both loops.
3. [5] This step creates a Dc. Skip 1 St. YO and insert the HK into the next St and pull up a loop (3 loops on the hook). YO and pull through 2 loops twice.
4. [6, 7, 8] This step creates a second Stacked Sc. Insert the Hk through the space between the first Stacked Sc and the Dc, Yo and pull up a loop. (2 loops on the Hk). YO and pull through all loops.
5. [9, 10] Stack the second single crochet: Look at the single crochet you just made. Find the left vertical leg (or side bar/loop) of that stitch. Insert your hook under that left vertical leg. Yarn over and pull up a loop (2 loops on the hook). Yarn over and pull through both loops.
6. [11] Chain 1.
7. [12, 13, 14] This step creates the final part of the cross. A FpDc is worked around the first stacked Sc group. Yo and insert the hk around the first stacked sc from front to back and then back to front. YO and pull up a loop (3 loops on the hook). Yo and pull through 2 loops twice.
Starting cross combo completed. This stitch will be referred to as Starting Cross Combo in the written pattern.
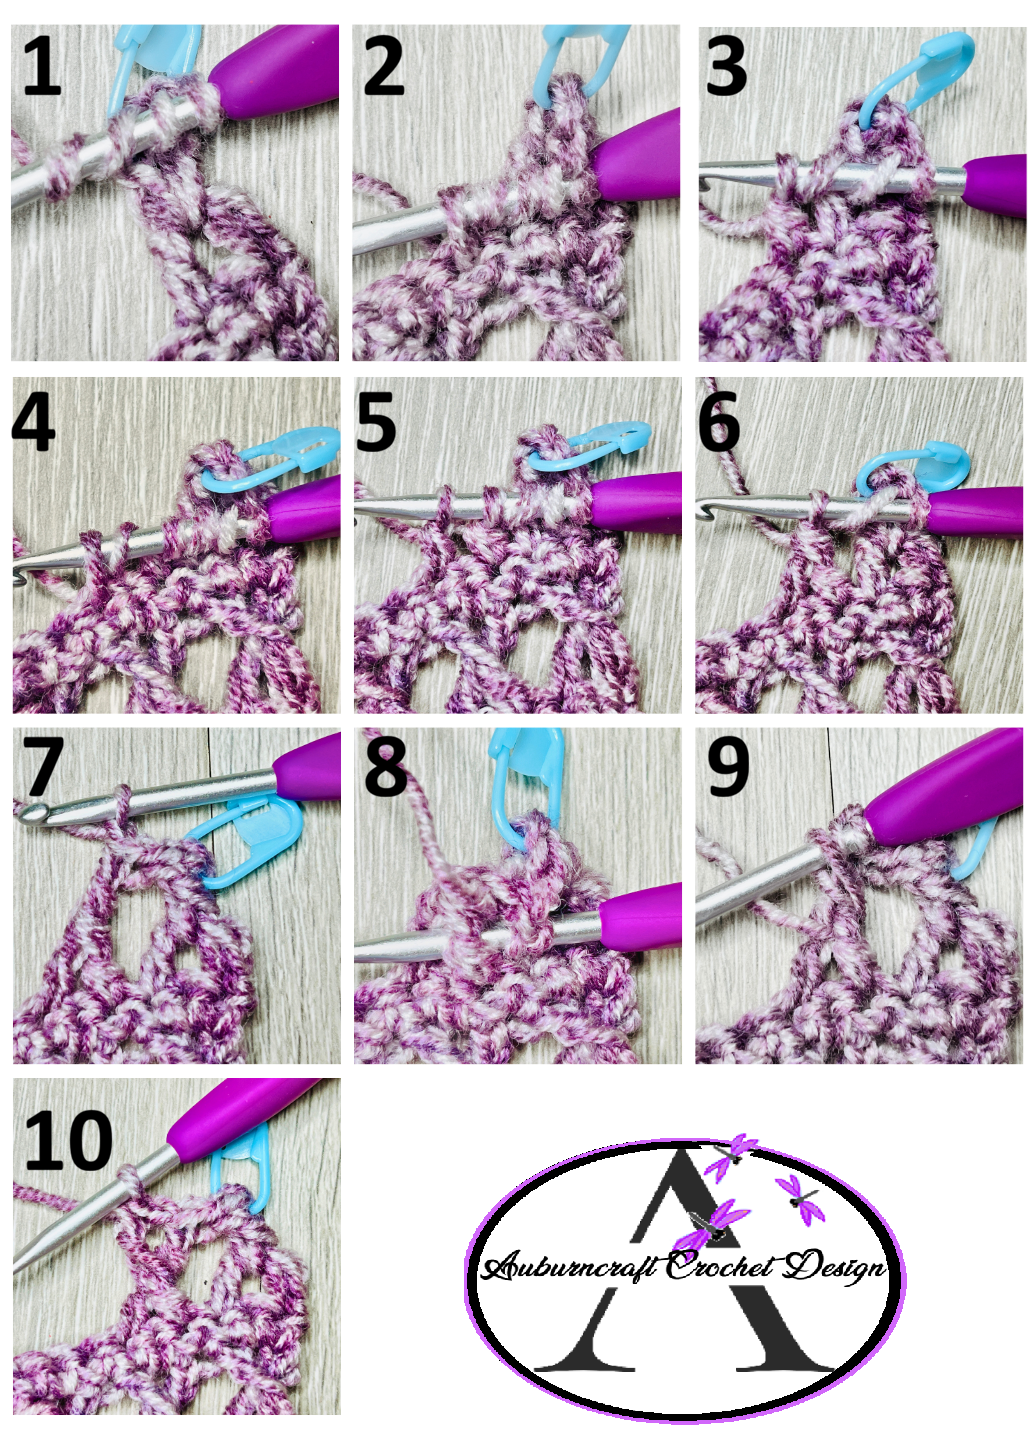
Cross Combination (Cross Combo)
This stitch is used for all other Cross Stitches and spans 3 stitches.
1. [1, 2, 3] Yo 3 times, insert the hk into the next St and pull up a loop. Yo and pull through 2 loops (4 loops on hk).
2. [4] Sk1, yo, insert the hk into the next St and pull up a loop (6 loops on hk).
3. [5] Yo and pull through 2 loops (5 loops on hk).
4. [6] Yo and pull through 3 loops (3 loops on hk).
5. [7] Yo and pull through 2 loops twice.
6. Ch1.
7. [8, 9] This step creates the final part of the cross. Work a FpDc around the first leg of the cross created in Step 1. Yo and insert the hk from front to back and then back to front around the first leg created in Step 1. Yo and pull up a loop (3 loops on hk). Yo and pull through 2 loops twice.
8. [10] The Cross Combo is complete.
This stitch will be referred to as Cross Combo in the written pattern.
Stacked Single Crochet (Stacked Sc)
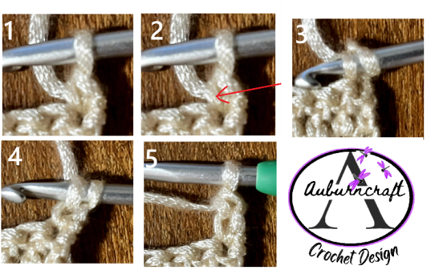
1. Without making a starting chain, insert the hook into the first stitch. Yarn over and pull up a loop. Yarn over and pull through both loops to create a single crochet.
2. Insert the hook into the loop indicated by the red arrow.
3. Yarn over and pull up a loop
4. (2 loops on the hook).
5. Yarn over and pull through both loops to complete the stitch.
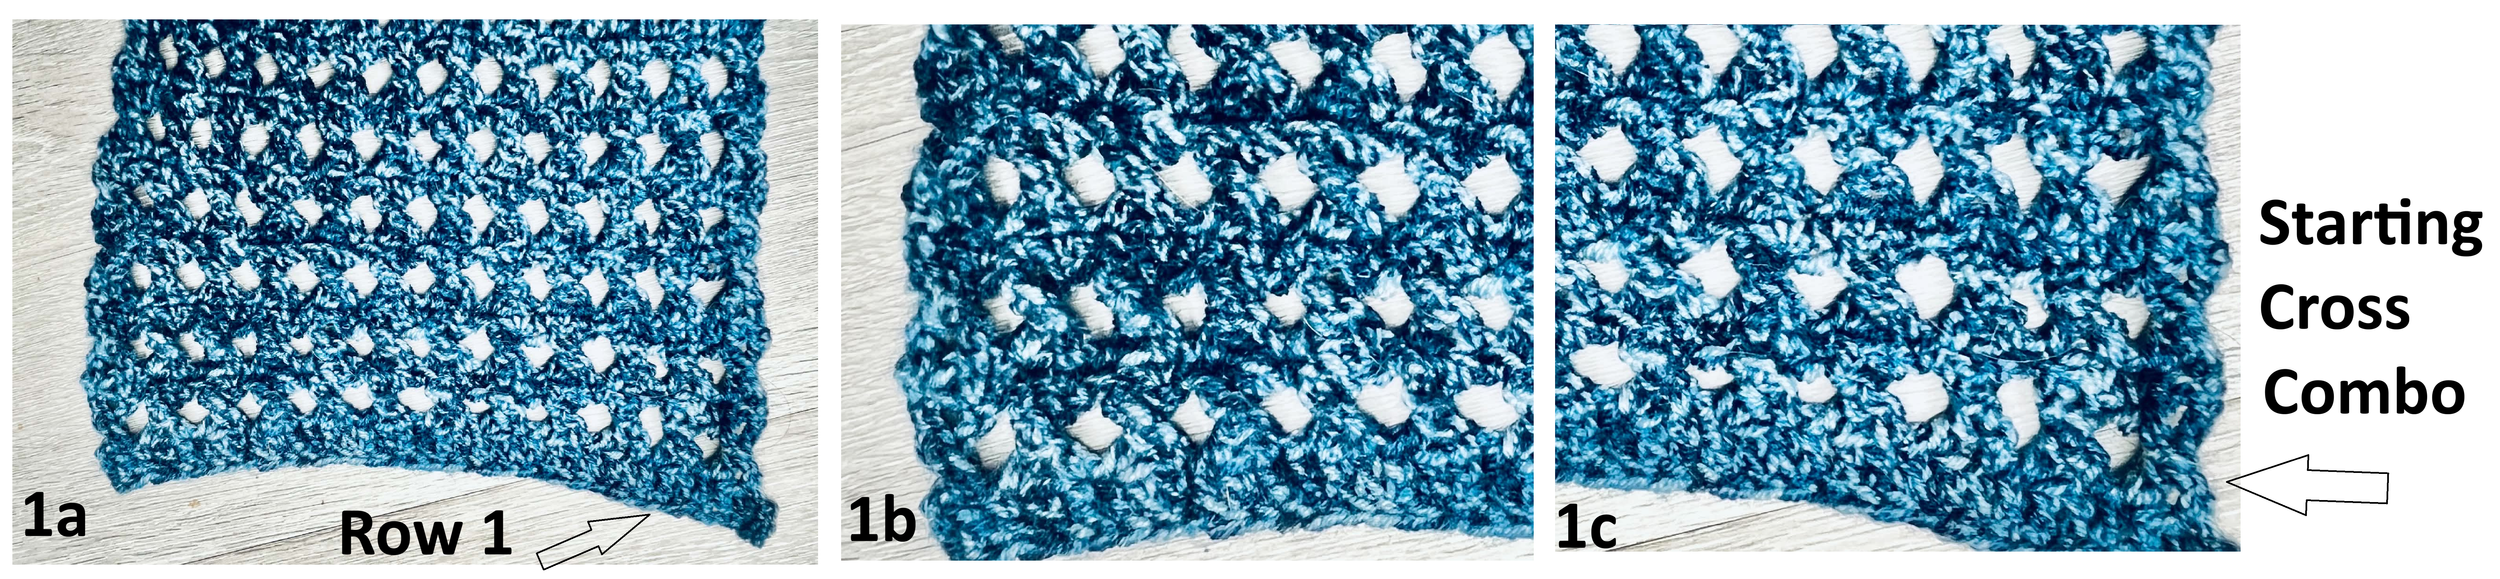
See Special Stitches for Starting Cross Combo.
Row 1: [1a, 1b, 1c] Ch38. Dc into 4th Ch from Hk (creates 2 Dc). Dc34 working into each Ch. Turn. [36 Dc]
See Special Stitches for Cross Combo.
Row 2: [1a, 1b, 1c] Create a Starting Cross Combo. Cross Combo11. Turn. [12 Cross Combo Stitches]
Row 3: [1a, 1b, 1c] Ch1, (Does not count as a St) Sc into same Sp as Ch1. [Sc into Ch1. Sc into top of Cross. Sc into next top of Cross]x11. Sc into Ch1. Sc into last Cross. [36 Sc]
Repeat rows 2 – 3 until desired length. Repeat row 3 once. Fasten off and cut yarn. For the length stated in the pattern measurements work 145 rows including the final repeat of row 3.
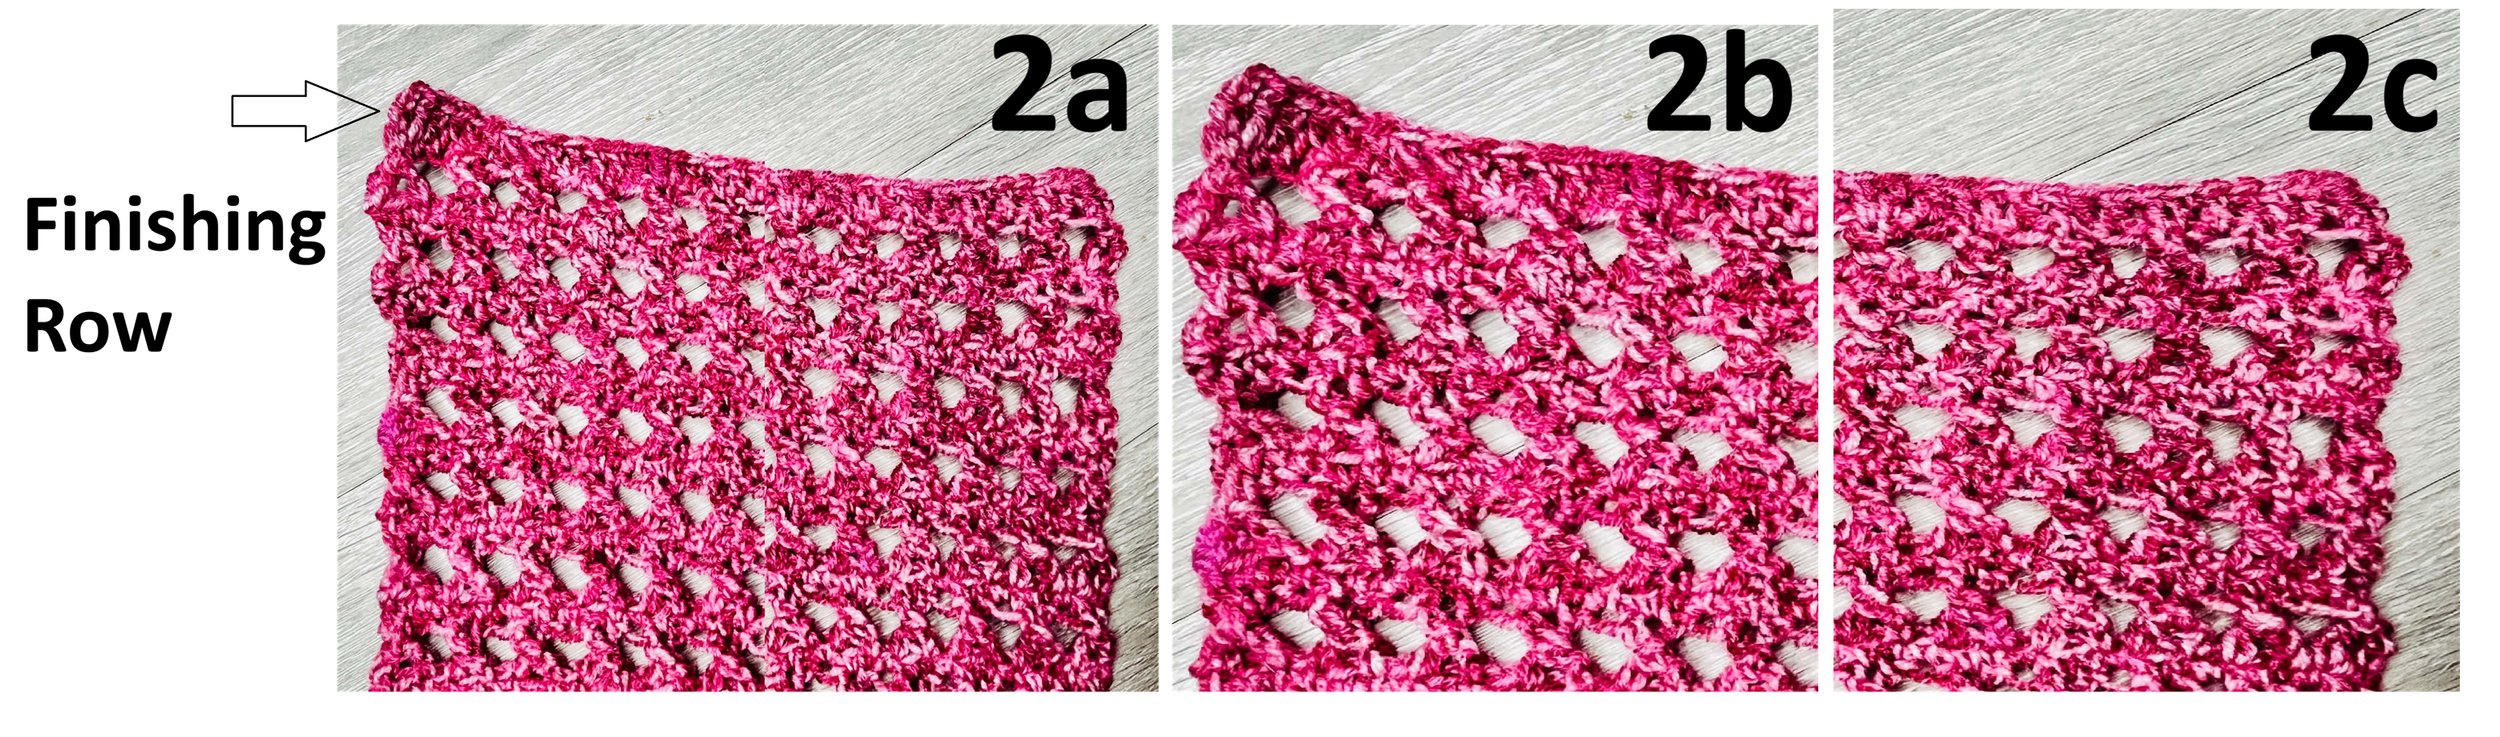
See Special Stitches for Stacked Sc
Final Row: [2a, 2b, 3c] Ch3 or create a Stacked Sc (counts as Dc). Dc35 working into each Ch. Turn. [36 Dc]
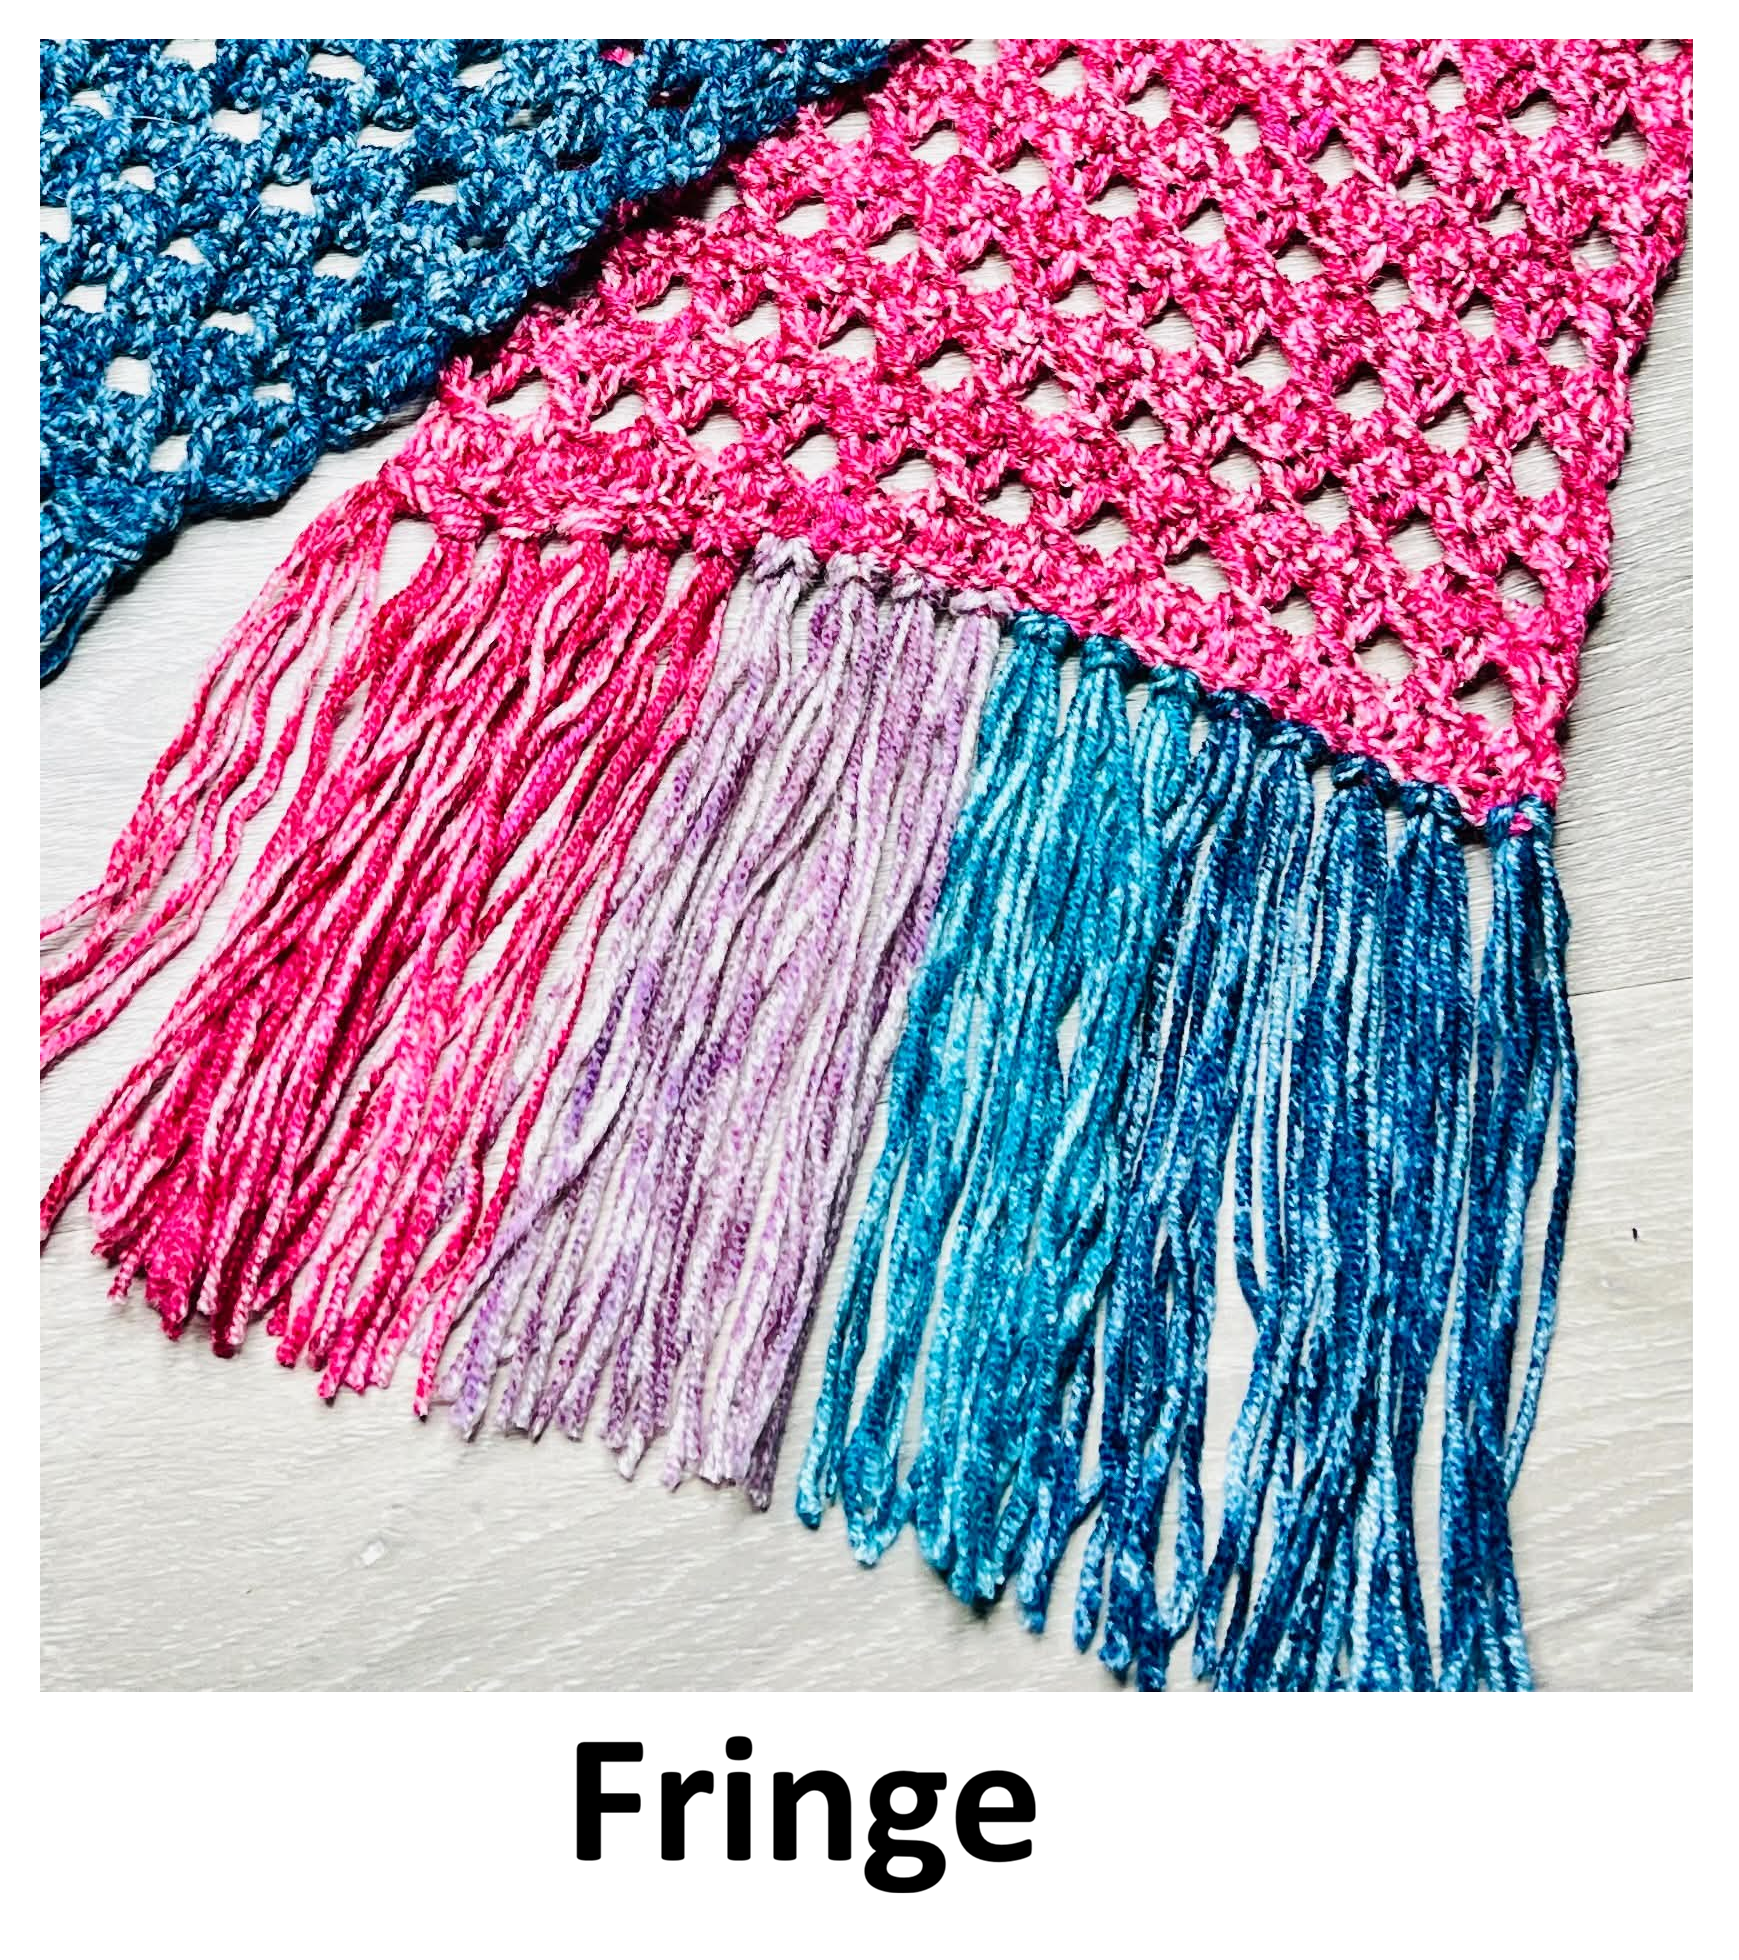
Fringe
Photograph numbering will begin from 1
Note: These instructions will create a fringe 6 inches long. To adjust the length of your fringe, multiply the length you want x2 and then add 2.5cm (1 inch). 3 pieces of yarn are used for each fringe length.
Helpful hint:
To avoid measuring and cutting each length of yarn individually, find an item with a circumference or measurement around it that gives you the desired length. A book or an iPad are a couple of suggestions. Wrap the yarn around the item and cut through the wrapped strands at one point to create lengths of equal size.
I used the remaining scrap yarn in Stylecraft Batik, keeping the three strands in each fringe piece the same colour. Depending on the amounts of yarn I had available, I arranged the fringe in colour groups, following the same colour progression as used in the scarf.
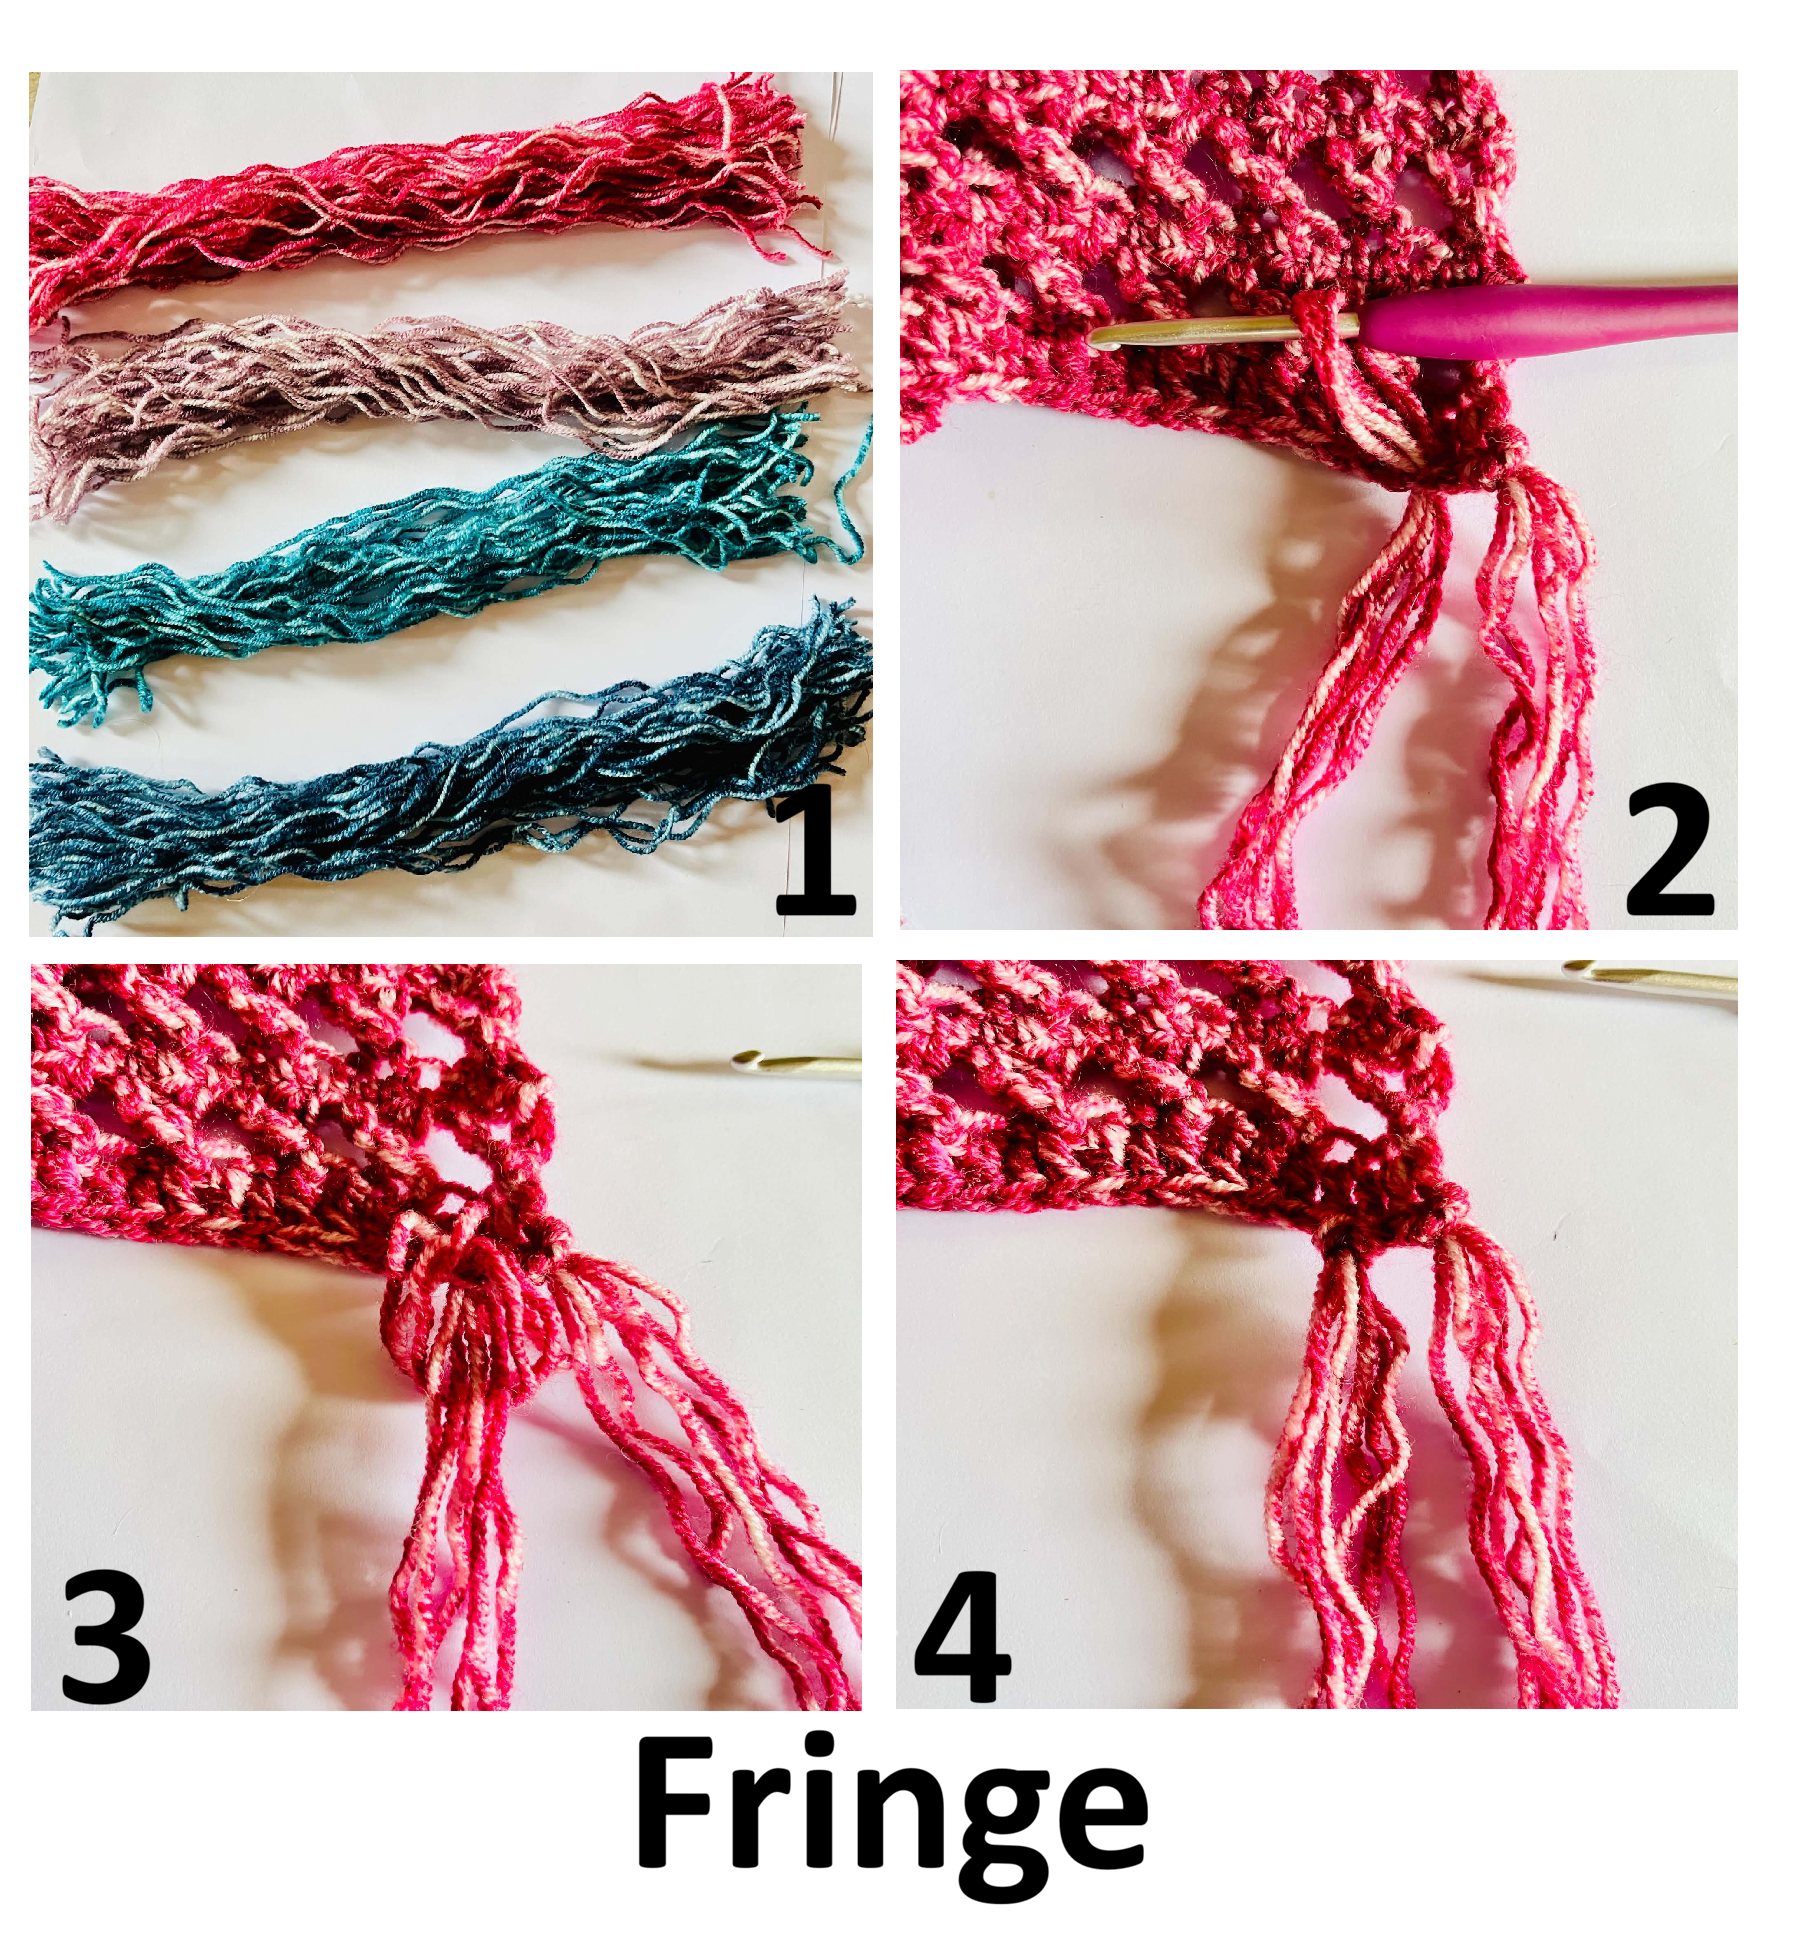
Step 1: [1] Cut 108 lengths of yarn, each 33cm/12.9 inches long, or to your desired length.
Step 2: [2] Using your hook, fold three strands of yarn in half and pull the folded loop through the first stitch at the row end.
Step 3: [3, 4] Pass the yarn ends through the loop and pull gently to secure the fringe.
Step 4: Attach the fringe in every second stitch along the row ends.
Step 5: Trim the fringe to create a straight edge.
Repeat Steps 1 to 5 on the other end of the scarf
Enjoyed the Pattern?
If you've enjoyed making Life's a Batik, or found the pattern helpful, you can always buy me a tea as a little thank you.
Every cuppa is appreciated and helps support the time and work that goes into creating more original Auburncraft designs.
Thank you for supporting independent crochet designers!
Pattern Usage
You are welcome to sell finished items made from this pattern, provided you credit Auburncraft Crochet Design as the designer and include a link to this pattern in your listing where possible.
Please remember that my patterns, written instructions, original stitch combinations and photographs are protected by copyright. You may not copy, reproduce, rewrite, redistribute, publish or claim any part of this pattern as your own, whether in print or digital form.
You are welcome to link to this blog post, but please do not reproduce the pattern instructions elsewhere or share copies of the pattern. Please do not use my photographs to promote or sell items you have made. Take and use your own photographs of your finished work.
This pattern is provided for your personal use. Any modifications you make, including changing the yarn, hook size or finished dimensions, are made at your own discretion and responsibility. Results will vary depending on your yarn choices, tension and modifications.
I'd love to see what you make, so feel free to share photographs of your finished creations and tag Auburncraft Crochet Design.
Before You Begin
This pattern assumes a basic knowledge of crochet and the ability to follow written and technical instructions.
Please read through the instructions before beginning and familiarise yourself with any special stitches. A YouTube demonstration is also available to help with the cross-stitch combination.
Stay in Touch
To keep up with new Auburncraft pattern releases, crochet news and subscriber-only discount codes for Ravelry, subscribe to the Auburncraft website.
Yarn Stalker Gold members can also access the complete downloadable PDF of this pattern, including the stitch graph and additional pattern support, free through the members area