Jump to -
What is a Colour Block Graph
How To Create a Straight Edge To Work A Border
How to Linked Double Crochet (LDc)
How To Create a Standing Double Crochet
How To Back Loop Herringbone Half Double Crochet (BLHHdc)
Adding Beads To Crochet The Easy Way
Cushion Wadding Tutorial
Filet Crochet How to Keep It Neat
A Few Tips To Understanding The Written Pattern
Here is a few tips to understanding how I write. The majority of my patterns are of an intermediate level. My style has changed slightly over the years and earlier patterns may employ the use of * instead of brackets.
How to Read Auburncraft Crochet Patterns: Brackets, Symbols & Helpful Tips
Opening a new crochet pattern should be exciting, not confusing. If you've ever looked at a pattern and wondered what all the brackets, symbols, stitch counts, and abbreviations mean, you're not alone.
Over the years I have developed a pattern style that aims to provide as much guidance as possible while keeping instructions clear and easy to follow. Whether you're working from one of my dragonfly designs, a shawl, blanket, purse, or motif pattern, the same formatting principles apply throughout.
This guide explains the symbols, brackets, and pattern conventions you'll find in Auburncraft Crochet Design patterns.
Why I Format My Patterns This Way
Crochet patterns can quickly become difficult to read when multiple repeats, stitch groups, and special stitches are involved.
My goal is to make patterns easier to follow by:
Clearly identifying repeats
Showing stitch groupings at a glance
Providing row-by-row stitch counts
Including charts whenever possible
Including tutorial photographs for additional guidance
Offering both US and UK terminology where available
Once you understand the formatting, you'll find the patterns become much easier to read.
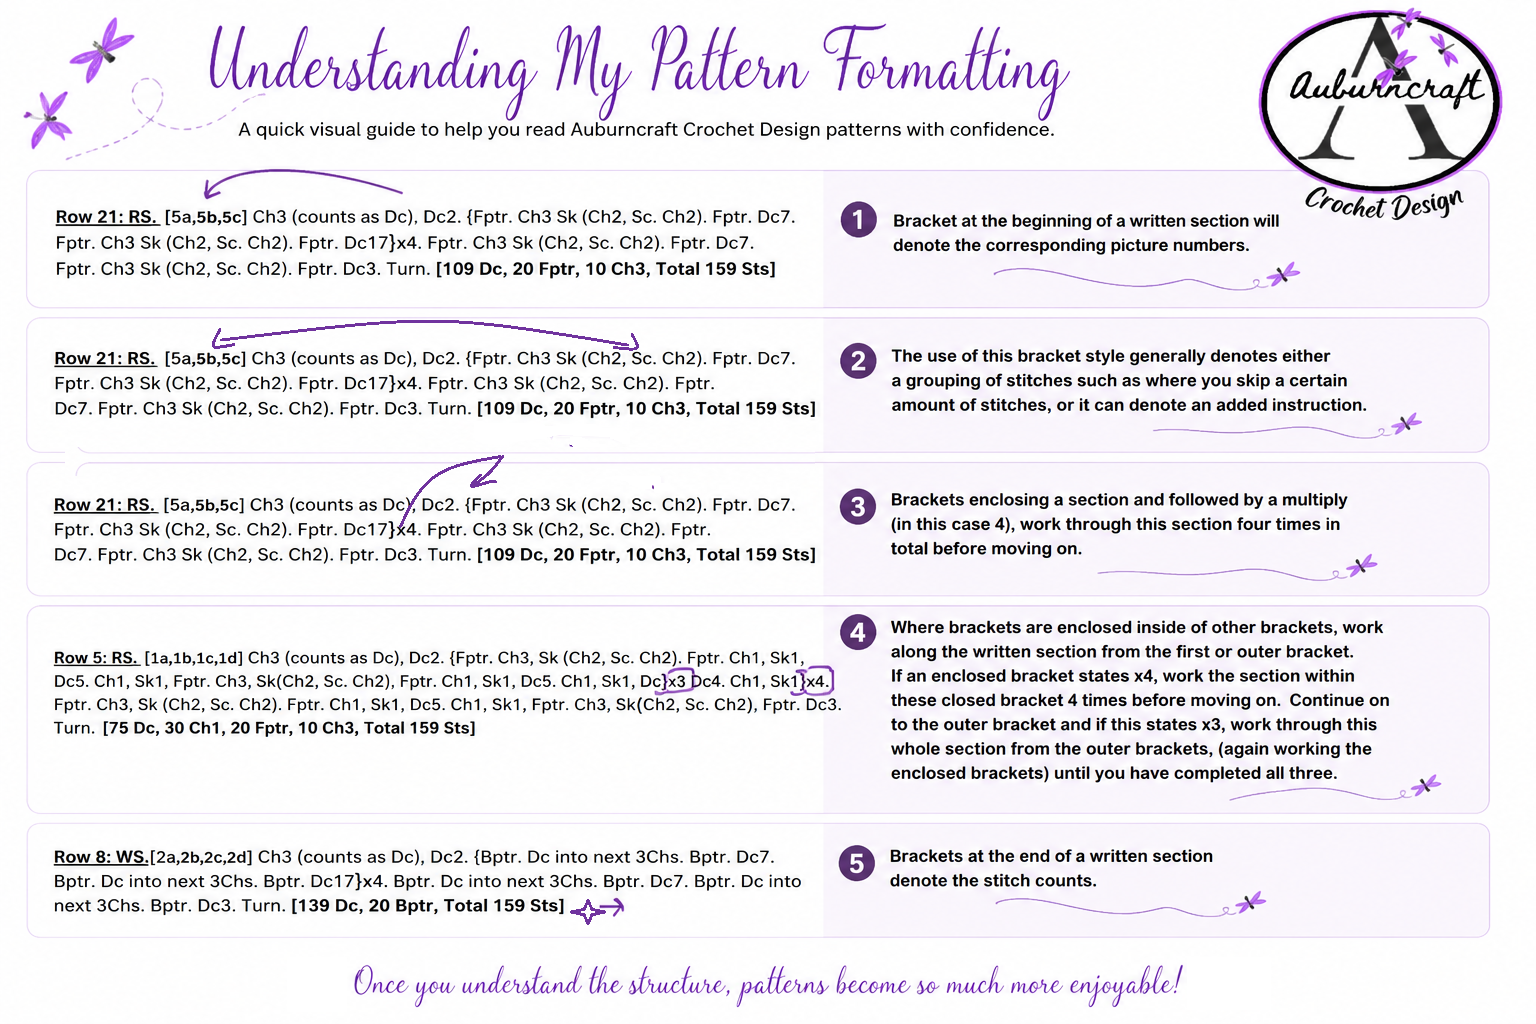
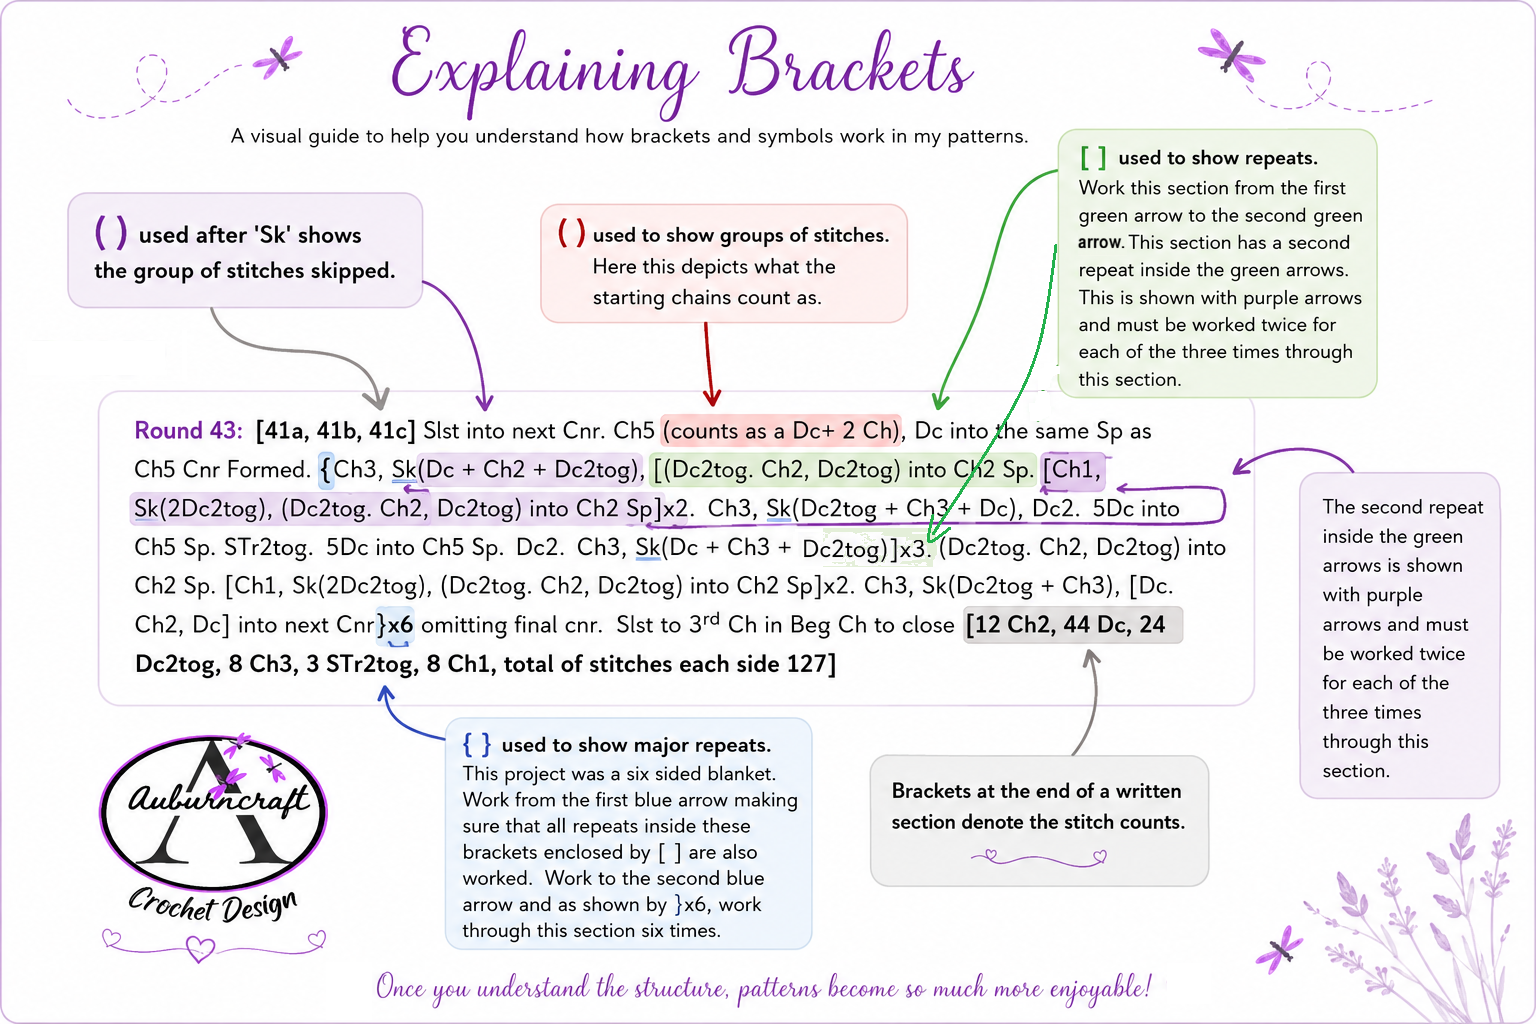
Understanding Brackets and Symbols
Round Brackets ( )
Round brackets are used to provide additional information.
You may see them used for:
Starting chains that count as stitches
Stitch definitions
Instructions for skipped stitches
Grouped explanations
Example:
Ch1 (counts as Sc)
This means the starting chain is counted as a single crochet.
Square Brackets [ ]
Square brackets indicate a section that is repeated.
Everything inside the brackets is worked the specified number of times.
Example:
[Sc, Ch2, Dc] x3
Work:
Sc, Ch2, Dc
Then repeat the same sequence two more times for a total of three repeats.
Curly Brackets { }
Curly brackets are used for larger sections that may contain multiple stitch groups or nested repeats.
These are particularly useful in more advanced patterns where a complete section needs to be grouped together for clarity.
Example:
{ [Sc, Ch2, Dc] x4, Ch1, Skip next St }
This allows larger sections of instructions to be read more easily.
The Plus Symbol (+)
The plus symbol shows stitches that are worked together within the same stitch or space.
Example:
(3Hdc + Ch3 + 3Hdc) into next St
This means:
Work 3 half double crochet stitches
Chain 3
Work another 3 half double crochet stitches
All into the same stitch.
The plus sign helps separate the individual components of the stitch group, making complex instructions easier to read.
Understanding Skipped Stitches
Sometimes patterns require skipping several stitches or a combination of stitches and spaces.
Rather than asking you to count each element separately, I place the skipped section inside brackets.
Examples:
Sk(Sc + Ch2)
or
Sk(Sc, Ch2, Sc)
The bracketed section shows exactly what should be skipped before continuing.
This often makes lace and filet crochet patterns easier to follow.
3Dc vs Dc3 — What's the Difference?
This is one of the most important formatting rules used throughout my patterns.
3Dc
A number before a stitch means all stitches are worked into the same stitch or space.
Example:
3Dc
Work 3 double crochet stitches into one stitch.
Dc3
A number after a stitch means the stitch is worked into consecutive stitches.
Example:
Dc3
Work 1 double crochet into each of the next 3 stitches.
The same principle applies to all stitches:
Sc3
Hdc3
Tr3
and so on.
Understanding this distinction makes stitch placement and stitch counts much easier to follow.
Pattern Photos and Tutorials
Many Auburncraft Crochet Design patterns include tutorial photographs.
When present:
Bold numbers at the beginning of a row correspond with tutorial photographs.
These photos provide visual guidance for that specific stage of the pattern.
For visual learners, these photos can be extremely helpful when working more complex stitch patterns.
Stitch Counts
At the end of each row or round you will find the stitch count displayed in bold square brackets.
Example:
[48 Sts]
This allows you to quickly check your work and identify any mistakes before moving on.
I strongly recommend checking stitch counts regularly, particularly when working lace, filet crochet, shawls, and motif patterns.
Starting Chains and Standing Stitches
Patterns include starting chains where required and indicate what those chains count as.
Personally, I prefer using standing stitches whenever possible because they often create a neater finish.
If you are comfortable using foundation stitches, you may also substitute foundation rows in place of starting chains where appropriate.
Right Side (RS) and Wrong Side (WS)
You may occasionally see:
RS = Right Side
WS = Wrong Side
These indicate which side of the work should be facing you.
Unless otherwise stated, photographs shown within my patterns are usually taken from the right side of the work.
US and UK Crochet Terminology
Moar Auburncraft Crochet Design patterns are available in both US and UK terminology.
Be sure to check which version you are using before beginning your project, as stitch names differ between the two systems.
Another look at a different pattern. This round of pattern is for one of my six sided dragonfly designs. It has brackets within brackets.
Final Thoughts
Crochet patterns often look complicated at first glance, but once you understand the structure they become much easier to follow.
My aim is always to provide clear instructions, detailed stitch counts, charts where possible, and plenty of photographs to help guide you through each design.
If you're ever unsure about a particular instruction, don't hesitate to reach out. I'm always happy to help fellow crocheters enjoy the journey from first stitch to finished project.
All these tools are there to help break up complex stitches and ensure your project turns out just as beautifully as intended.
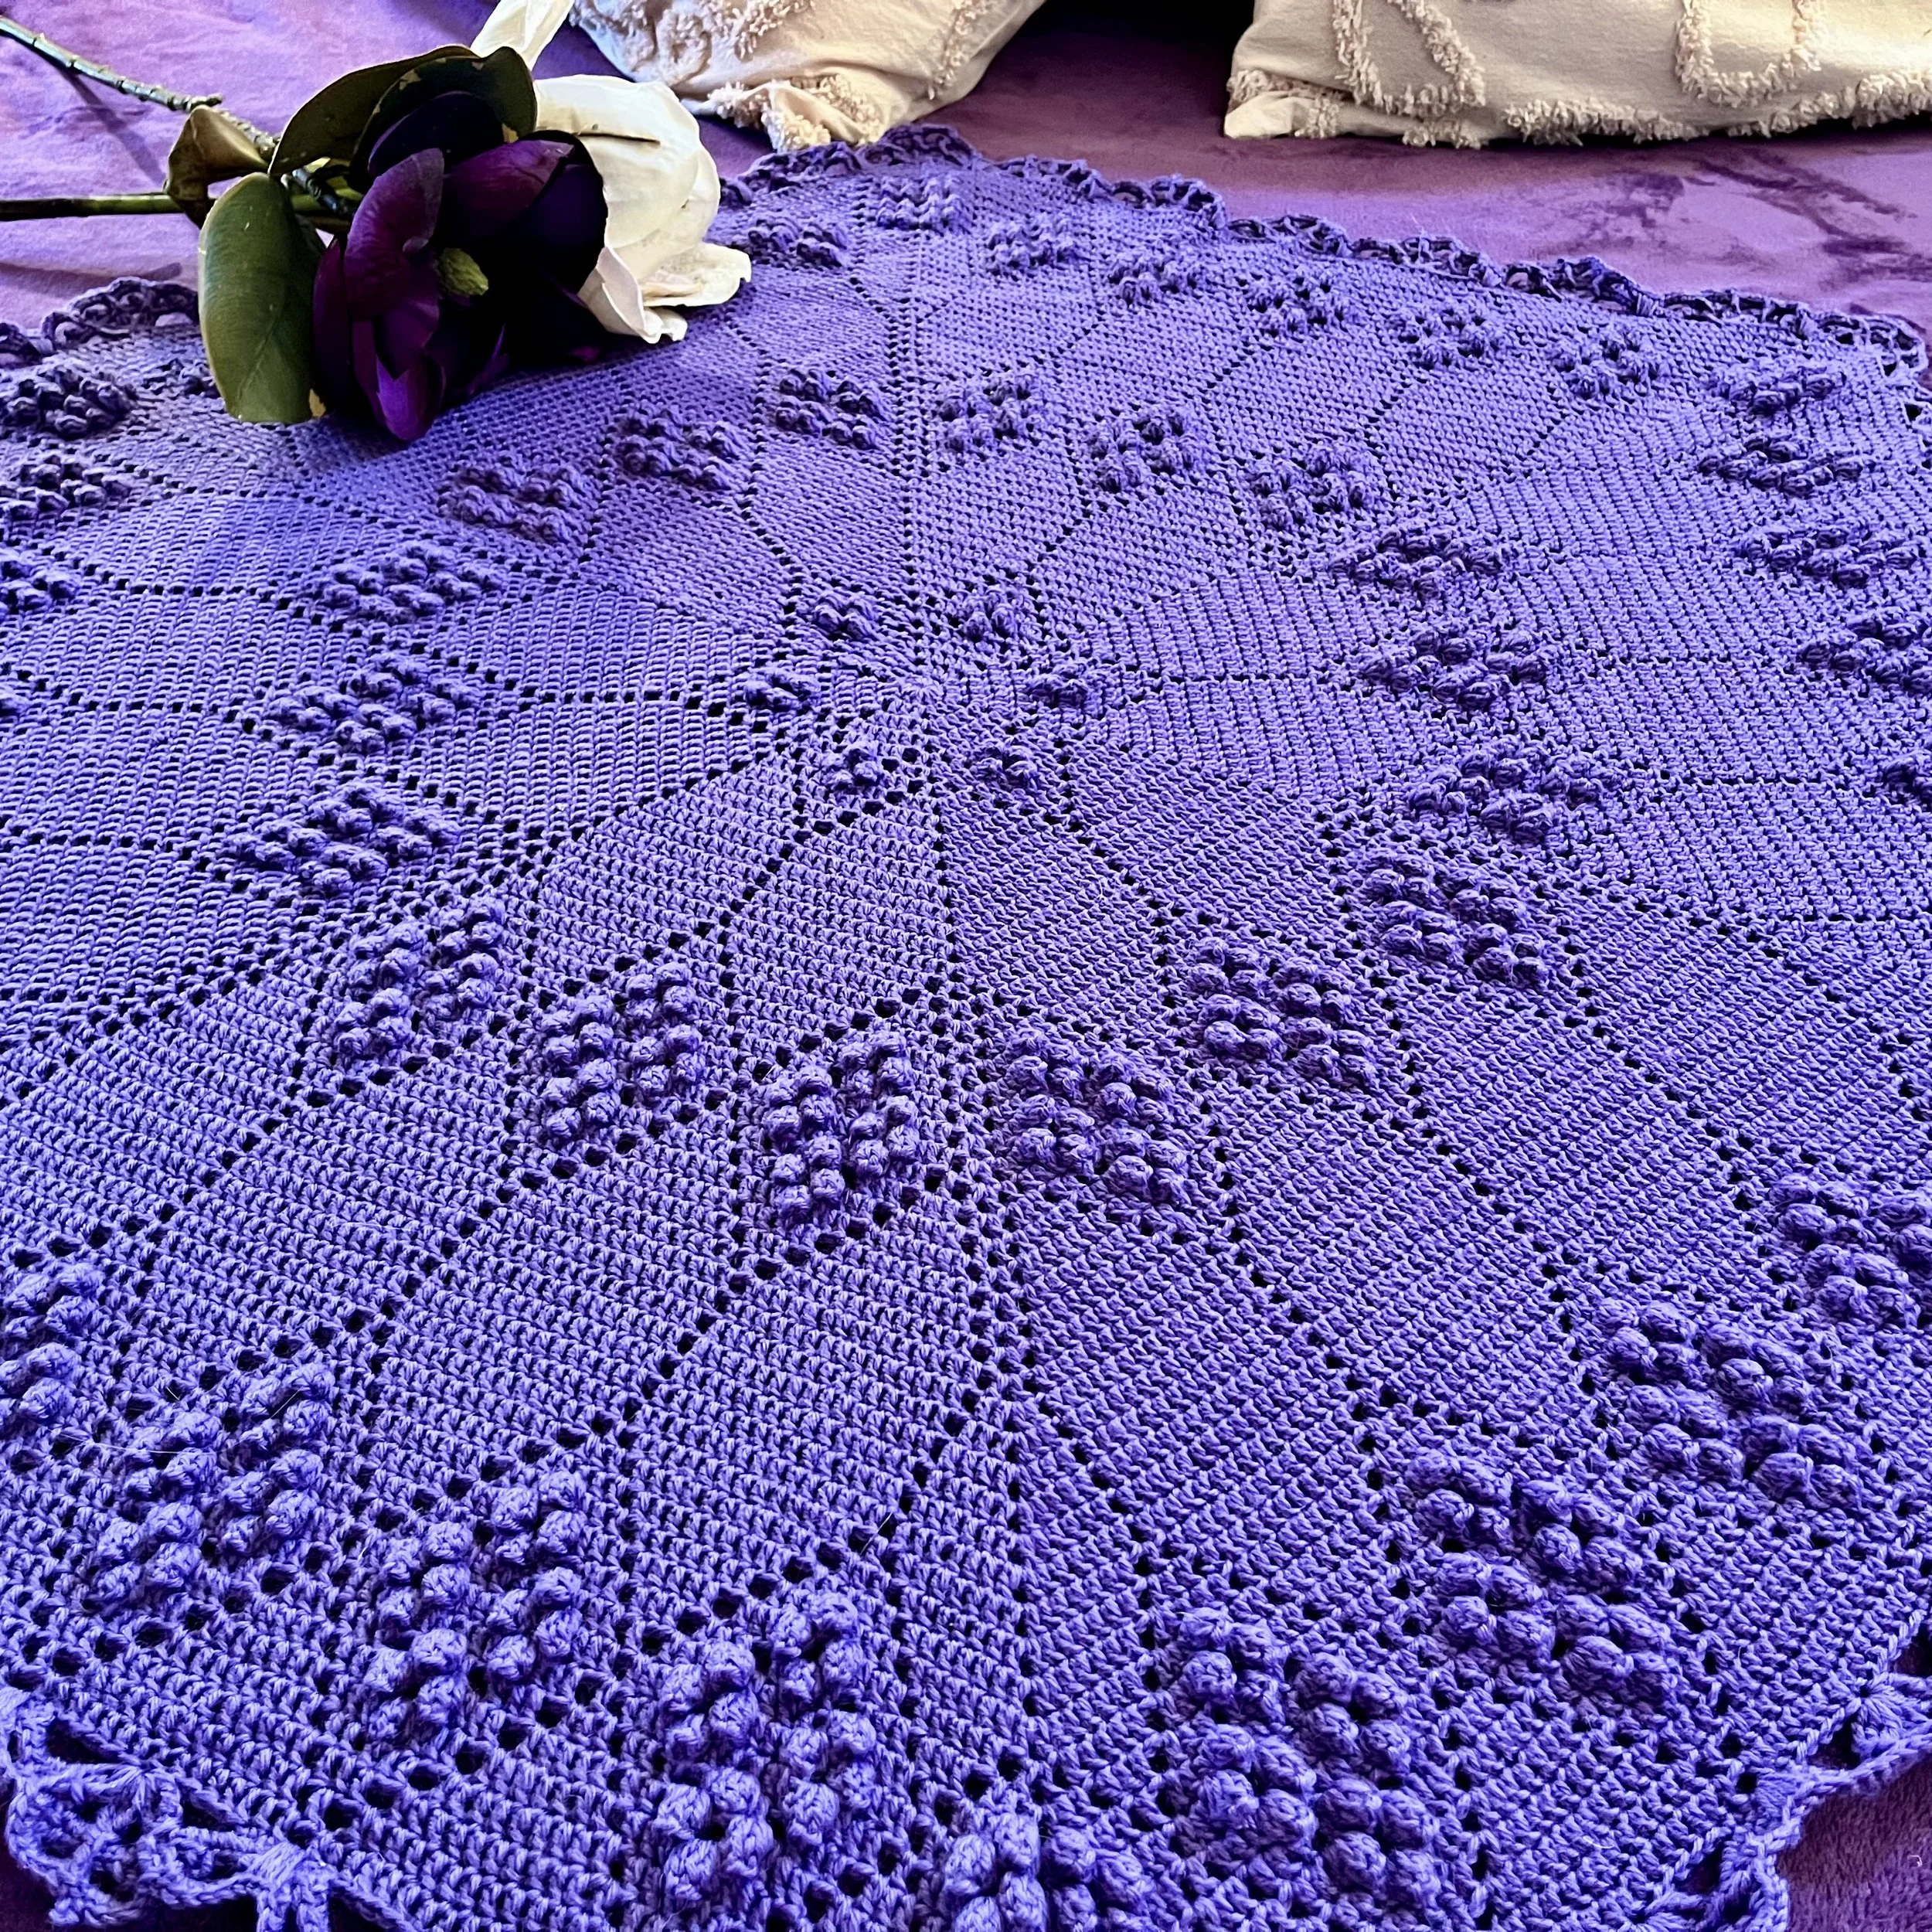
What Is A Colour Block Graph
While all my patterns come in written format with Uk and US terminology, I also utiliise a colour block graph to help clarify stitches. You will see that I mention this with many of my patterns in that they come with an added colour block graph. Here I will explain just a bit about this.
This is my own form of graphing and works a lot like a filet crochet graph. I started using this method a few years back and found it works great. Trying to draw up whole patterns for things like blankets, with a symbol graph can be difficult, messy and take a massive amount of time. Many of the programs you can use for this do offer basic symbols but more advanced symbols, or anything out of the ordinary becomes a problem. These block graphs can be worked in the round and the examples shown are blanket that do not turn. I have done a number of patterns using colour blocks that are worked in rows and turn, but the examples here do not. These are worked from left to right.
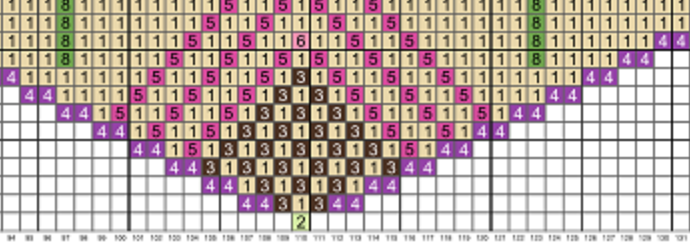
I use 2 forms of colour block graphs:
Colour Block Graph 1:
With blankets I graph one side. With the blanket graph shown below this blanket was square. Once the corner No4- Purple is worked you repeat the graph again, across the next side. You continue in this manner until you get back to your starting point.
In this block graph, each colour denotes just one stitch. Earlier block graphs I just used a colour to distinguish the stitches but I have no advanced to colour and no on each block.
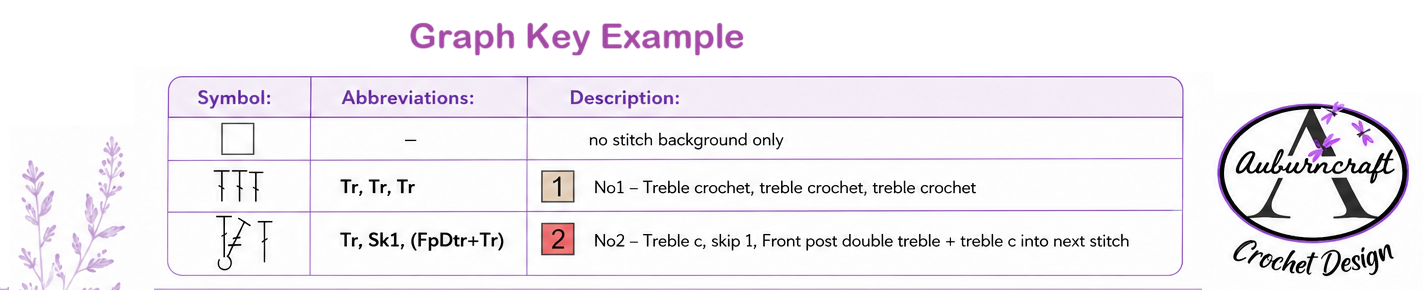
Each graph comes with a key stating what colour and number denotes each stitch. Below is an example of one of my latest graphs.
Explanation of a few of these colours and their meaning:
No4- Purple- Each block denotes 1 double crochet (US) in the corner.
No3- Black- Each blok denotes 1 chain.
No1- Beige- Each block denotes 1 double crochet (US) in the main body of the work.
Colour Block Graph 2:
Each block in this style of colour block graph denotes 3 stitches. The last stitch in the first block, is the first stitch in the next block. These are a little bit trickier to use but sometimes to gain a beautiful picture blanket, this style of colour block graph works best. My Batten Down The Hatches Blanket uses this style of block graph.
This is much like a filet crochet graph but with basic filet crochet, the stitches don’t vary greatly. I use anything and everything in my blankets and often stitches I have made up myself.
Again the earlier of my colour block graphs of this style only came with colours. The last pattern that I put out to test had so many stitch variations that I was running out of colours and so decided to start using numbers as well, in an effort to make the colours easier to distinquish.
You will note by the example graph below. Describing the 3rd round of the graph below: From left to right. No3- Blue- this block begins in the second half of the square blanket corner. and is made up of 2 double crochet (US) in the corner and 1 double crochet (US) after the corner. The next block is No1- beige- This is comprised of 3 double crochet (US). After this is N029-Salmon- This is made of of 1 double crochet (US), 1 Front post treble (US), and 1 double crochet (US). then we have No1- Beige- 3 double crochet (US). The last block in this side of the blanket is No3- Blue- 1 double crochet, 2 double crochet into the corner.
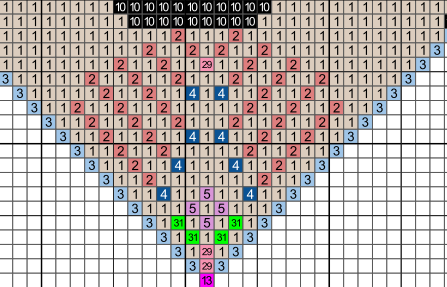
Again this of course has a graph key to state what blocks denote what stitches (remember this style of colour block graph denotes 3 stitches per colour. . Below shows the cropped picture of the graph key shows just a couple of the stitches and the meaning. Of course there are many more stitches involved in this project but this is just an example.
Hopefully you will find my explanation of my colour block graphs helpful.
How To Create a Straight Edge To Work A Border
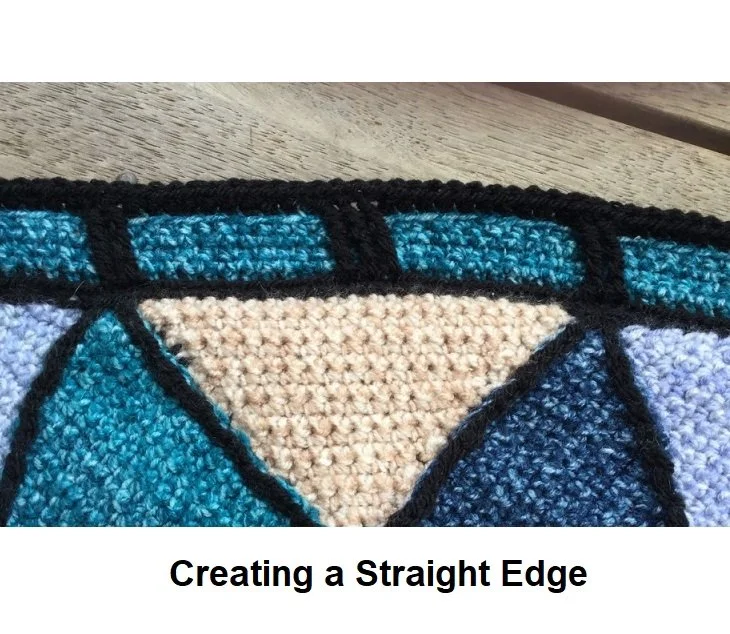
Sometimes, no matter how hard you try, your blanket edges end up looking like you’ve had one too many wines before picking up a crochet hook. No matter what you do, things just go a little wonky.
There are many reasons this can happen. Perhaps you’ve joined motifs and the edges sit slightly uneven, or perhaps there really was a glass of wine involved.

If you’re just starting out on your crochet journey, your edges might even resemble a winding road in Tasmania (if you’ve driven there, you’ll know exactly what I mean).
In my own Leadlight Afghan (pictured above), after joining the motifs, I found I wanted the edge just that little bit straighter than it naturally wanted to sit.
In other designs, I also find that working a single crochet (US) / double crochet (UK) directly into uneven edges can look a little untidy.
Whatever the reason, this simple technique can help create a much straighter edge, giving you a clean foundation for your border.
Surface Slip Stitch Method
The first step is to learn how to work a Surface Slip Stitch.
How to work a Surface Slip Stitch
(Work stitches close to the edge — the guide line shows placement.)
Attach yarn at the working edge with a slip stitch.
Insert hook through the front of the work.
Pull up a loop from the back to the front, then through the loop on the hook.
Insert hook into the next stitch and repeat around the entire edge.

For corners, either pause and reattach on the next side, or continue working slip stitches around the turn.
Once complete, you can begin your border on a much straighter edge.
Work your first round of border stitches into the top loop only of the surface slip stitches (the loop closest to the outer edge). It doesn’t matter if you also catch the main body of the work, but this is optional (I personally didn’t).
For my Leadlight Afghan, I worked a row of single crochet (US) / double crochet (UK) as the foundation round. This creates a clean, even edge and avoids the mess of working directly into uneven stitches.
The result is a much straighter edge and a neater base for any additional border work.
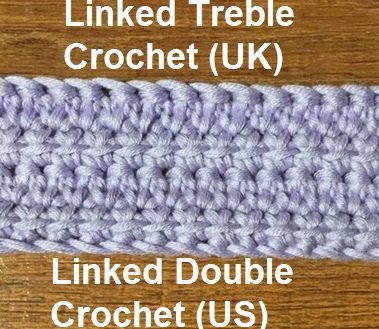
How to Linked Double Crochet
Crochet Terminology: US
It all starts with an idea. You want to make something, but you have a few things you want this item to have. You start a checklist:
No Gaps.
You don't want it to take forever.
You would prefer fewer stitches.
You find single crochet (US) rather annoying and when it comes in abundance it is enough to make you just want to sit down and cry. You don't feel a great deal different about Half Double Crochet (US).
Never fear as there is an answer and it is Double Crochet (US). Not ordinary Double Crochet but Double Crochet with super powers. Linked Double Crochet ticks all the boxes and is actually a fun stitch to do. It isn't hard and can be rather addictive.
How do you work this amazing stitch you ask?
Just keep scrolling and all will be revealed.
The concept is really quite simple. Double Crochet (US) has those tiny little bars that sit across the centre of each stitch. To get rid of that gapped look between the stitches you just join those little bars.
But let's start at the beginning of the row.
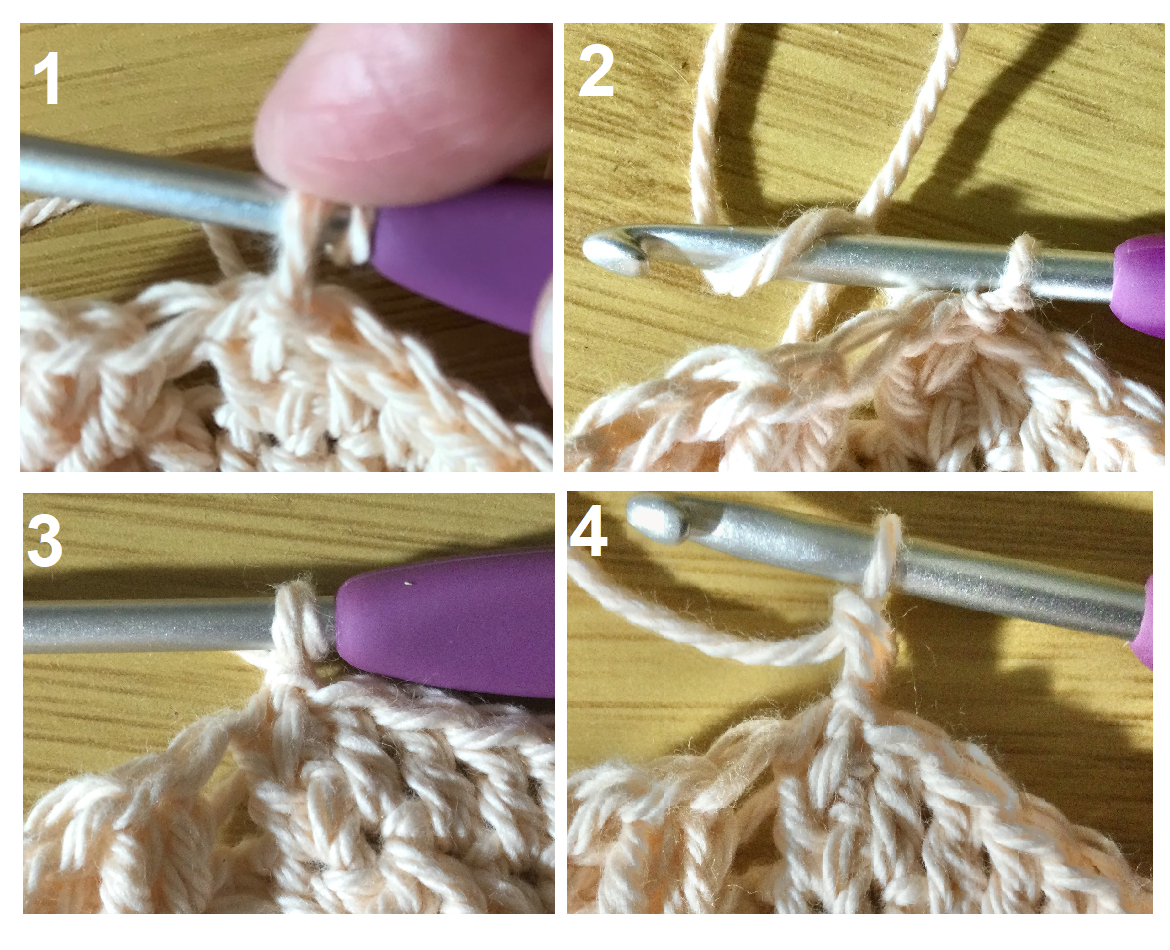
How to start a row. Steps outlined below:

How to create the first linked double crochet
Step 1: Chain 3. This counts as your first stitch.
Step 2: Insert your hook into the 2nd chain from the hook and draw up a loop. This has created the connection to the first stitch.
Step 3: Insert your hook into the next stitch , yarn over and draw up a loop.
Step 4: Yarn over and pull through 2 loops on your hook.
Step 5: Yarn over and pull through 2 loops on your hook.
Now for the rest!
Continue creating Linked Double Crochet (US Terminology). Steps Below:

The end result
Step 1: The orange line indicates the bar that sits in the middle of each Double Crochet.
Step 2: Insert your hook down through this bar, yarn over and draw up a loop.
Step 3: Insert your hook into the next stitch,yarn over and draw up a loop.
Step 4: Yarn over and pull through 2 loops.
Step 5: Yarn over and pull through the remaining 2 loops on your hook.
And done! You have created a Linked Double Crochet (US)!
Linked Double Crochet is a very useful stitch. Any time you want a solid look but dread the thought of working in Single Crochet (US), think of this stitch instead. It is so versatile and can be great for anything from basic wash clothes to clothing. It can be worked flat or in the round and the little line of bars that form in rows give it a unique look.
The end result
How to Create a Standing Double Crochet
Note: Standing double crochet (US terminology). Standing treble crochet (UK terminology). I will be describing this using the US terminology.
This stitch seems to have a few names, depending upon who you ask. I have heard it called a starting double crochet stitch. A standng double crochet and a chainless double crochet. No doubt someone will enlighten me on the differences at some point, but the reason for this post is to describe how I do this. I choose to refer to it as a standing double crochet. There are numerous ways to create a standing double crochet stitch. The method described here is my preference.
Chains at the beginning of rows/rounds can produce a messy, uneven appearance. This helps to prevent this.
Step 1: Pull up the loop on your hook to the height of a normal double crochet.
Step 2: Twist the hook in a counterclockwise direction,down towards you, wrapping the lengthened loop around your hook. You now have the original loop around your hook as well as an extra double strand Yarn over and pull through the extra double loop on the hook.
Step 3: 2 loops remaining on the hook.
Step 4: Yarn over and pull through the remaining 2 loops on the hook.
Back Loop Herringbone Half Double Crochet
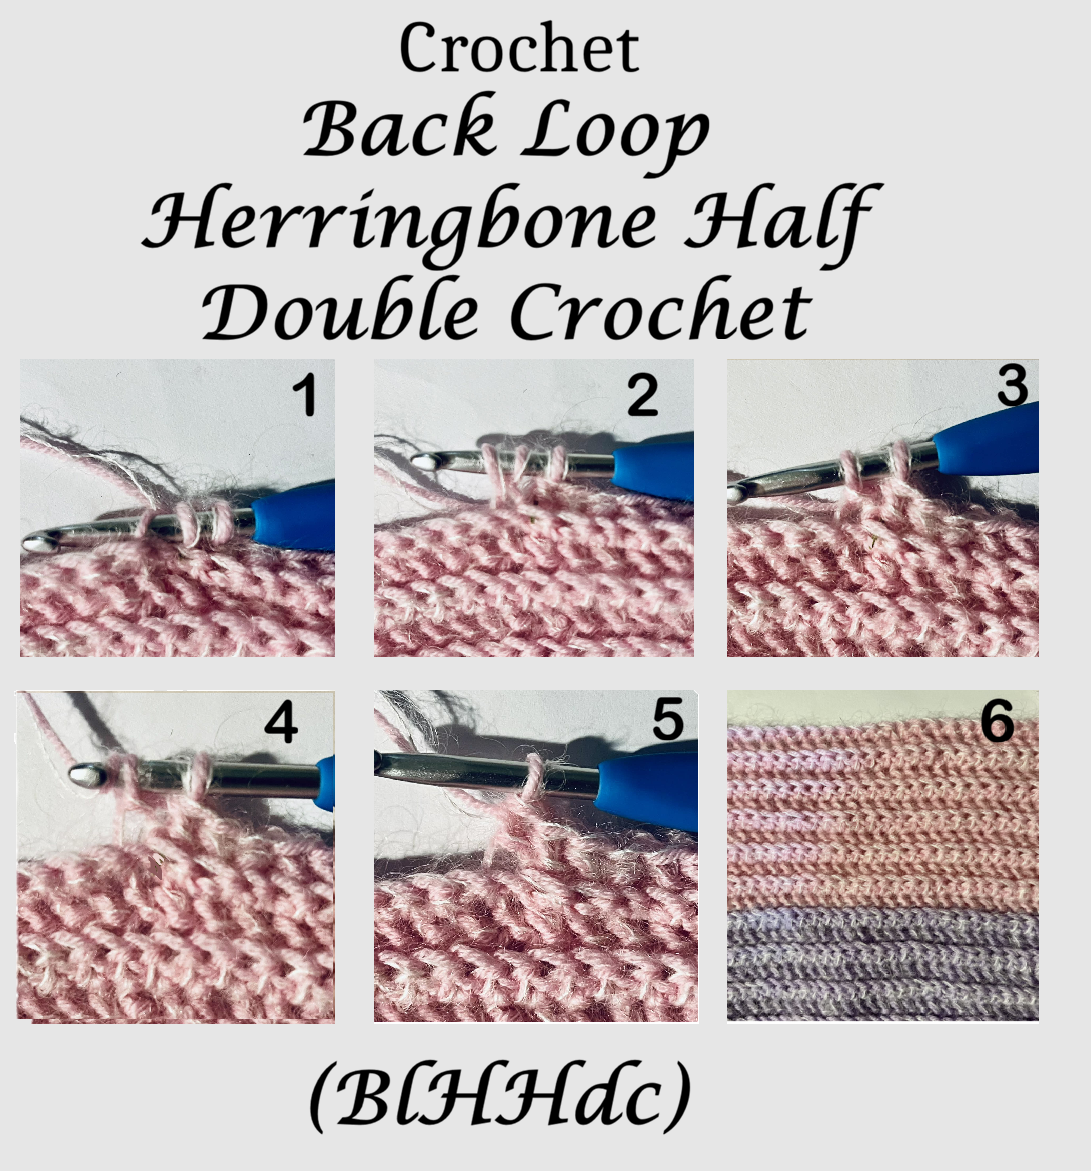
This tutorial uses US terminology and refers to the stitch as the Back Loop Herringbone Half Double Crochet (BLHHdc).
In UK terminology, this stitch is called the Back Loop Herringbone Half Treble Crochet (BLHHtr).
About the Stitch
The basic Herringbone Half Double Crochet is a beautifully textured stitch that creates a subtle angled effect. It produces a denser, less gappy fabric compared to a traditional half double crochet, giving your work a lovely, polished finish.
It is simple to work, and once you’ve practised it a few times, it develops a smooth, natural rhythm.
When worked into the back loop only, it adds an entirely new dimension. The stitch forms a defined ribbed texture with wonderful depth and structure — a look I love for pieces that need both stretch and visual interest. I have several new designs with this stitch coming very soon!. Subscribe to the webpage for notifications on launch days!
Back Loop Herringbone Half Double Crochet (BLHHdc)
This stitch can be worked starting from a base row of either single crochet or half double crochet. Simply create your starting chain, work the chosen stitches across, and begin the BLHHdc on the next row. Alternatively, you can start with a foundation row of single crochet or half double crochet and work the BLHHdc into the back loop only of the following row. I personally prefer a foundation single crochet row, as it gives a neat edge with excellent stretch.
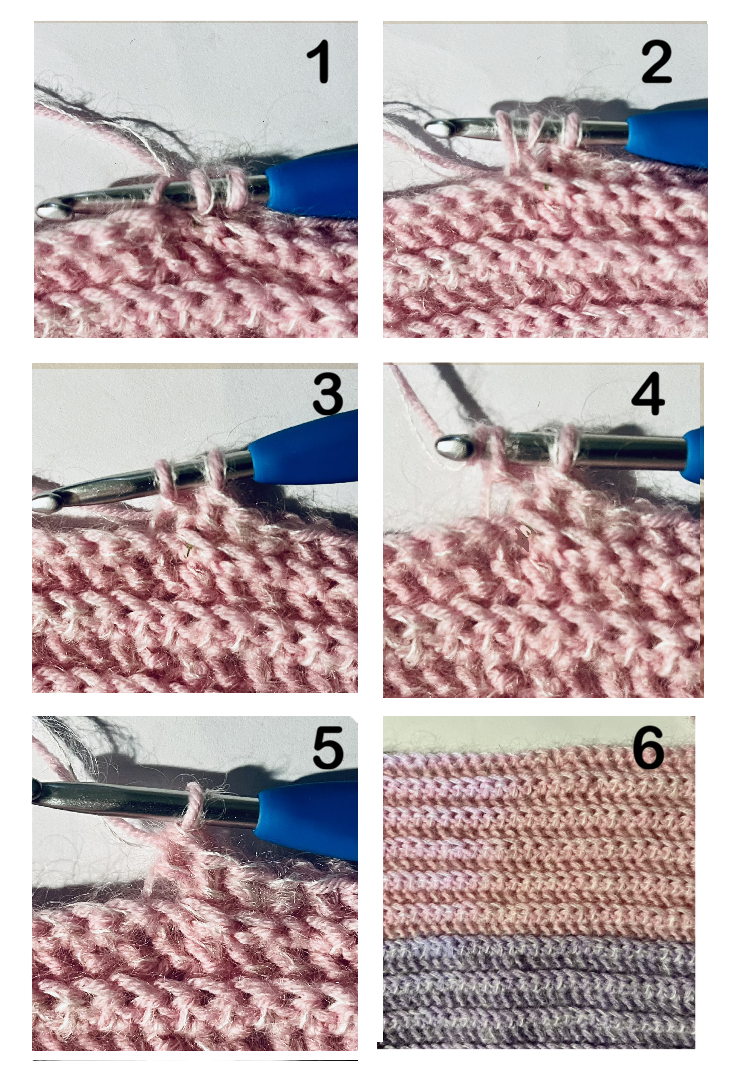
Step 1: Yarn over, insert hook into the back loop only of the next stitch
Step 2: Pull up a loop. 3 loops on the hook.
Step 3: Draw the first loop through the second loop. 2 loops remaining on the hook.
Step 4: Yarn over and pull through the remaining 2 loops on the hook.
One BLHHdc complete.
Repeat across as instructed in your pattern.
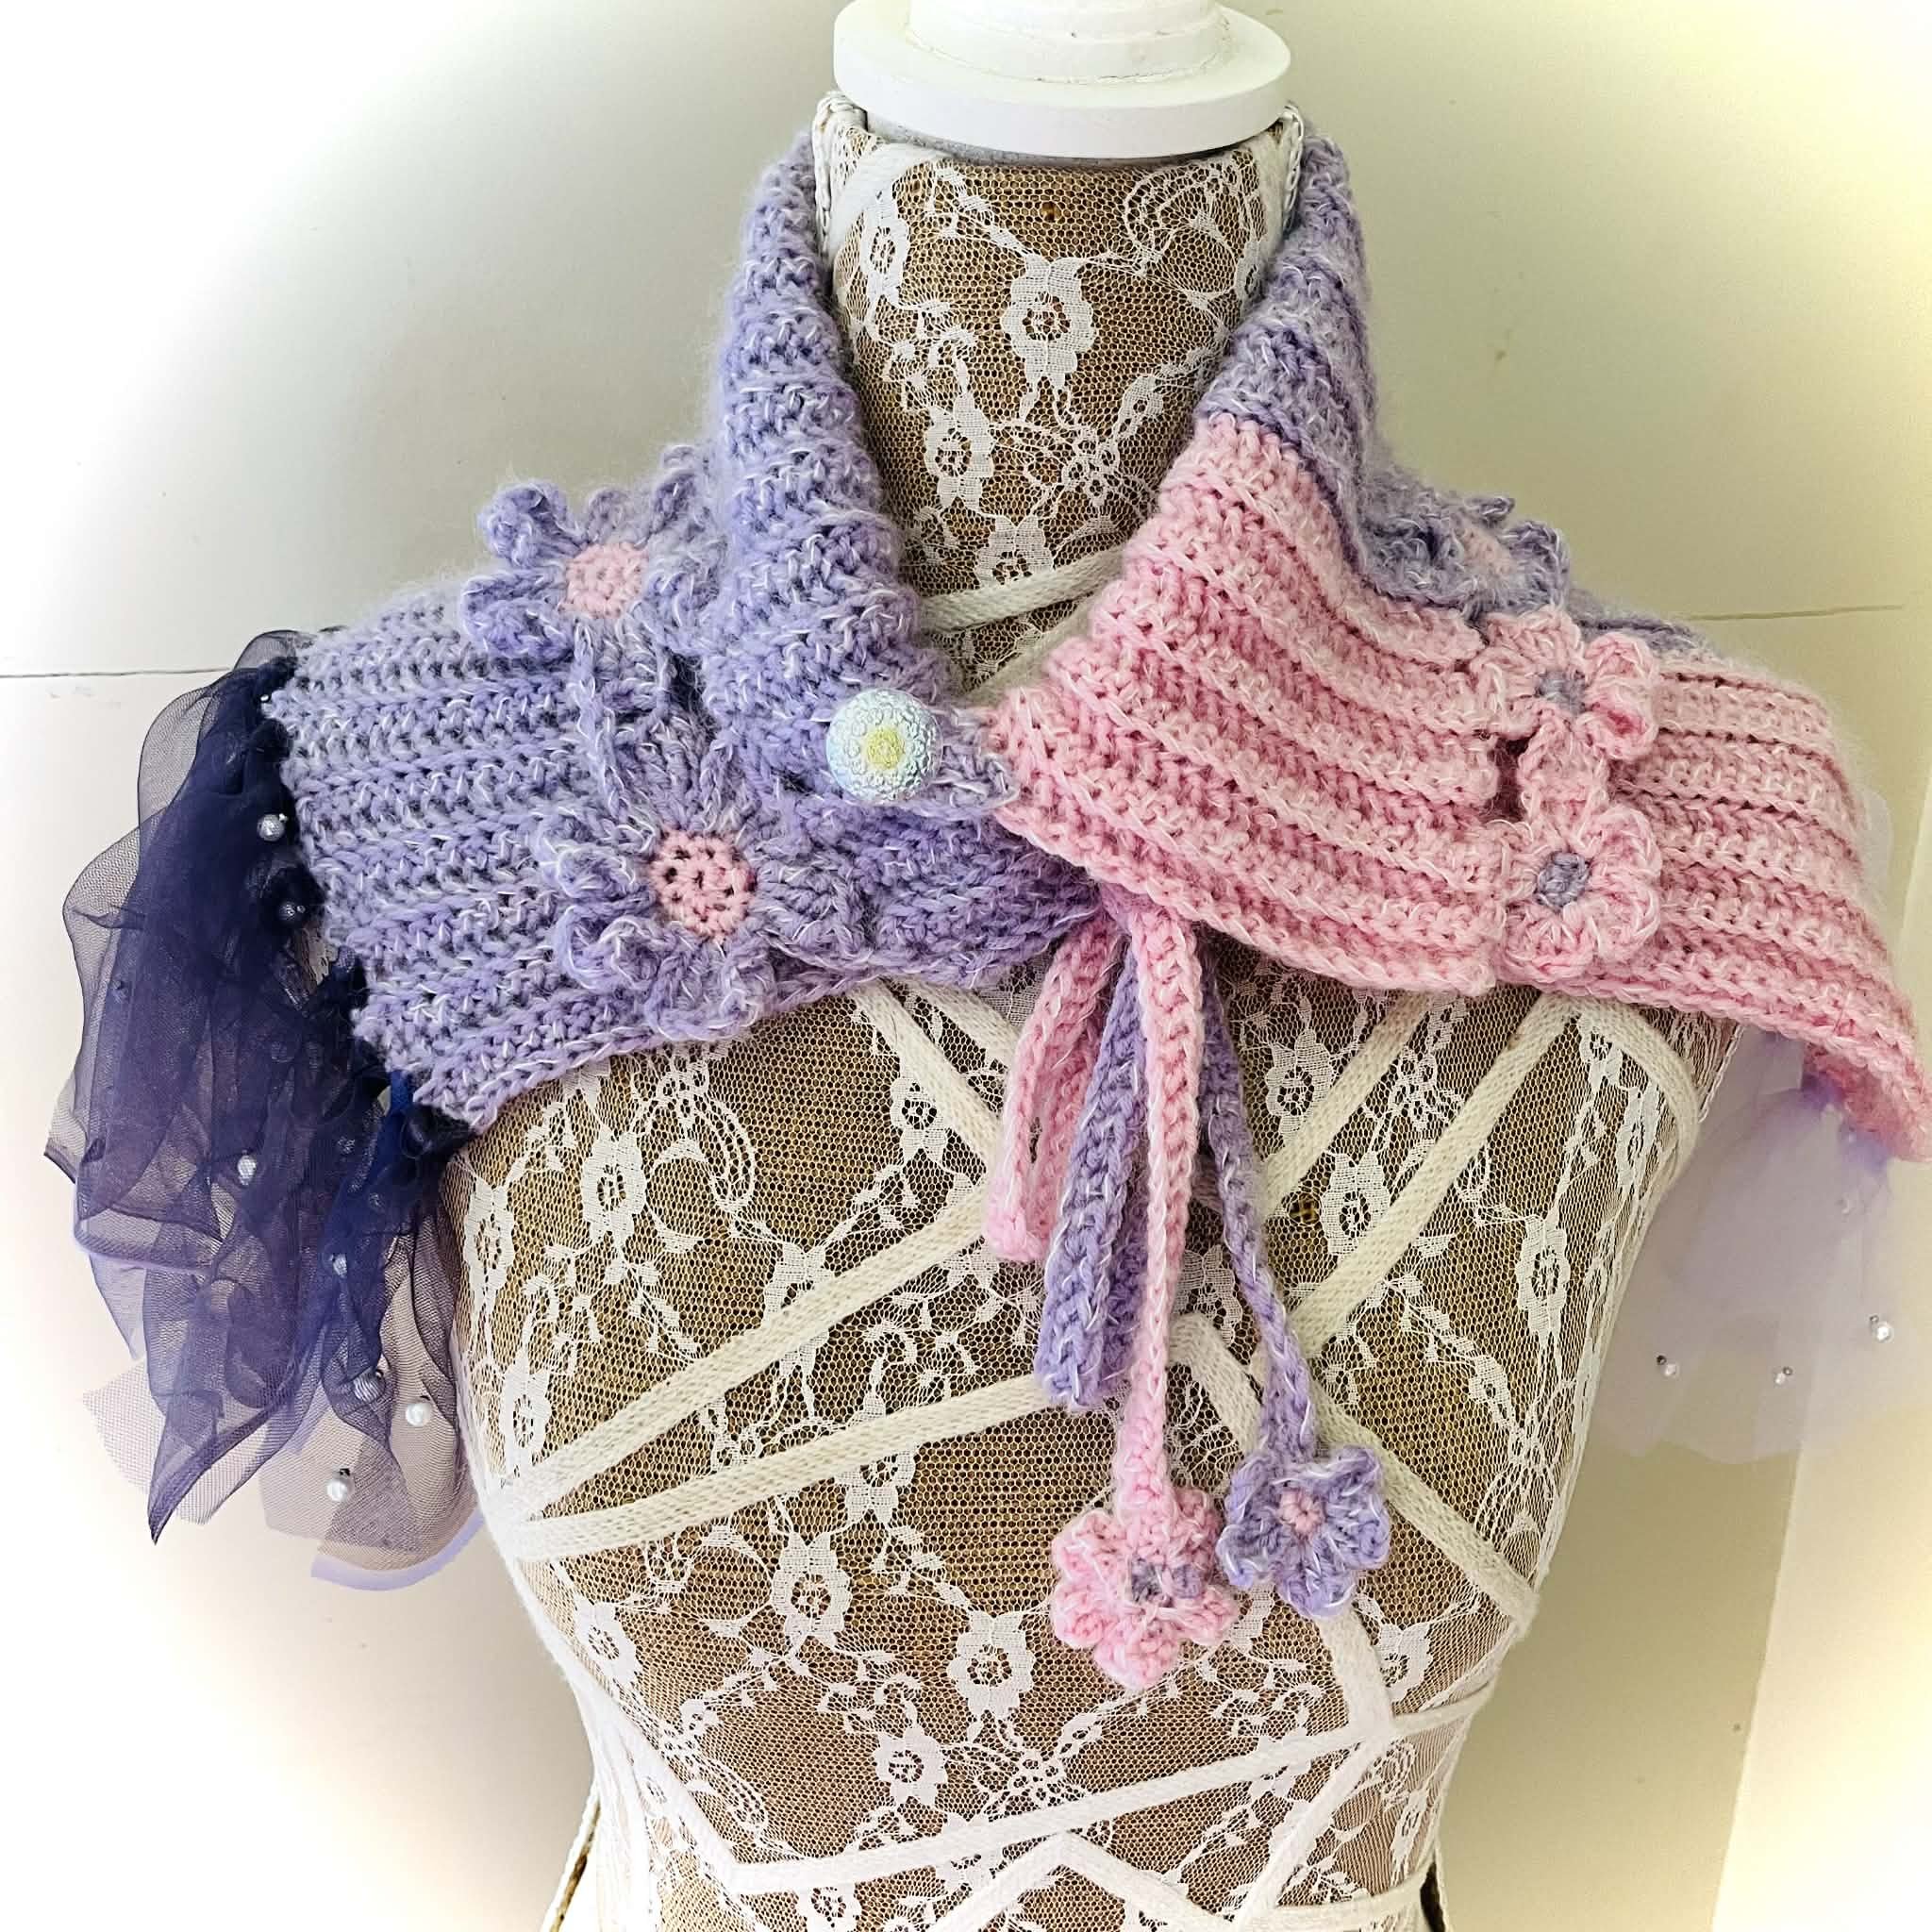
Below is Dancing With The Fae Neck Warmer completed using this stitch.
Adding Beads To Crochet The Easy Way
My step-grandfather was one of those tough old-school blokes who worked on the railways for part of his life. He had a saying for everything… and honestly, some of them probably wouldn’t go down too well if repeated today.
But there is one saying of his that always comes to mind when I think about beading:
“There’s more than one way to do it.”
(Not quite as colourful as the original version he used… but far more suitable for polite company.)
And he was absolutely right. There are many different ways to approach the same task, and beaded crochet is a perfect example of that.
Have you ever looked at beaded crochet with awe and assumed it must be complicated?
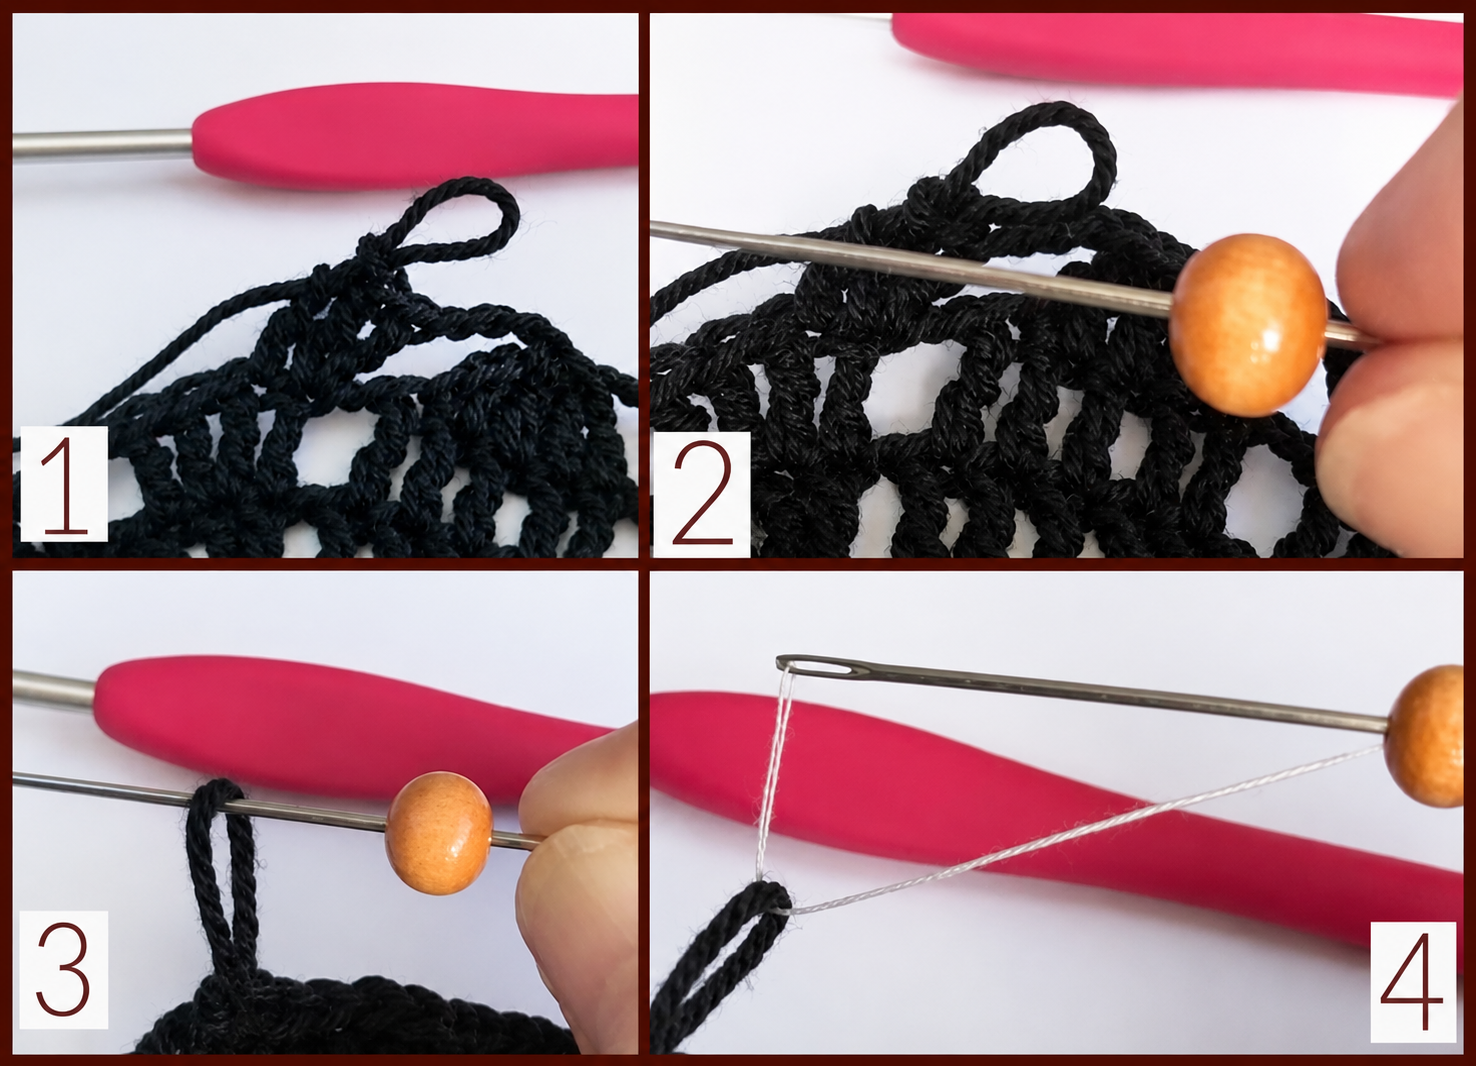
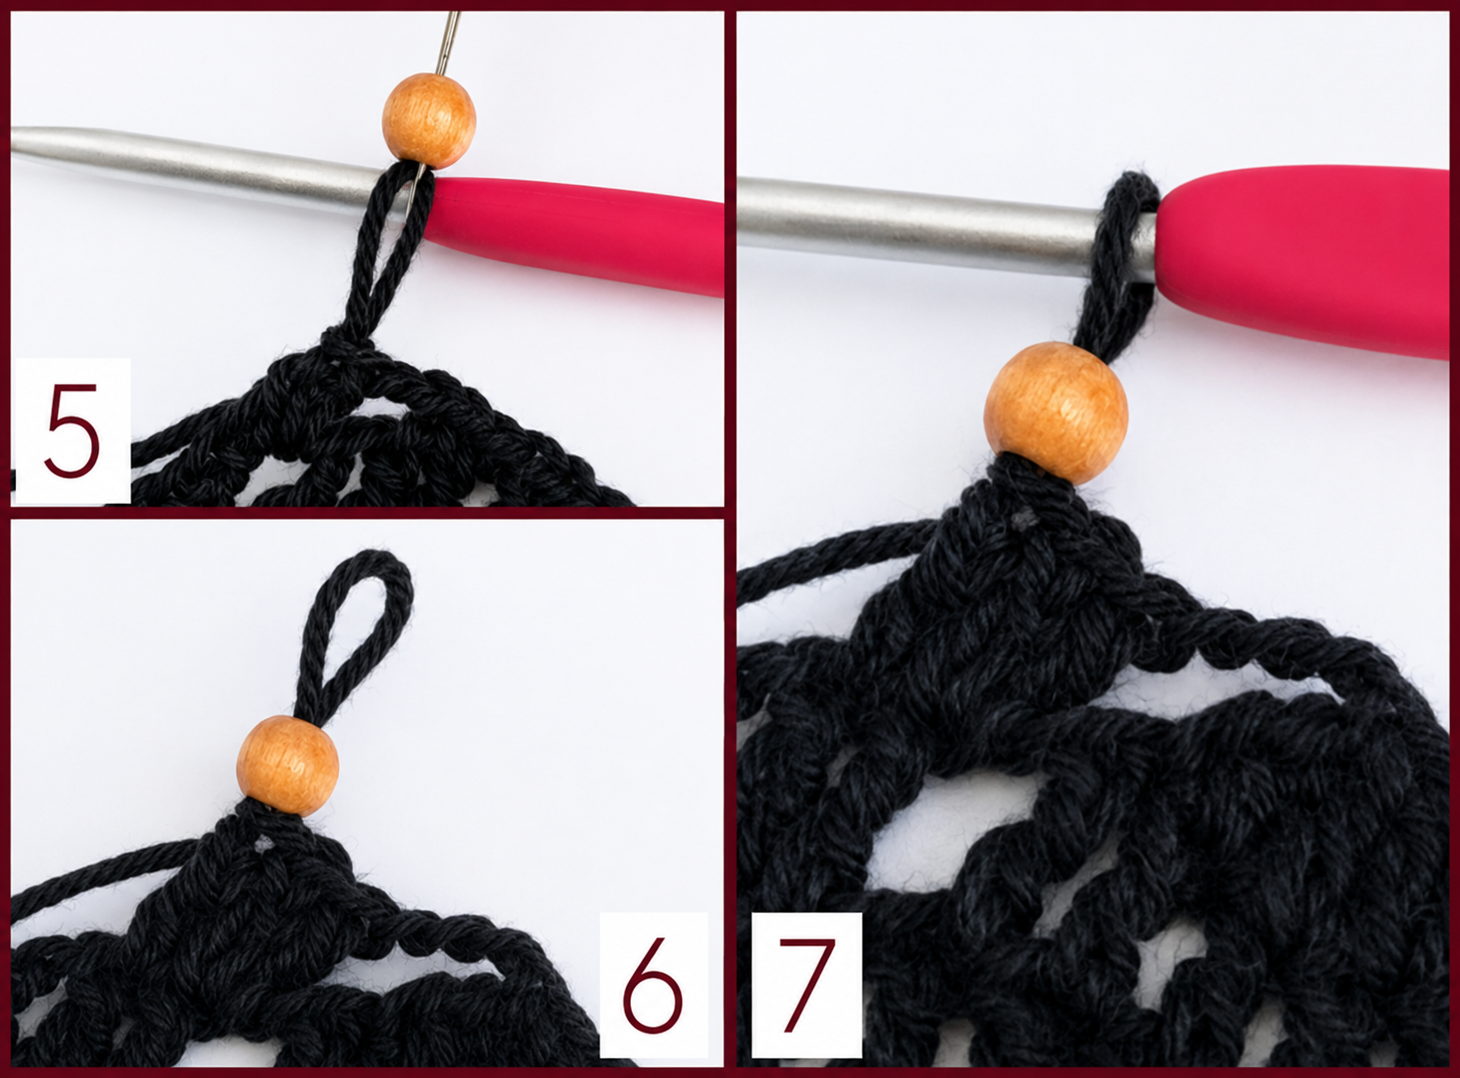
Well, I’m here to tell you… it really isn’t.
Beading is easy!
There are several methods you can use, but my personal favourite is using a sewing needle and thread. And no—I’m not sewing the beads on. I’m simply using the needle and thread to position the bead exactly where I want it.
Let’s Get Started! (Pictures Below)
Remove your hook from the working loop.
Thread a sewing needle and slide the bead onto the thread.
Insert the needle (with the bead on it) through the working loop.
Pull the thread through until you have enough length to pass the needle back through the bead.
The bead will now be sitting above the working loop.
Gently slide the bead onto the loop while pulling the thread snug.
Remove the needle and thread, reinsert your hook, and continue crocheting as normal.
I find this method quick, simple, and easy to control—especially when you want beads placed neatly and consistently.
And if you enjoyed this little tip… feel free to buy me a cup of tea (link on the page).
Cushion Wadding Tutorial
A clean, practical guide for improving the finish of handmade crochet cushions.
Cushion Inserts vs Stuffin
Using a cushion insert is usually the easiest and most washable option when creating a cushion. However, inserts the right size aren’t always available—especially when your cushion is an unusual shape.
Loose stuffing can work, but it often pokes through crochet stitches, creating a lumpy or untidy finish.
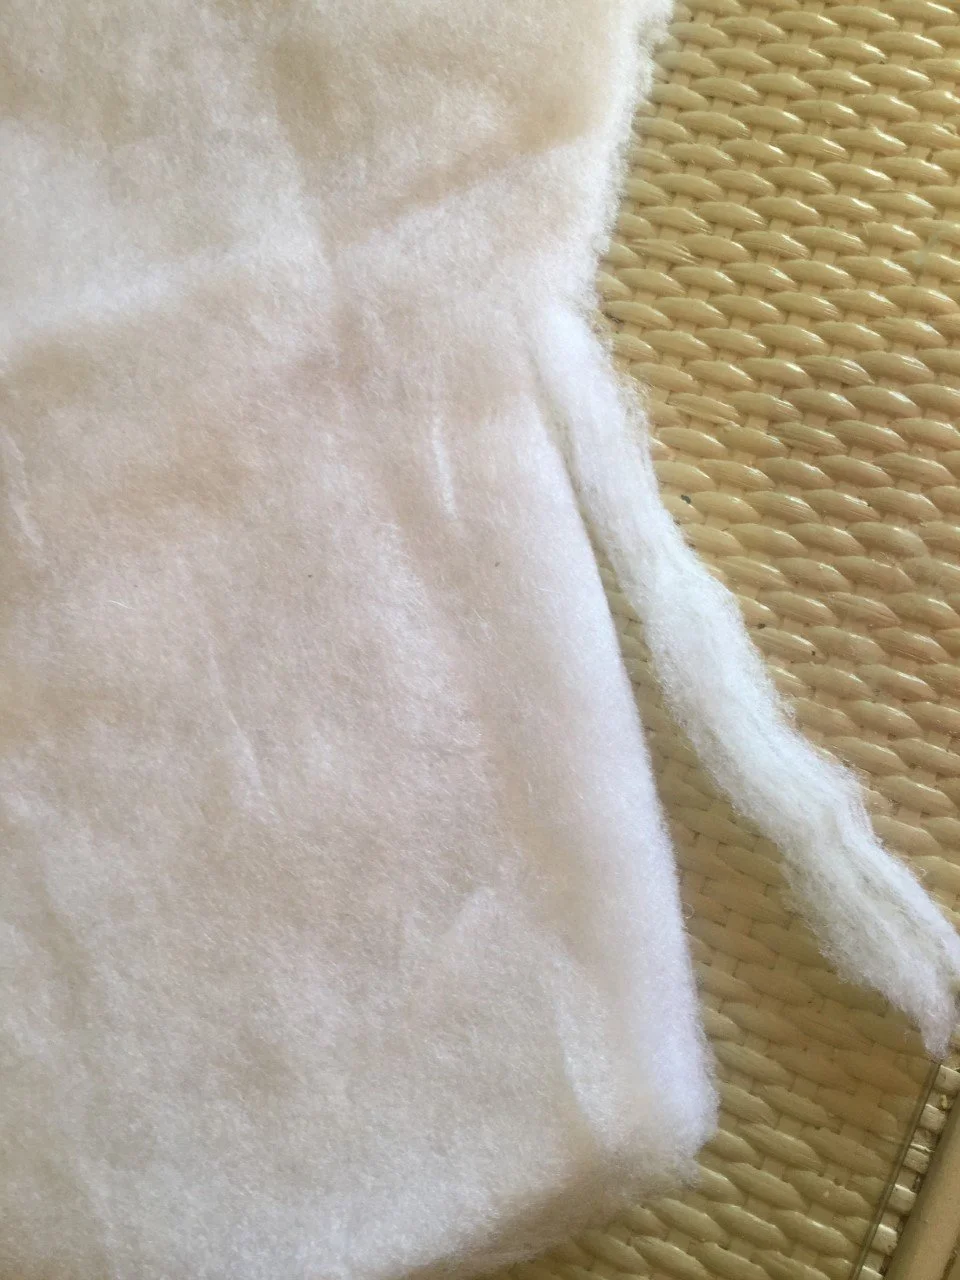
Instead of just the usual white fluffy stuffing, purchase some wadding. This is readily available from any fabric store and many craft suppliers. You can usually buy it by the metre/yard.
The Wadding Solution
Cushion wadding provides structure, reduces the amount of stuffing needed, and prevents fibres from escaping through the crochet.
Wadding is available by the metre/yard at most fabric and craft stores.
Materials
Cushion wadding
Loose stuffing
Darning needle and thread
Crochet cushion pieces
Instructions
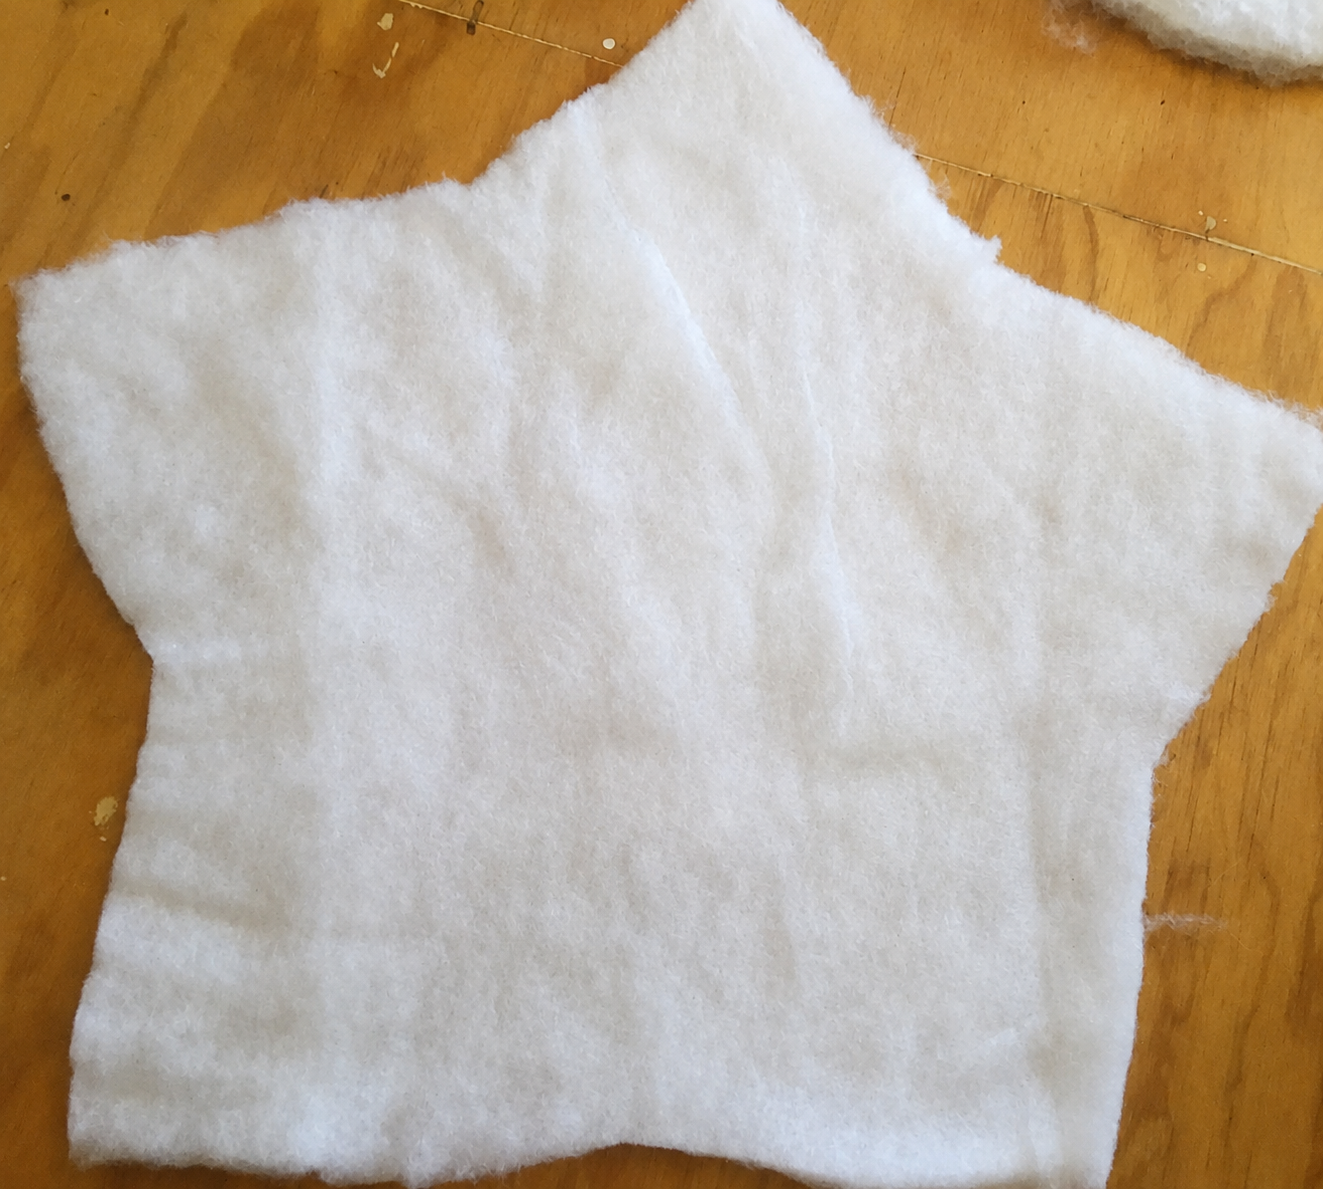
1. Cut the Wadding
Cut the wadding to match the general shape of your cushion, slightly smaller than the finished size.
Cut The Wadding
2. Attach the Wadding
Crochet cushions are usually made in more than one piece. Often a back and a front. Using a darning needle and thread, tack the wadding to the inside of one cushion panel.
3. Assemble the Cushion
Join your cushion pieces together as usual. Insert stuffing as needed. The wadding will hold it in place and prevent fibres from escaping.
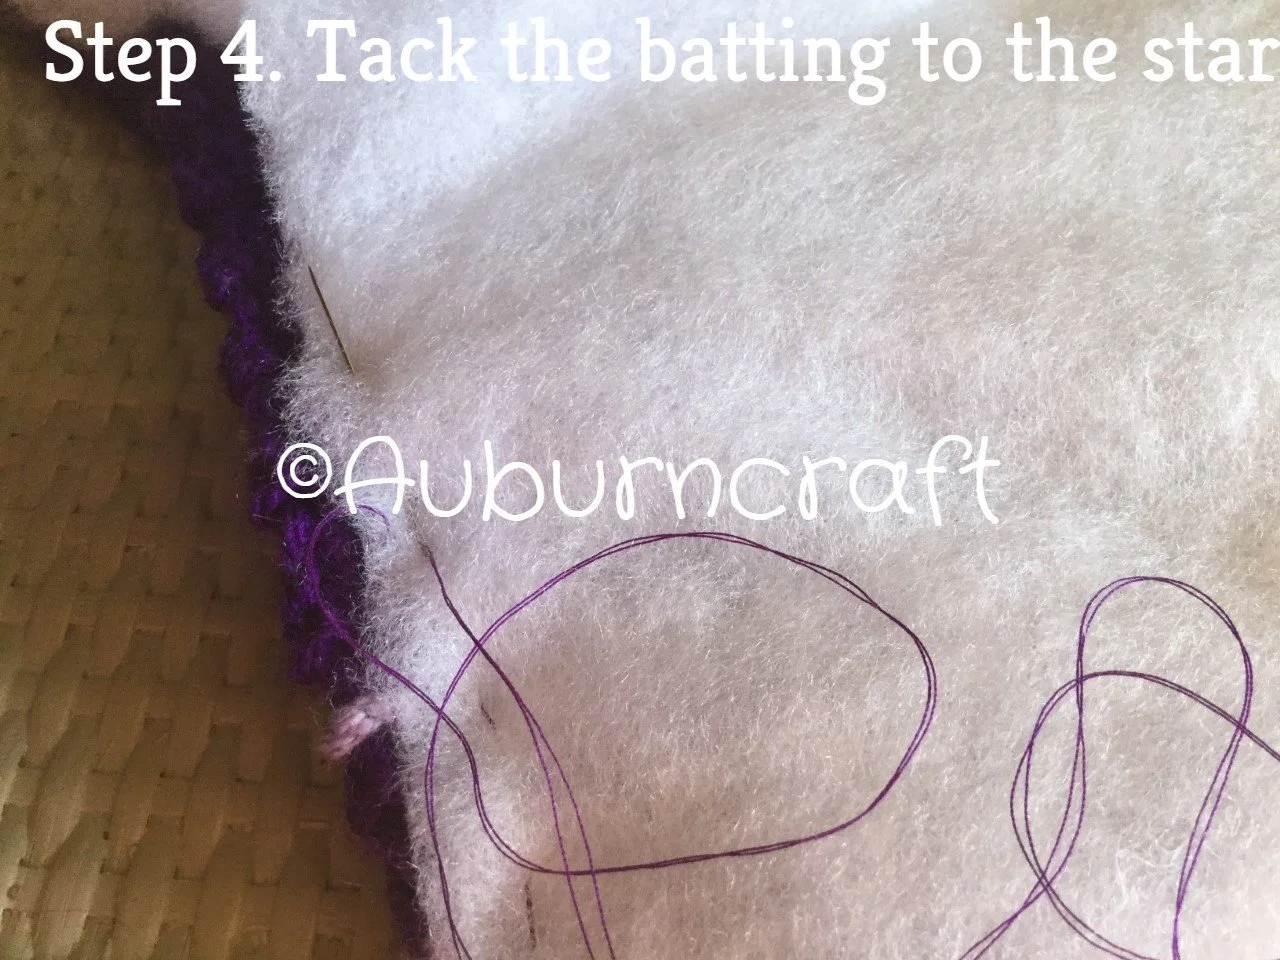
Tack The Wadding

Assemble
Benefits
Prevents stuffing from poking through stitches
Creates a smoother, more professional finish
Reduces the amount of stuffing required
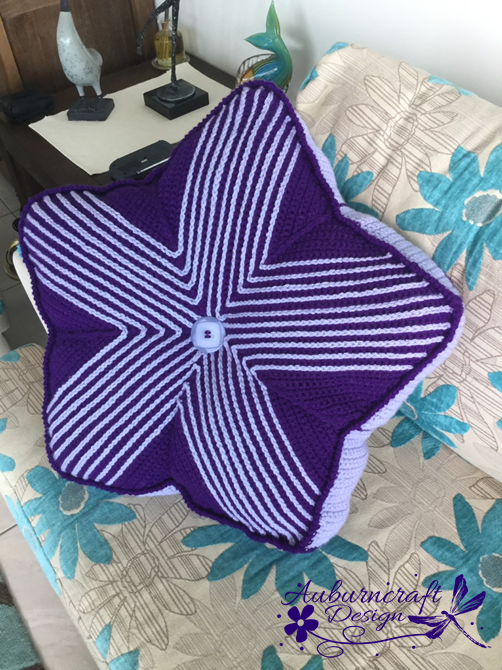
This method was used in the Wish Upon a Star cushion and works beautifully for any crochet cushion project.
Tips for Neat Filet Crochet
TIps for keeping filet crochet neat
I do love a bit of filet crochet. Watching the pattern slowly appear is incredibly satisfying. Filet can look absolutely stunning when worked neatly, but getting those crisp little blocks can be tricky.
So, if your filet work is starting to look more like a maze no one is ever going to escape from, here are a few helpful tips to keep it neat and tidy.
Keep your starting chain consistent. Your foundation chain needs to match the tension you’ll use throughout the project. If you tend to chain tightly, go up a hook size for the chain. Otherwise, the bottom edge of your blanket may bow.
Maintain even tension. Consistent tension is key to creating neat blocks.
Watch your stitch height. Tension and stitch height are not the same thing. If you struggle with stitch height, there are many helpful tutorials online that can assist.
Work into the chain space, not around it. It’s very tempting to crochet around the chain loop instead of into it. But if you want your filet design to really pop, take the time to work solid block stitches into the chain, not around it.
Stack your stitches neatly. Ensure each double crochet sits squarely on top of the double crochet in the row below.
Consider a standing double crochet. Chaining three at the beginning of a row can sometimes look messy. A standing double crochet (US terms), or standing treble crochet (UK terms), can create a much cleaner edge.
Count your stitches regularly. Count each row and section. Discovering you missed a stitch ten rows back is no fun at all.
Choose your yarn wisely. Some colours show filet work better than others, and fibre content can make a big difference. A flatter yarn such as cotton often creates more defined stitches and sharper detail.
Filet Crochet does not have to be just open and closed blocks. Once you get past the basics of Filet Crochet, you can step into slightly more advanced patterns such as adding blocks that span two normal sized blocks, with chains and Single crochet (USA terms). Below pictures showing a close up of this as an example.
An example of more advanced techniques that can be incorporated into Filet Crochet,
My 'Fishing for Luck' Shawl/Wrap is one of my most popular designs, incorporating added blocks to create delicate netting, from which small clover leaves hang.
At this stage in my design career, I’ve created over 180 designs, with a large portion featuring Filet Crochet.
If you haven’t tried Filet Crochet yet, grab your hook and give it a go!
Below are just a few examples. All of these patterns are available on Ravelry and Etsy, and those using Bendigo Mill cotton can also be found on their webpage. If you find these tips helpful, consider buying me a cup of tea—the button is at the bottom of the page.
An example of more advanced techniques that can be incorporated into Filet Crochet,