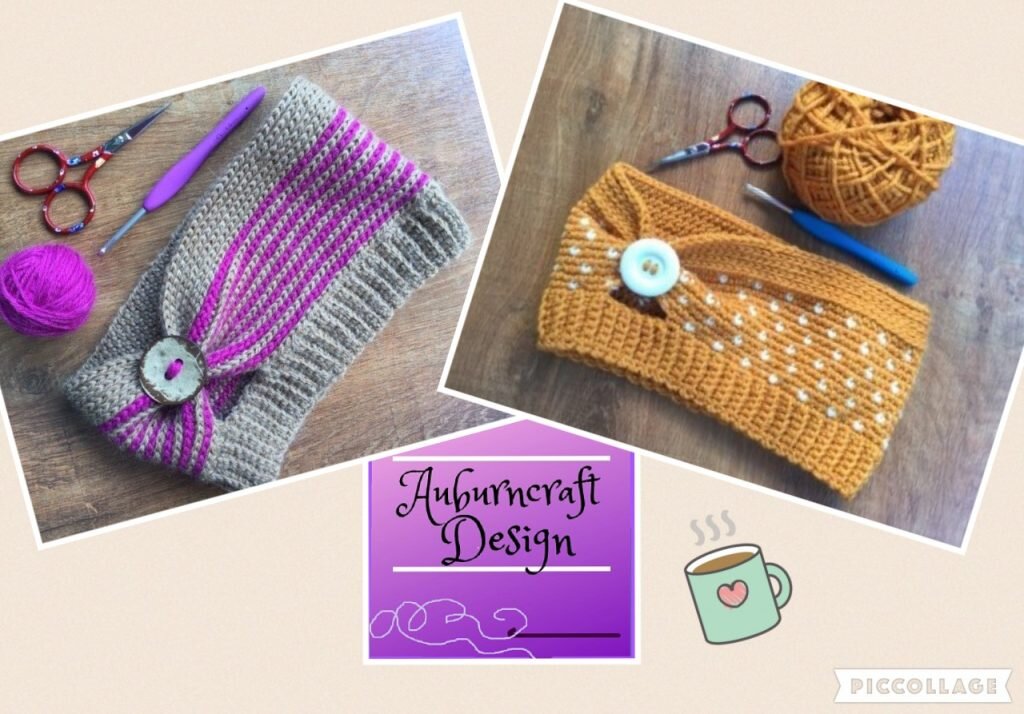
Having survived Christmas and made my way into 2020, I was extremely happy to get two new blanket designs off to my testers. My testers were all really glad to be released from the locked room I keep them in and allowed to get to work on the roughly 28 pages of the pattern put in front of them. A couple of them complained about not being allowed to go home for Christmas, but I did allow them some turkey scraps, so they should all be good to work! If I can force them to all work really hard, not sleep and generally crochet 24 hours a day, I am hoping to have the designs really to publish towards the end of February.
I made a promise to one of my testers a few months back that I would name a design after her and so I named the two blankets, Bouquet for Bethany Blanket and Vintage Bouquet for Bethany Blanket.
The blankets are a mixture of Filet work and Popcorn stitches and I am really looking forward to publishing them. The patterns are similar, with one using a solid yarn and having a variation on the border to make it an individual design. The other a slow colour change yarn for a completely different look. Vintage Bouquet for Bethany is made using Bendigo Woollen Mill 4ply cotton and Bouquet for Bethany I have done in Scheepjes Whirl.
Yarn and colour choice can take a design and change the look of it completely. It then becomes an extension of the person making it with their choices.
Sneak peek Vintage Bouquet for Bethany Blanket coming soon.
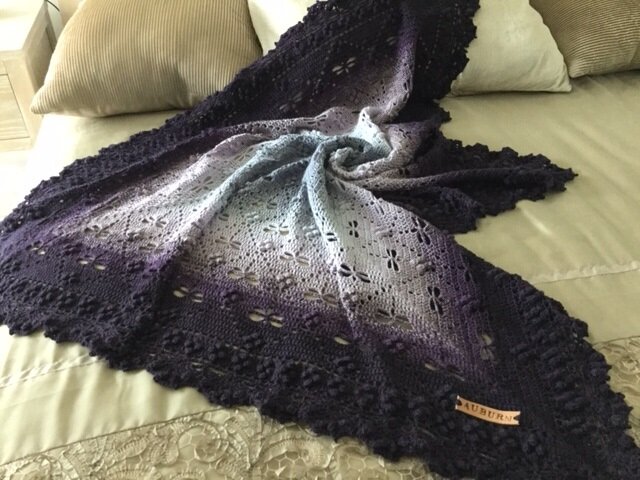
I have been using Scheepjes Whirl yarn a bit over the last few months and had some success with my Flight of the Dragonflies Blanket and my Fishing for Luck Shawl. Both have been accepted well and are proving to be my top sellers.
Left: Fishing for Luck Shawl. Right: Dragonflies in Flight Blanket.
I have quite a number of partially completed original designs on the hook at present and should have some great things coming in 2020.
Thanks to everyone who supported my designs and patterns in the past 12 months. I appreciate it!
Now to the boring stuff! You are welcome to sell items made from my patterns, but please credit me as the designer and add a link to purchase my pattern in your sale.
Many hours of work goes into the designing and producing of my patterns.
If you purchase/download my patterns, they are for personal use only. Please note my patterns and my images are copyright protected, please do not use my images to sell your items. No pattern or photograph may be reproduced or distributed — mechanically, electronically, or by any other means, including photocopying, without written permission of Auburncraft Design. Please do not copy, rewrite, or redistribute this pattern as your own or otherwise. Just because you can copy does not mean you should. Please do not resell my patterns.
The fires here in Australia are of a magnitude that can only be described as a National Disaster. Many people have lost homes,property and some their lives. The fires not only affect people but have and are having a massive impact on our wildlife.
Many of us are not in a position to help in huge ways but little things count. So if you are asking yourself what can I do to help?
If you craft, sew, knit, crochet you can help. There are several organisations here in Australia that are working madly to make pouches for injured wildlife. Here are a couple of links to, two of these groups:
One person from these groups that I had contact with, told me that wildlife carers are reporting things such as 1000's of bats just dropping from the sky. Those that survive need wraps to recover in.
These people are co-ordinating the making of pouches and wraps for injured wildlife. If you have the skill and ability to make pouches out of fabric, knit or crochet, you can then help in this way.
Not everyone has the ability or time for this but I know many of us have yarn stashes that we can never work our way through in this lifetime. The groups listed above have thousands of people who work making pouches etc, but many of these helpers are pensioners, so getting some free yarn helps. Any Wool, acrylic, cotton, bamboo, alpaca are all fine! The donated yarn is then distributed out to those who can make the pouches. So I encourage everyone to go through your yarn stashes and help in this small way.
I have already sorted through my yarn stash and sent a massive bag to them. Such a small thing to do to help and anything is better than nothing.
A few weeks back I gave my new crochet Hygge Shawl to a local radio station to auction or raffle to help the wildlife effected by the fires. Again this is a small thing but add all those small things together and we can make a difference.
Hygge Shawl
If you are able to help make pouches or donate yarn, click on one of the links in my post and message those in charge of these organisations.
Bendigo Woollen Mills have just announced that they will be donating $1 from every ball sold in the month of January to the bushfire disaster appeal. This is really nice yarn and many of my patterns use their yarns. So you now have the chance of increasing your yarn stash, while helping the bushfire victims.
One of my head warmers is made from Bendigo Luxury and my Mosaic and Dragonfly Patch blankets are made from their cotton. One of my flower blankets which will be up to test shortly is made from their 4 ply
This year, a designer friend and I decided to start a Facebook group which combines our love of crochet, our businesses and a whole pile of other people (including other designers) who share our interest.
The Designers in our group are welcome to post their patterns on weekends, using the tag #wickedweekend. This is great for the Designers and also prevents the group being over run by Designer posts every day.
The group is slowly growing and we have implemented a Designer of the Month program. Each month a new designer has free reign to run giveaways and promote their patterns whenever they want.
My partner in crime in this venture is an Irish Designer who runs Flo's Crafty Crochet. Our partnership works well as when she is awake in Ireland I am sleeping in Australia. So one of us is usually around to tend to our group.
To get our Designer focus months started Fiona became Novembers Designer of the Month. This month I am Decembers Designer (Auburncraft Crochet).
It has been a fun month with pattern give-aways and competitions. At present I have a competition running for a copy of my Flight of the Dragonfly pattern. So if you would like to join in and win a copy of my Flight of the Dragonfly Blanket Pattern, join Two Redheads Crochet on Facebook (click here).
What could be better than a patch of dragonflies? I love dragonflies and am always looking at new ways to incorporate them into my designs.
I really have a thing for Dragonflies! I love days where you see them! A buzz of wings and they are gone on their way, about their day! You can try to chase them but they are not going to be caught!
I have to say I am pretty pleased with the end result of this design. The motif squares measure roughtly 25.4cm/10 inches (depending upon hook, yarn choice and tension).
The sky is the limit for how large you want this beauty to be, as it can easily be made larger with more motif squares added.
I used Bendigo Woollen Mill 8ply Cotton for this. The BWM cotton is a super soft yarn which is lovely to work with. Many different yarns could be used as a substitute.
Materials 3.5mm hook C1=1 x Bendigo Woollen Mill 8ply/Dk Cotton in Daffodil 485m/530yd per ball. Approx 400m/437yd used. C2=1 x Bendigo Woollen Mill 8ply/Dk Cotton in Honeydew 485m/530yd per ball. Approx 400m/437yd used. C3=1 x Bendigo Woollen Mill 8ply/Dk Cotton in Kiwi 485m/530yd per ball. Approx 400m/437yd used. C4=2 x Bendigo Woollen Mill 8ply/Dk Cotton in Parchment 485m/530yd per ball. Approx -650m/710yd used. Scissors Tapestry Needle
The pattern comes with separate copies for Uk terms and USA terms. It has many photos to help along the way.
Pattern testing is a huge part of getting a design ready to publish. I am lucky enough to have some really incredible people who test for me. They have amazing patience and tolerance to my errors, or what I like to refer to as my boo, boos. Below is a few examples of their work.
Test Blanket: Made by Cindy Cary using Bendigo Woollen Mills 8ply Cotton in Daffodil, Pink Rose, Artic and Teal.
Test Blanket by Debbie Schell Kirkland, made using Bernat Baby Sport in Lavender and Cream.
left: Test Blanket by Kathy Mant. Made using Bendigo Woollen Mill 8 ply cotton in Artic, Daffodil, Cream and Pine Lime. Centre: Test Blanket by Lindsay Broussard Silvestrini. Made using Caron Simply Soft.
Right: Test Blanket by Elika Rivera. Made using Red Heart with Love in Grape Jam, Boysenberry, Lilac and White.
Test Blanket by Michelle Westwood. Made using Paintbox Simply Dk and a 4mm hook
Now to the boring stuff! You are welcome to sell items made from this pattern, but please credit me as the designer and add a link to purchase my pattern in your sale.
Many hours of work has gone into the designing and producing of this pattern.
You are purchasing/downloading this pattern for personal use only. Please note my patterns and my images are copyright protected, please do not use my images to sell your items. No pattern or photograph may be reproduced or distributed — mechanically, electronically, or by any other means, including photocopying, without written permission of Auburncraft Design. Please do not copy, rewrite, or redistribute this pattern as your own or otherwise. Just because you can copy does not mean you should. Please do not resell my patterns.
I few weeks ago when I started making keyhole head warmers, I had no idea that I would end up doing 5 different stitch designs. It just sort of happened.! I'd finish one and then there would be another stitch idea in my head that was clammering to get out.
This is the final in the series of five and I have to say I rather like this one.
Winter Snowflake Keyhole Head Warmer uses many of the design features of the other Head Warmers in the series, but its main body is done in Waistcoat Stitch. This give a fabulous basis for the Cross-stitch snowflake pattern that is worked on it.
Easy Level
The pattern is available on Ravelry (click here). You have the option of purchasing all five of the series at a discounted price if you wish. Add all five to your basket and use the code ‘five’. Five patterns included in this. Autumn Snowflake Keyhole Head Warmer Not for Summer Keyhole Head Warmer Spring Arrows Keyhole Head Warmer Winter Snowflake Keyhole Head Warmer Winter Sunset Keyhole Head Warmer.
and Etsy (click here).
Series of Five: All pattern available on my ravelry store Auburncraft Crochet. Centre Top: Winter Snowflake Keyhole Head Warmer Left Top: Winter Sunset Keyhole Head Warmer Left Bottom: Spring Arrows Keyhole Head Warmer Right: Autumn Snowdrops Keyhole Head Warmer Bottom: Not For Summer Keyhole Head Warmer
This pattern can worked in varying yarns due to its nature. Size is determined by the length of the head band and the amount of rows worked. While size can be adjusted easily for the circumference of the head and height can be adjusted by omiting rounds, due to the snowflake pattern this head warmer is best suited to teen or adult sizing.
Two contrasting yarns are used to gain maximum impact with the cross stitch that is worked over the Waistcoat Stitch to form the Snowflakes
It is assumed that you have prior knowledge of cross stitch. A small graph is included with the Snowflake pattern, instructions for stitch placement are included.
Lion Brand A Touch of Alpaca. Links to yarn available in the Materials section.
As usual with my patterns, getting them through the test process is always a process. This could not be achieved without the input and work done by my pattern testers. Below are a few examples of their work.
Top Left: Test Head Warmer by Michelle Rose. Made using Caron Simply soft Bottom: Test Head Warmer by Mirjam Annaars. Made using Zeeman Royal in Vintage Pink and Cream. Right: Test Head Warmer by Cindy Cary. Made using Caron Simply soft.
This pattern has been tested by a large group with varying abilities in crochet.
You are welcome to sell items made from this pattern, but please credit me as the designer and add a link to purchase my pattern in your sale.
Many hours of work has gone into the designing and producing of this pattern.
You are purchasing/downloading this pattern for personal use only. Please note my patterns and my images are copyright protected, please do not use my images to sell your items. No pattern or photograph may be reproduced or distributed — mechanically, electronically, or by any other means, including photocopying, without written permission of Auburncraft Design. Please do not copy, rewrite, or redistribute this pattern as your own or otherwise. Just because you can copy does not mean you should. Please do not resell my patterns.
I bounced out of bed this morning knowing that today was a pattern launching sort of day.
I had a spring to my step that can only be achieved when a pattern has made its way through testing and is ready to leave home and find its way to places like ravelry and etsy. I put the finishing touches on my pdf and kissed 'Not For Summer Keyhole Head Warmer' goodbye and pressed the publish button.
So now for the tedious task of getting it out there on social media.If you would like to save 20% off the cost of the pattern, join the facebook group 'Two Redheads Crochet' (Click here) as I am designer of the month and only those members have access to the code.If you see my baby (Not For Summer Keyhole Head Warmer) making its way around some of the social groups and looking a little lost, please give it some encouragement. It's a big world out there and it is only a baby!
Easy Level
Adding to my collection of Keyhole Head Warmers and introducing, Not For Summer Keyhole Head Warmer. This is the Fourth Head Warmer in the Collection.
This is a unique design featuring the Keyhole.
This can be made from varying yarns due to the nature of the pattern. Size is determined by the length of the ribbed band and the amount of rows worked. The pattern comes with separate copies for Uk terms and USA terms. It has many photos to help along the way.
Suggested Materials: 4mm/G hook C1=1 x Rare Essentials Cocoon Persimmon Alpaca and Merino Dk 50g ball. Approx 70m/76yd used C2=1 x The Homeground Collection in Dye free Alpaca Dk 50g ball. 100m/110yd. Approx 70m/76yd used. C3= 1 x Cleckheaton Country Dk White approx 35m/38yd used. Tapestry Needle 1 x 40mm/1.5-inch Button Scissors Stitch Markers
While any Dk weight yarn can be used for this project, I found an Alpaca yarn to be a great option. This is another available substitute to the suggested yarn, King Cole Baby Alpaca Dk (click here).
My pattern testers as usual did a Fab-U-LOUS job and produced some really lovely Head Warmers. A huge thanks to them for their efforts!
Right top and Right Bottom: Test Head Warmers by Sheri DeBacker Mc Crork. : Made using Lion Brand Wool-Ease in Dk lakeside. Paintbox Dk in Midnight Blue and Duck egg. Top Left: Test Head Warmer by Shaunna Hallon. Made from Lion Brand Ice-Cream Scoop and Bernat Softee Baby. Right Bottom: Test Head Warmer made by Sharon Heard. Made using Panda Magnum 8ply Centre Bottom: Test Head Warmer made by Tammy Taylor. Made using Magic Lite Dk Centre: Test Head Warmer made by Jane Wynne. Made using Moda Vera Florentine
TO FIND SOME OF THE YARNS MY TESTERS USED CLICK ON THE NAMES BELOW:
You are welcome to sell items made from this pattern, but please credit me as the designer and add a link to purchase my pattern in your sale.
Many hours of work has gone into the designing and producing of this pattern.
You are purchasing/downloading this pattern for personal use only. Please note my patterns and my images are copyright protected, please do not use my images to sell your items. No pattern or photograph may be reproduced or distributed — mechanically, electronically, or by any other means, including photocopying, without written permission of Auburncraft Design. Please do not copy, rewrite, or redistribute this pattern as your own or otherwise. Just because you can copy does not mean you should. Please do not resell my patterns
Now, this question was asked in a facebook group dedicated to crochet, and I know what popped straight into my head, me being a self confessed Hooker. But the word covers so much more and it very much depends upon who you ask, as to the answer you will get......
Afghan Dog!
If you ask a dog lover you will be told that an Afghan is a very tall, hairy dog with a pointed nose. Yep, that is true!
A
AFGHANISTAN!
If you ask a person who paid attention at school, or maybe lives there, they will tell you: An Afghan is a person native to Afghanistan. Again right!
If you bother to look the word up in the online Dictionary it states:
A blanket or shawl of colored yarn knitted or crocheted in strips or squares.
A Turkoman carpet of large size and long pile woven in geometric designs.
Afghan Hound: A tall hunting dog of a breed with long silky hair.
Afghan Blanket!
A Crochet Afghan
But getting back to what us Hookers know as the only RELEVANT meaning of the word, that being crochet blankets: Afghans come in a huge array of styles, shapes etc.
This gives me a very amusing visual of a person of Afghanistan origin, sitting on an Afghan carpet, with their Afghan dog, crocheting an Afghan. Who knows they could even be in Afghanistan doing this.
If you are going to be really fussy about what a Crochet Afghan is, then it specifically refers to a blanket made from Tunisian Crochet. Of course those who are not proficient in Tunisian Crochet will claim the word Afghan as being relevant for any crochet blanket. Right or wrong is anyones guess!!
It may well be that we all just prefer the word 'Afghan'. If someone claims 'Oh, what a beautiful blanket you are making', we can respond, 'Oh no, It is actually an Afghan!'. Certainly sounds just a little more special.
Afghans can be made in one solid piece (which is usually the case in Tunisian Crochet), motifs joined together, crochet squares and strips. How versatile is that! And the word 'Afghan' does sound so much more interesting than just a boring old blanket.
Must get back to making my latest Afghan Crochet!!! I need it to take on my trip to Afghanistan! May take my dog who would like to be an Afghan hound but isn't (Cocker Spaniel).
Australia is nearing the end of Spring and heading towards Summer. We will soon see Dragonflies flitting about yelling 'Summer is here', as they herald the beginning of the long hot Summer.
I have done many different variations on patterns that include Dragonflies, but I have to say I am pretty proud of this design. It was a lot of work to get it here, to the publishing stage, and I believe it was worth every bit of effort.
With Purple being my favourite colour, I just had to make this beauty using Scheepjes Whirl in Lavenderlicious and Whirlette in Grappa.
There are a million patterns for Headwarmers floating around online and trying to design something that is unique and not like others is a bit like re-designing the wheel.
I kind of think I have achieved success in making these something new and unique.
Both of these can be made to suit varying head sizes, simply by adjusting the length of the band and the amount of rows worked.
Suitable for most yarn weights. Adjust your hook to suit.
Both Headwarmers feature the unique keyhole design.
Winter Sunset Keyhole Headwarmer is made using Camel Stitch to create a feature pattern, and Autumn Snowdrops Keyhole Headwarmer is worked mainly using the Tapestry or Intarsia Technique.
These are quick and easy projects, that can also use up some of that scrap yarn you may have stashed away.
As stated any yarn can be used but here is the Material Lists:
Autumn Snowdrops Keyhole Headwarmer
Materials: 4.5mm hook C2=1 x Bendigo Woollen Mill Luxury 10ply/Aran in Curry. 300m/328yds per ball. 100m/109yds approx usage. C1=2 x Bendigo Woollen Mill Luxury 10ply/Aran in Cream. 300m/328yds per ball. 200m/218yds approx usage. Tapestry Needle 1 x 40mm/1.5-inch Button
Winter Sunset Keyhole Headwarmer
Materials 4mm/G hook C1=1 x Rare Essentials Cerise Alpaca and Merino Dk 50g ball. 100m/110yd. Approx 70m/76yd used C2=2 x The Homeground Collection in Dye free Alpaca Dk 50g ball. 100m/110yd. Approx 150m/164yd used. Tapestry Needle 1 x 40mm/1.5-inch Button Stitch Markers
What would Designers do without Testers? Testing is a very important part of the design process. I know I could not do without them.
Top left: Ruth Tipping test Head Warmer. Made from For the Love of Yarn in Dark Purple and Lilac. Top Right: Bethany Colhoff test Head Warmer. Made from Loops and thread. Bottom Right: Jenny Hinton test Head Warmer. Made from Bendigo Woollen Mill Luxury 10ply in Mulled Wine and Stone. Middle Left: Test Head Warmer by Bethany Colhoff made with Loops and Thread. Middle Right: Test Head Warmer by Sharon C Coys Elderton. Made using Stylecraft Special Dk. Bottom Left: Test Head Warmer by Nikki Barker made with Red Heart Soft in Grape and White. Top Right: Test Head Warmer by Bethany Colhoff made with Loops and Thread. Top Middle: Test Head Warmer by Sonia Bowmar-Scothern. Made from Hand dyed Merino Dk from Siobhans Crafts.
Boring Stuff:
You are welcome to sell items made from this pattern, but please credit me as the designer and add a link to purchase my pattern in your sale.
Many hours of work has gone into the designing and producing of this pattern.
You are purchasing/downloading this pattern for personal use only. Please note my patterns and my images are copyright protected, please do not use my images to sell your items. No pattern or photograph may be reproduced or distributed — mechanically, electronically, or by any other means, including photocopying, without written permission of Auburncraft Design. Please do not copy, rewrite, or redistribute this pattern as your own or otherwise. Just because you can copy does not mean you should. Please do not resell my patterns. This post may contain affiliate links.
Asking the question as to why I make is a little like asking someone why they breathe!
Lovecrafts Blogger Awards. Link to Lovecrafts https://www.lovecrafts.com/en-au/l/yarns My blog may not be the biggest or have the most followers, but it is mine!!!
I always tell people that I crochet because punching people is frowned upon. But of course there is more to it than that! Being creative is who I am and so I guess crochet is my happy place.
My most recent Design Only One Woof Cushion. Pattern available soon on Lovecrafts
I have always had the need to create. Just you try and stop me, it won't be pleasant!!!.
Even when very young, I used to make clothes for my dolls out of scraps of material. They were not particularly all that good, but I thought they were.
I am not really an extroverted type of person and don't feel the need to be out there in front of everyone, but when it came to being creative, I was always the weirdo in the hand painted jeans, or the tie-dyed head scarf.
As I got older and had my own home, nothing was safe from my creative hands. The picot fences had flowers painted on them, so did the letterbox and front gates. I painted pictures on the doors inside the house and carefully painted flowers or pictures on the power point covers throughout. Art work is everywhere at my place and I recently began producing resin art pieces as well.
One of my Resin Art Pieces
My kids had paper mache piggy banks and their rooms became works of art. My daughter wanted fluro pink walls with tiny daisies painted on them. My husband shook his head, but he painstakingly marked out intervals on these fluro walls so I could add the tiny white daisies, one by one. Her curtains had hand threaded beads on them, which took me forever to do.
I spent a lot of time with beads and sequins adorning Ballet and dance costumes for her as well during all her dance years.
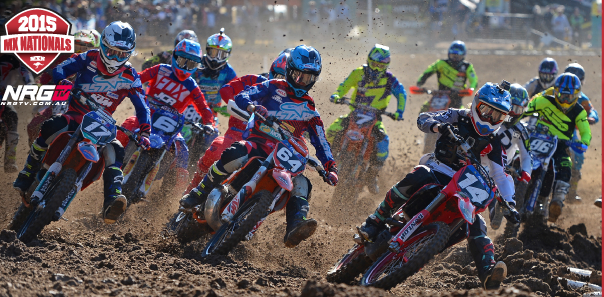
My sons who were motocross riders had finish flags for curtains and handmade blankets with the motorbike brand logos on them.
Then they all went and grew up!
My youngest still raced motocross and supercross and for anyone who knows about this sport, for mothers it is a lesson in how to manage stress. I had the basics of crochet and knitting taught to me by my grandmother and had done a little of each throughout the years, but now I needed something to stop me climbing up the walls whilst my youngest child sped by on his motorbike, jumping huge mounds of dirt as he went, all the while with other riders slamming into him and basically making a mother want to jump the railing and send them all to the naughty corner for attempting to hurt my little boy!!!
My son #14 getting the holeshot at an outdoor event. Talk about stressful for a mother.
This began my real journey into the crochet world. There I would be, in the pits at a National event as my son prepared for his next race. As the line of bikes all revved up in anticipation of the start flag, I would be clutching my crochet hook and trying very hard not to have a melt down. I have stood in stadiums full to capacity of over 35000 people waving my crochet hook in encouragement as my son raced by. As he progressed in his career I would at times be sitting up in the middle of the night, glued to a computer, hook in hand, furiously working on another crochet design, while watching my son race overseas in Germany, USA or half a dozen other countries.
Crocheting in the pits at a National Motocross Event.
I can truly recommend crochet as a stress reliever and great for anxiety!!! I would also strongly suggest never letting your child take up motocross/supercross racing.
Designing crochet is something that comes easily to me and ideas are always whirling around in my head. I don't have a specific niche of how I design. I do what makes me happy, I make with yarns that make me happy. If a yarn is calling to me then I really must answer.
I appreciate all the outlets such as Lovecrafts that allow me to publish my designs, although I sometimes wonder if they don't add something addictive to their yarns that make you want more and more. They wouldn't do that, would they?
I can't say I have a favourite yarn, although I tend to gravitate towards anything purple. Dangle a purple skein of yarn in front of me and I will happily watch it for hours. Give me a hook to go with that skein and I will turn that yarn into something beautiful!
If you haven't had a go at crochet then get to it, especially if one of your children decides to take up a dangerous pursuit!!!!! And if anyone questions why you need that extra ten skeins of yarn, just tell them it is therapy yarn..
If you have a ton of Chenille yarn (or you can use other yarn) hanging about, left over from making pumpkins or scrunchies, then you will love this pattern.
This is an Easy level project with basic stitches. Finishing touches require Surface Slip Stitch and the edging is done with Crab Stitch.
Why the name?
The name for this cushion comes from the Children’s book by James Herriot that I used to read to my kids. It is the story of a dog who never barks. He is separated from his puppy playmate. One day they are reunited, and he gives just one bark, the only bark he ever makes.
I first made this cushion for my mother quite a few years back, and at the time I did not bother to write it up. Mum still has it on her bed. I thought it time I got around to making another one and this time writing it up.
The pattern comes with separate copies for Uk terms and USA terms. It has many photos to help along the way.
A different colourway. Made using Green with purple trim.
BORING BUT IMPORTANT STUFF!!!! Many hours of work has gone into the designing and producing of this pattern, You are purchasing/downloading this pattern for personal use only. Please do not copy, rewrite, or redistribute this pattern as your own or otherwise. Just because you can copy does not mean you should. Please do not resell my patterns.
You are welcome to sell items made from this pattern, but please credit me as the designer and add a link to purchase my pattern in your sale.
Please note my patterns and my images are copyright protected, please do not use my images to sell your items. No pattern or photograph may be reproduced or distributed — mechanically, electronically, or by any other means, including photocopying, without written permission of Auburncraft Design.
This post may contain affiliate links. These links help to keep my blog open.
I was sent a screenshot recently by a designer friend. It was of a post in a Facebook Crochet Group. The person who posted this was basically looking for affirmation, and for people to say that her actions are okay.
What had this person done? They had seen a lovely crochet item, painstakingly designed by someone with creativity. The designer had gone to the bother of publishing this works and taking some fabulous photos of the design to promote it. It is a slow process from idea to pattern, filled with testing calls and hours of editing, photography, along with producing the item itself.
Along comes the person who posted the question and sees this incredible work. They want one. They enlarge the photo and lo and behold they can see each and every stitch. Did they buy this pattern from this creative designer? Nope!! They decided that they could reproduce it from the stitches in the picture and did so. Now they want others to tell them , sure it's okay, you go ahead and do this.
The majority of comments on this question posed, were others claiming loudly that, sure it's okay, everyone does it. Why would you bother to buy the pattern? Many people congratulated the person for having the ability to copy a designers work, claiming that if they are of a standard to be able to copy then it is more than fine for them to do so. The catch phrase of 'Everyone Does it' was ringing loudly.
One person exclaimed that if a designer is silly enough to publish a pattern that an intermediate crocheter could copy then it is their own fault, and why would they bother to publish an easy pattern anyway? This person also exclaimed that they just use the pictures to inspire them and anyway, the finished item won't be exact stitch for stitch, so therefore its really alright to do it.
Several designers and group members tried to explain just how morally wrong it is to do what was done, but most of those posting really didn't care!!!
Who cares that patterns have to go through the ideas stage, on to the make stage, then the test stage and finally publishing? Who cares that a design can be months in the making and producing? Hey, if you can just copy it and steal someones idea, then why bother to pay a couple of dollars for the pattern?
I know where I stand on this!!!
Just because you can copy a designers work does not mean it is right!
So if you are thinking about making one of my designs by enlarging a promotion photo of it, and reproducing it that way, please think again. It is wrong!!!! If you want to wing something, then by all means do so and don't cheat by stealing someone elses intellectual property.
And I applaude those few who stood tall and told the many that they support designers and their work. Thank you to them!!!
This is my opinion and if you don't like it please move along!!! Or enjoy the read, it's all RELATIVE!!!!
The main photo on this post is of my wonderful testers completed Fishing for Luck Shawls. The work they do is very much appreciated.
Crochet can be a very useful item in so many ways when travelling!!!
I recently had the need to travel interstate to Far North Queensland.
Only going for a few days, I wanted to pack lightly. This, of course did not apply to my crochet. Crochet falls into the 'Must Have' category when travelling. Who cares if I wear the same clothes for three days? As long as the crochet fits in the suitcase, all is good!
I packed my smallish suitcase with my usual care (everything got thrown in at the last minute, except for the carefully selected 3 crochet WIPS (work in progress)). I often send a photograph of my extremely bad packing to my daughter to irritate her. She packs with a neatness that most certainly did not come from me, and often asks if I am really her mother.
I headed to the airport with magic wand (hook) in hand.
The airport was a nightmare! Crowded with people enjoying school holidays. Check-in took way longer than the length of my patience. I was glad when I could find a quiet corner (well as quiet as a busy airport will allow.) and wait for my plane.
Out came the crochet, and I sat working away on my latest design 'Flight of the Dragonflies'. I find crochet can often be a topic of interest for those waiting around you, and conversation often begins with people interested in what I am working on.
Pattern availabe soon. Flight of the Dragonflies. Made from Scheepjes Whirl and Whirlette.
Finally boarding time and I get to my seat. A father and his teenage son were already in my seating row. The teenager must have disliked his allocated seat (which was middle, row) and decided that my allocated window seat was nicer. I certainly was not sitting in the middle between his father and him, so I politely chucked him out of my seat. Just as well he moved over or I most certainly would have stuck him a few times with my crochet hook to get his attention. He was rather lucky I was feeling in a good mood and had my crochet to immerse myself in, once seated.
I had a couple of hours waiting in Cairns for my husband to arrive as he was on another flight, so again out with the crochet. More conversation with interested people, often oohing and ahhing over the blanket I am making.
Then came the short road trip to Port Douglas. Hubby drove so I could crochet.
Crochet while road tripping. Dragonflies squares that I am in the design stage of. Made using Bendigo Woollen Mill Cotton in 8ply
We had several pleasant days in Port Douglas with my middle child, who had been working in the area this year. One of our days away was spent Tree Surfing in the Daintree Rainforest. This involves zip lining in the tree tops, at times more than 17 metres up. I happened to be last in the group to go down the zip-line each time.
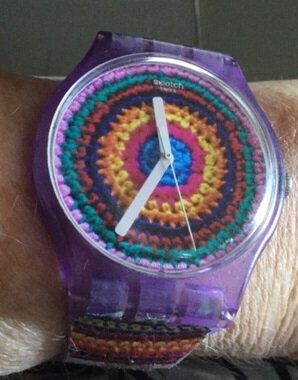
My watch
So there I was with the male guide on the platform and he spots my watch. It has a crochet look band and face to it. He exclaims 'is that a crochet watch?' So I told him about my watch and about designing crochet. While he was re-clipping my harness ready to go on the next length of zip-line, he was asking me all about my crochet. His mother and sister were avid hookers and so he wanted information to pass on to them.
At the end of the trip, this guide comes up to me with pen and paper in hand, wanting me to write down my online information for his mother and sister. Who knows, if they did follow up, they may even be reading this. If so, all I can say is that you have a very lovely son/brother. He made our zip-lining very enjoyable.
And it just goes to show, crochet can be a topic of interest anywhere in the world!!
Even when you are hanging around upside-down, 17 metres in the air, in the middle of a rain forest!!!
Me just hanging around in the Daintree. Figured I may as well have a go at the zip-line upside-down. Was a real buzz!!!
Firstly, you may be wondering why I named this ‘The Paper Bag Hat’. I did so due to the way I have chosen to close the top of the hat. It reminded me of the old-fashioned brown paper bags from my days working in a local Supermarket.
I started as a Checkout Chick in my teens and the registers were all push button (but not in the digital sense). I would have to ask each customer if they would like a box, or a bag for their purchases. If they wanted a bag I would grab one from the pile of neatly stacked brown paper bags and open it up. The bags had a square bottom, and the sides had a concertina fold. So totally different from the tons of plastic bags that are in supermarket now. Know doubt many people over the years would also love me to put a paper bag over my head so now I can!
Materials: (click on any of the yarn names to source them)
Once you have your chains to start done, you can place themaround the head you are making the hat for and adjust if you think it will notbe the right size. The starting chains must be dividable by 3 sothe pattern will work.
It is a good idea to sew the ends in as you go and to eitheruse a stitch marker or count your stitches so you don’t lose one of them asthey are slippery little suckers and tend to hide.
Ch1 stitch to begin rounds does not count as a stitch.
If you find it too confusing on the rows that you work inthe round, you can just slip stitch each round closed. Doing the rows in the round as stated in thepattern will give a better look visually to the larger sections of sc.
Treble stitches on Round 31 which you place into the frontloops you made on Round 28 count as ast. Don’t make Treble stitches tootight.
Finished Circumference: Adult Small 20 ½’ 52cm, Medium 22’ 56cm, Large 24’ 61cm
Gauge: 24 rows to 10cm . 17 stitches to 10cm
Difficulty Level Intermediate
Abbreviations.
Ch. Chain
Sl St. Slip Stitch.
St. Stitch
Sts. Stitches
Bl- Back Loop
Scbl. Single Crochet Back Loop Only.
Notes: DO YOURSELF A FAVOUR AND READTHE NOTES
Once you have your chains to start done, you can place themaround the head you are making the hat for and adjust if you think it will notbe the right size. The starting chains must be dividable by 3 sothe pattern will work.
It is a good idea to sew the ends in as you go and to eitheruse a stitch marker or count your stitches so you don’t lose one of them asthey are slippery little suckers and tend to hide.
Ch1 stitch to begin rounds does not count as a stitch.
If you find it too confusing on the rows that you work inthe round, you can just slip stitch each round closed. Doing the rows in the round as stated in thepattern will give a better look visually to the larger sections of sc.
Treble stitches on Round 31 which you place into the frontloops you made on Round 28 count as ast. Don’t make Treble stitches tootight.
Hat
With C1. Ch 75 (81,87) Do not twist Chain. Slst to first chto form a ring.
Rnd 1: (Right Side): Ch1. Sc in same Ch asjoining and in each Ch around. Slst into back loop of first sc. Turn. – 75(81,87) sts.
Rnd 2: Ch1. Bl only, Sc in each st around.Slst to join. Turn. Fasten off and cutyarn.
Rnd 3: Attach C4 in same st as join. Ch1. Blonly, Sc in each st around. Slst to join. Turn.
Rnd 4:Bl only. Sc in each st around. Slst to join. Turn. Fasten off and cut yarn.
Back or hat.
Rnds 5-6: With C3, repeat Rnds 3-4.
Rnds7-8: With C4, repeat Rnds 3-4.
Rnds 9-10:With C2, repeat Rnds 3-4,
Rnds 11-12 With C4, repeat Rnds 3-4
Rnds 13-14 With C3, repeat Rnds 3-4
Rnds 15-16 With C4, repeat Rnds 3-4
Rnds 17-18 With C1. Repeat Rnds 3-4
Rnd 19: With C4. Sc Bl only into each Sc around. Do not cut or turn.
Rnd 20: Continue working in the round and usea marker to show where each row starts. Shift the marker after each round to the next row. Sc into both loops.
Rnds 21-22-23-24-25-26-. Repeat Rnd 20
Rnd 27: Sc into each St around. Close round with Slst.
Rnd 28: Ch1. * Scbl1, sc2* Repeat from *to * around. Close round with a Slst. Insert stitch marker 75(81, 87) sts.
Rnd 29: Ch1. Sc around. Close round with a Slst.
Rnd 30. Repeat round 29. Do not cut yarn
Rnd 31. Change to C3. Ch1, Sc1 into same st.Tr2tg the first part of this will go into the loop in Rnd 28 that has thestitch marker in it. The second partinto the next free loop. This counts asone st on row 31 (or the row you are working on). Sc2. *Tr2tg first part into same st as before and second part into the nextfree loop, sc2* Repeat from * to * around. Sc1. Close round with a Slst. Cutyarn. 25 (27,29) v’s
Rnd 32, 33, 34: Continue with C4. Ch 1. Sc in all stitches around. Do not close round, continue onto the next round with sc. (this round will work in a spiral. 75(81, 87) sts. Keep using a st marker to mark the start of each round.
Rnd 35: Sc around. Close this round with a Slst atStitch marker point.
Rnd 36: Repeat row 28
Rnds 37-38: Repeat row 29
Rnd 39: Using C2. Repeat row 31
Rnds 40-41-42: Continue with C4. Ch 1. Sc in all stitches around. Do not close round, (this round will beworked in a spiral). Continue onto the next round with Sc .75(81, 87) sts.Place a St marker at the end of the round.
Rnd 43: Continue with Sc around. Close this round with Slst at St marker.
Rnd 44: Repeat row 28
Rnds 45-46 :Repeat row 29
Rnd 47: Using C1 Repeat row 31
Rnd 48-49-50-51. Continue with C4. Ch1. Sc in all stitches around. Do not close round, continue onto the nextround with Sc. 75(81, 87) sts. Place aSt marker to show the end of each round. Fasten off and cut yarn.
Rnd 52-53-54: Attach C1. Sc in all stitches around. Do not close round, continue onto the next round with sc. Place a St marker to show the end of each round. Fasten off and cut yarn. 75(81, 87) sts.
Closing the top of the Hat:
Step One:Lay the hatflat and neatly folded into half. Measure in 3.5 “(3.”, 3.9’”inches) 9 (10, 10)cm.
Step one.
Step Two:
Tuck the measured section in on itself or folded in onitself.
Step two.
Step Three:
With your darning needle and C1. Use tacking stitches to hold the fold inplace for when you crochet around it.
Step three.
Step Four:
Repeat the last three steps on the other side.
Step Five:
Starting at a fold edge, attach yarn and slip stitch the twolayers of the fold together. Slst acrossthe middle top of the hat and onto the left-hand fold edge. Fasten off and cut.
Step five.
Step Six:
Done!!!
You will now have two folded edges remaining to do. Attach the yarn at one of them and Slstacross to close. Fasten off andcut. Attach yarn at other fold edge, slst across to close.
Sew in any ends.
A free Pdf version of this pattern is available on Ravelry (Click here). Please give some of my pattern some love if you visit and pop a few in your favourites.
Now for the Boring Stuff!!!
Many hours of work has gone into the designing and producing of this pattern, You are purchasing/downloading this pattern for personal use only. Please do not copy, rewrite, or redistribute this pattern as your own or otherwise. Please do not resell my patterns.
You are welcome to sell items made from this pattern, but please credit me as the designer and add a link to purchase my pattern in your sale.
Please note my patterns and my images are copyright protected, please do not use my images to sell your items.
This pattern has been tested by a large group of pattern testers, with varying abilities in crochet.
If you are on Ravelry, please add your finished photos as projects as I love to see your finished work.
Mosaic Filet Lap Blanket. Made from Bendigo Woollen Mill 8 ply Dk Cotton In Parchment.
I have been staring at patterns created by Tessellated Tiles for ages. My mind has been busy working up a pattern, using the shapes that mimic these tiles. I have to say I am pretty darn excited by the results.
I love Filet Crochet! It is simple and gives a very effective finished product, which is easily achievable for most levels of crochet ability.
Below: (Pictured) are a few of my testers blankets. They look super fantastic!!! As usual a huge thank you to all those who tested for me.
Left: Amanda Corniello test blanket. Made from Premier Dk Everyday Baby yarn in Fog Grey. 3.5mm hook. Approx 1300m of yarn used. Right: Simone Howes test blanket. Made from Bendigo Woollen Mills 4 ply/ Fingering Cotton in Wisp Grey. 3mm hook used. Approx 1250m of yarn used.
Left: Sharon C Coys Elderton test blanket. Made from Stylecraft Special Dk in white. Right; Michelle Rose test blanket. Made from Caron one pound, worsted weight in Limeade.
Now for the Boring Stuff!!!
Many hours of work has gone into the designing and producing of this pattern, You are purchasing/downloading this pattern for personal use only. Please do not copy, rewrite, or redistribute this pattern as your own or otherwise. Please do not resell my patterns.
You are welcome to sell items made from this pattern, but please credit me as the designer and add a link to purchase my pattern in your sale.
Please note my patterns and my images are copyright protected, please do not use my images to sell your items. No pattern or photograph may be reproduced or distributed — mechanically, electronically, or by any other means, including photocopying, without written permission of Auburncraft Design.
This pattern has been tested by a large group of pattern testers, with varying abilities in crochet.
If you are on Ravelry, please add your finished photos as projects as I love to see your finished work.
This shawl was so much fun to make! Each time I added one of the little clovers that hang at the end, it felt like such an achievement. And they look so cute!!!
Working from a Scheepjes Whirl cake is always a blast. The excitment of reaching each colour change in the yarn cake! I just love it!!!
CLOVER CHALLENGE. We all know that a four leaf clover is a rare thing!! This shawl has three leaf clovers throughout. The challenge is to place one (JUST ONE) four leaf clover somewhere in the shawl. Show off your finished shawl on ravelry and link it to my pattern.
Fishing for Luck Shawl. Scheepjes Whirl in Scrumptious Lush!
The pattern comes in UK and USA terms and now available in NL Terms (Dutch). It uses a 3.5mm/E hook and one cake of Scheepjes Whirl.
The pattern has been tested by a fabulous group of crochet super heroes, with some incredible results. Below picture shows some of the test shawl results.
Top Left: Dulcy Harris Test Shawl. Made from Lion Brand Shawl in a Ball. Colour Feng Shui Grey. H/5mm Hook
.
Top Middle: Amanda Haynes Test Shawl.
Top Right:
Amy Belanger Dreffs Test Shawl. Made from Lion Brand Mandala in Centaur. 2.5 cakes used. 5mm hook
Bottom Left:
Denise Cullen Test Shawl. Made from Scheepjes Whirl in Brambleberry.
Bottom Middle:
Hannah Schmuker Test Shawl. Made from Lion Brand Mandala. E Hook. 12 pattern repeats.
Bottom Right:
Amy Elizabeth Peterson Test Shawl. Made from Yarn Bee Rainbow Wrapsody in Gerbera Daisy. 3mm hook
Congratulations to Denise Cullen. Her Fishing for Luck Shawl took out 2nd at the Canberra Royal Show. What an achievement. I really do only use the very best pattern testers as their work is exceptional.
Now for the Boring Stuff!!!
Many hours of work has gone into the designing and producing of this pattern, You are purchasing/downloading this pattern for personal use only. Please do not copy, rewrite, or redistribute this pattern as your own or otherwise. Please do not resell my patterns.
You are welcome to sell items made from this pattern, but please credit me as the designer and add a link to purchase my pattern in your sale.
Please note my patterns and my images are copyright protected, please do not use my images to sell your items.No pattern or photograph may be reproduced or distributed — mechanically, electronically, or by any other means, including photocopying, without written permission of Auburncraft Design.
This pattern has been tested by a large group of pattern testers, with varying abilities in crochet.
If you are on Ravelry, please add your finished photos as projects as I love to see your finished work.
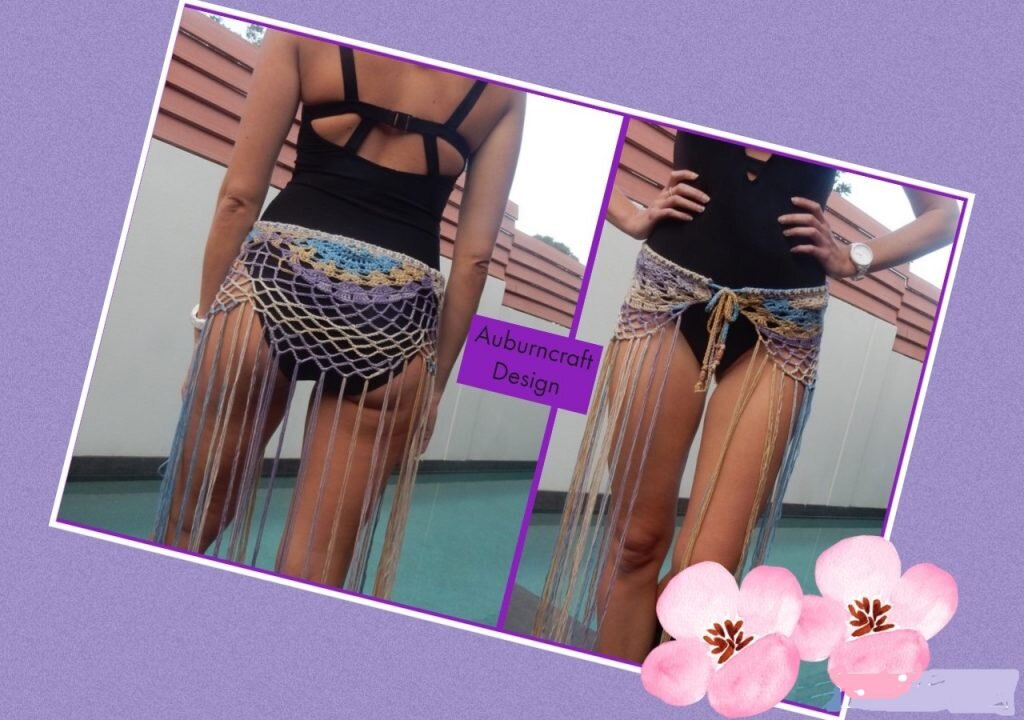
Sometimes the cogs in my brain just start turning, and an idea pops into my head that just has to be turned into reality.
The other week I had the idea for the Boho Bikini Wrap and I found myself grabbing for my magic wand (crochet hook) and working away in a designer frenzy.
Boho Bikini Wrap modelled by Layne.
Which as the dictionary states is:
frenzy/ˈfrɛnzi
a state or period of uncontrolled excitement or wild behaviour."Auburncraft Design worked herself into a frenzy of rage"synonyms:hysteria, madness, mania, insanity, derangement, dementedness, delirium, feverishness, fever, wildness, distraction, agitation, turmoil, tumult; wild excitement, euphoria, elation, ecstasy; informalcraziness; raredeliration"the crowd (change to,no just me) worked themselves (herself) into a state of frenzy"fit, seizure, paroxysm, spasm, bout, outburst;ferment, fever, storm"she contorted her face in a frenzy of anger (perhaps change this one to crochet excitement)"
Well, whatever. I guess you are getting the picture!
The results of this frenzy are the Boho Bikini Wrap. The pattern is available on Ravelry (click here), Etsy (click here). Soon also on Love Crochet. The pattern is available in Uk and USA terms
This cute little wrap can be used as a bikini accessory or even a belt. It looks great over both bikinis, leggings, jeans etc. The fringe length can be adjusted to suit your height or style.
Worn over leggings.
I am fortunate enough to have some fantastic friends who are willing to loan out their daughters to model for me.
My main model for this is over 6ft tall, and an approx Australian size 8. She is a fantastic person and even though she was laid up with her foot in a moon boot, due to breaking it playing rugby, she didn't hesitate to throw on a swim suit and model for me.
Now to the boring stuff.
This post may contain affiliate links.
Many hours of work has gone into the designing and producing of this pattern, You are purchasing/downloading this pattern for personal use only. Please do not copy, rewrite, or redistribute this pattern as your own or otherwise. Please do not resell my patterns.
You are welcome to sell items made from this pattern, but please credit me as the designer and add a link to purchase my pattern in your sale.
Please note my patterns and my images are copyright protected, please do not use my images to sell your items.
This pattern has been tested by a large group with varying abilities in crochet.
If you are on Ravelry, please add your finished photos as projects as I love to see your finished work.
Velvet Scrunchies seem to be everywhere at the moment. I thought I would jump on the band wagon and do my own little version. These are something that I tend to wear often. They can be useful to keep my long hair out of the way when working out at the gym.
I don't know about anyone else, but sewing items together is not a huge favourite of mine. These Scrunchies pretty much a no sew item. That is of course if you don't count sewing in the tails created, but two tails I can cope with.
These are super easy! Super fast to make and super fun!!!
The free pattern is available below in USA terms. For Uk terms and a pdf version (also free), you can visit my ravelry store (click here) or my Love Crochet page (click here) and download it free!!! If you download from ravelry please give my patterns some love and add a few to your favourites!!!
Elastic Hair Tie(available at most pharmacies and many retail stores).
Needle tosew in ends.
Hair Elastic. Bernat Velvet
Notes:
This is worked in a continuous spiral.
Follow the instructions in Row 1 to prevent twisting of the starting chain.
Numbers in rows indicate corresponding photographs. Example [5]
Do not make the starting chain overly tight. A 6mm/I hook can be used for the starting chains or a foundation row can be substituted, if you find it necessary.
Add a stitch marker at the beginning of the row to easily count your rows.
Count your stitches each row.
Stitch counts appear at the end of each row. Example [20].
Gauge and finished measurements are not applicable for this project.
Abbreviations:
Ch- Chain.
Hk- Hook.
Yo- Yarn over.
St- Stitch.
Sc- Single Crochet.
Rs- Right Side.
Slst- Slip Stitch.
Row 1: [1]Ch10. Remove hook from Ch and insert Hk throughfirst Ch (furthest from hook) and working Ch. With both loops on Hk, Ch 35. Toclose the Ch and form a circle Yo and pull through both loops on Hk. [45]
Pictures 1 and 2
Row 2: [2]Ch1 (does not countas a St). Sc into same Ch and into eachCh around. Do not close round. Place a St marker to indicate beginning ofrounds. [45]
Row 3: Continue in a spiral. Sc into each St. Do not close round. [45]
Row 4: Sc into each St. Do not close round. [45]
Row 5: [3] Sc into each St. Donot close round. [45]
Pictures 3, 4, 5, 6
Row 6: [4] With RS facing,place elastic hair band to the back of the Scrunchie. [5] [6] Fold the Scrunchie over the elastic. Work 1 Scthrough Row 1 and Row 5 inserting hk through both and enclosing hair elastic. [7] Do not close round. [45]
Pictures 7 and 8
(Round 7 is optional to add picots)
Row 7: Ch4 (counts as Scand 3 Chs), Slst into third Ch from Hk (picot made). Sc into next 3 Sts. [Ch3, Slst into third Chfrom Hk. Sc into next 3 Sts]x13. Ch3, Slst into third ch from Hk. Slst to Ch1at beginning or round. Fasten off andcut yarn.
Sew in ends.
Now for the boring stuff!!!
This pattern is free and will remain free unless it is found that this is being abused. Even free patterns have copyright. To read about my last bad experience with a limited time free pattern, please go to my blog https://auburncraftcrochet.com/2019/03/26/crochet-pattern...
This pattern for personal use only. Please do not copy, rewrite, or redistribute this pattern as your own or otherwiss. This includes posting a copy of my PDF to your own web page or facebook group. Please do not resell my patterns.
You are welcome to sell items made from this pattern, but please credit me as the designer and add a link to purchase my pattern in your sale.
Please note my patterns and my images are copyright protected, please do not use my images to sell your items.
This pattern has been tested by my very capable band of testers. If you do find an error please let me know.
I guess the answer to that is in the eye of the beholder!The Dictionary says this:
Crochet is a handicraft in which yarn is made up into a textured fabric by means of a hooked needle. "a crochet hook".
Some who don't like or get Crochet may answer like this:
"Crochet is a complete waste of time and money".
But to those of us who know the true secret of Crochet and the wonder of creating it is much more.
You see, you get (or are maybe given) this magic wand (crochet hook). You wave this wand and incredible things appear. Well, that is what is meant to happen. Sometimes there is a lot of frustration along the way. A lot of Frogging and the occasional swear word all added into the mix.
We crochet because we enjoy creating something of beauty. We crochet to help avoid stress. To keep our minds active. To create that item for our loved ones, that is unique and special.
And to those who don't get the need to Crochet I say "Full Speed Ahead and damn the torpedoes. Hooks (or wands), Charge!!!"