Crochet... Entering Local Agricultural Shows.

If you have ever given thought to entering local events that judge crochet, but have just not been game enough to go ahead, I say re-think this, as entering show, events etc can be a positive thing.

Sure I have had a few unpleasant experiences. Take the larger show that miss labelled my king size afghan and then decided to sell it for approximately half of what it was worth. And if that wasn't bad enough, try adding the fact that the Afghan they sold, was not actually for sale. I almost got into a tug of war with the supposed new owners of my Afghan, on trying to retreive it. But this is hopefully an isolated incident!!!

A few years back I stumbled across an advertisment for local upcoming show. It had a schedule of events, with sections that could be entered for Arts and Crafts. I thought about this for a good while, wondering if any of my crochet could possibly be good enough to enter.

I decided to take the plunge and enter. I spent a bit of time figuring out how to fill out the forms and where to drop my crochet beauties off etc. Then I waited for the big day to come. Finding I had won a couple of prizes was a huge buzz.

I have been entering the local shows ever since. Sometimes I do well, sometimes not as well. It can all be a little cloak and dagger. You find yourself stalking posts in local crochet groups as to who is entering what, and trying to size up the competition to see if what they have produced might be better. Doing this, is of course a complete waste of time, as you really never can tell what a judge will decide to really like, or perhaps not like.

Over the past few years I have gained quite a few ribbons for my efforts and a couple of times even taken out Best in Show and runner up to Grand Champion. I received lovely big sashes for those effort.

Best in Show Crochet Section

I had the pleasure of dropping a few items off this morning, to the final show of the year in my area. It is a small show, and drop off is in a small hall in a rural community. I parked the car outside and could hear the ladies calling out to me as I grabbed my crochet from the back of the car. The excitement in their voices, with the prospect of someone bringing interesting goodies was evident and they showed it with a ton of enthusiasm.

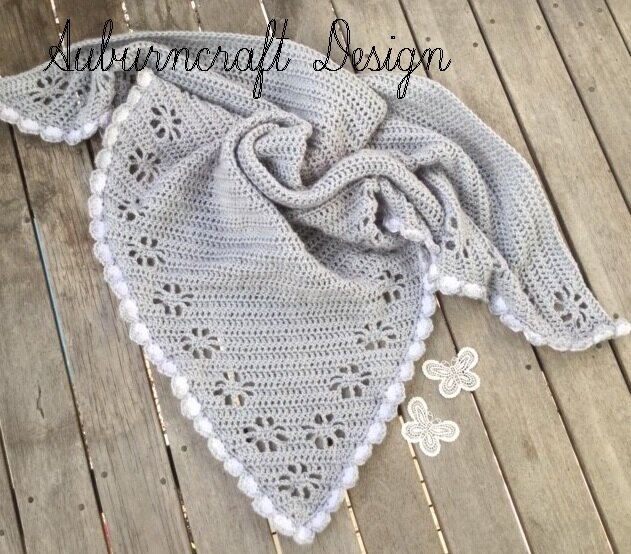
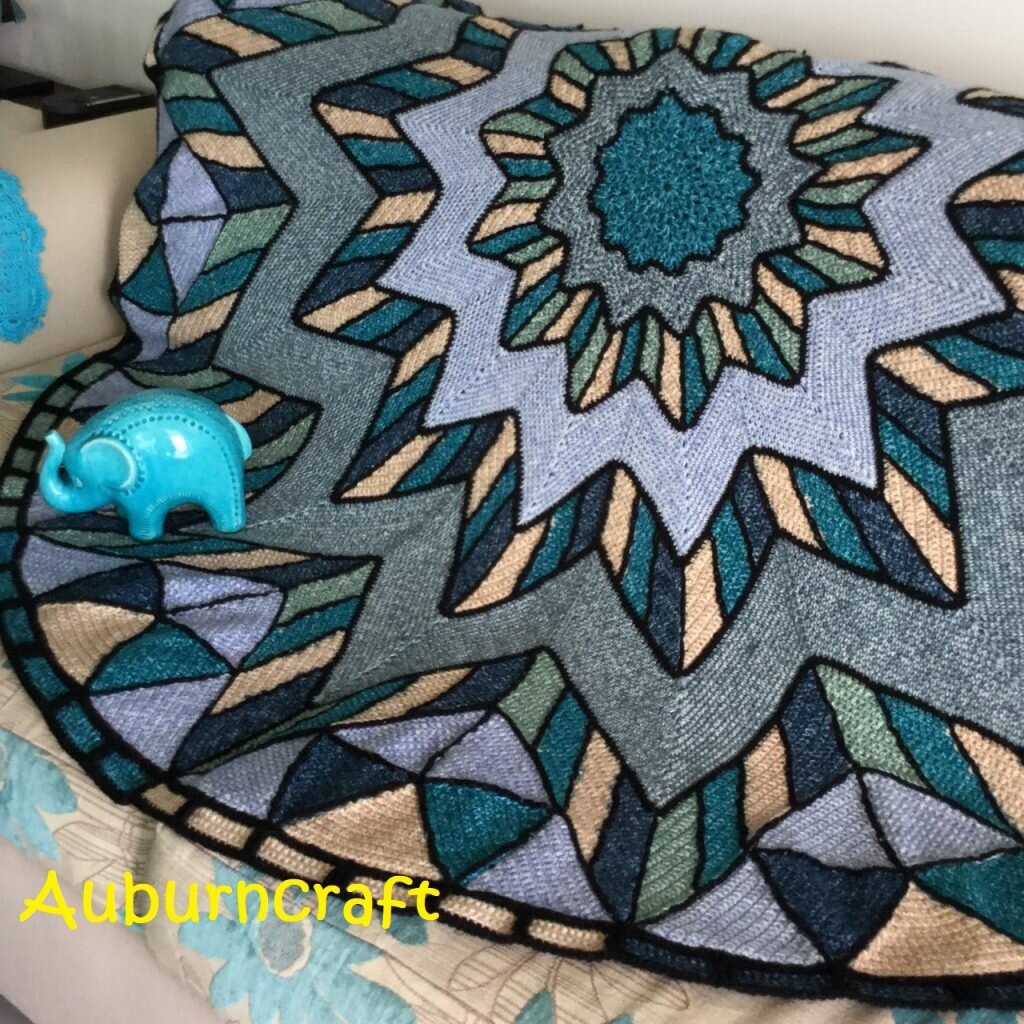
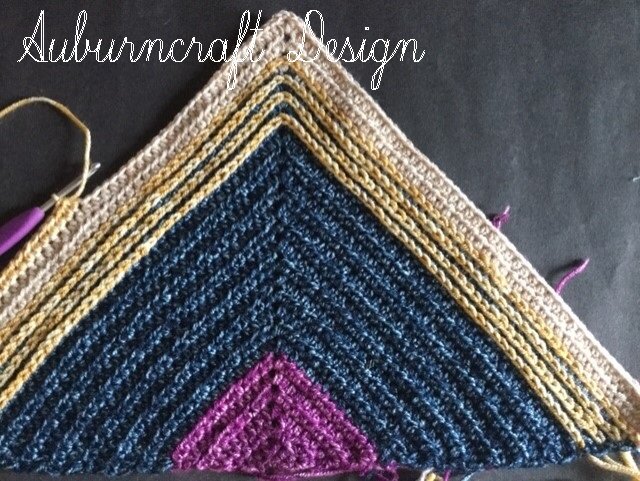
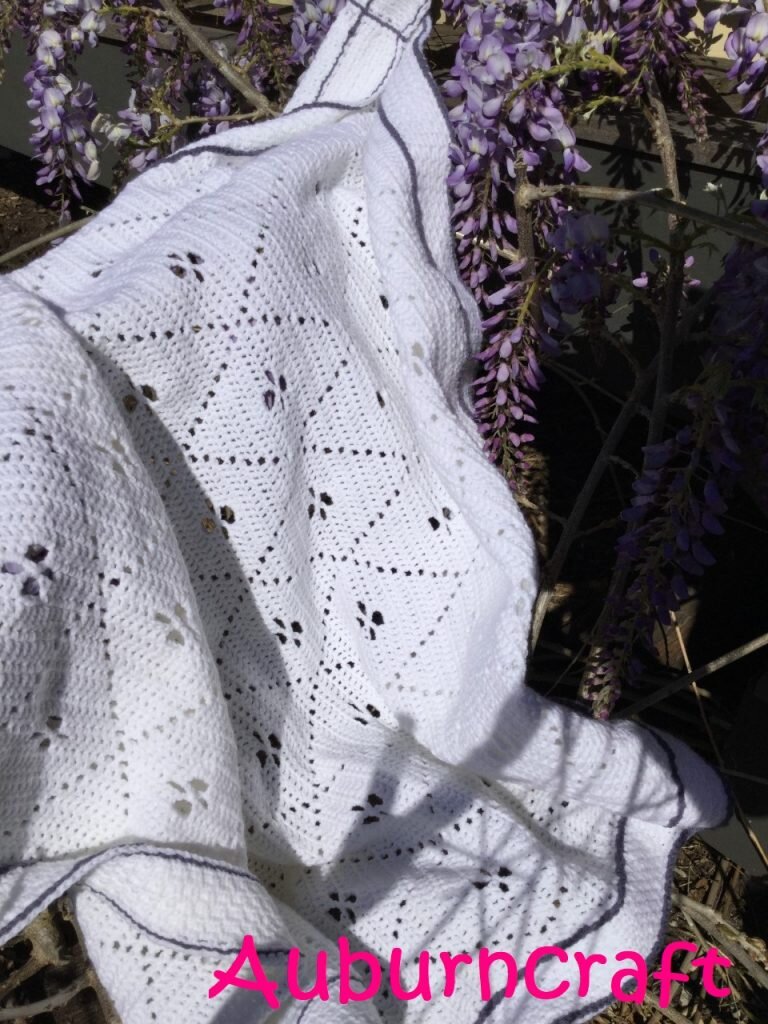
They remembered me from last year and began going through my entries, oohing and ahhhing, over each and every one. They especially liked my Technicolour Yawn vest and my Leadlight Afghan.

Technicolour Yawn Vest. Made using freeform technique

Leadlight Afghan. pattern available on ravelry

One lady suggested I try my vest on to show them, and do a modelling session. I smiled and told her that they were all welcome to try it on, and model it themselves. I drove away wondering if they were now all giggling and strutting around in my Technicolour Yawn Vest.

I will now have to wait and see if I am lucky enough to win something. Regardless, it brightened my day to see how excited these women were over what they were doing. I even had one of the ladies, reach for a crochet blanket she was working on, to ask advice on how to join squares and avoid that ridge you can get when joining using a Single Crochet method.

All in all it was a pleasant experience.

Amanda Christening Blanket

Following on from my two triangle shawls, Clematis Shawl and Vintage Clematis Shawl (shawl pictures and links at bottom of page), and at the suggestion of one of my testers, I designed this really cute Christening blanket. The pattern is available on Ravelry (click here) and Love Crochet (click here).

The blanket is named after the tester, who decided I should turn this design into a blanket. And so it became the 'Amanda Christening Blanket'.

I wanted something that was special, and had a special border that stood out. I think I have achieved that goal with this blanket.

It has spent the past month with my testers, who have helped to make the pattern what it is. They impressed me not only with finding my errors (or what I like to call my Boo, Boos), but they also used varied yarns and the results were really amazing.

Amanda Christening Blanket

4mm/G hook

·       4 x James C Brett Supersoft Shade BB4 290m/317yd per ball. Total yarn used approx. 1100m/1202yd.

brett-yarn.jpg

James C Brett Supersoft available on Love Crochet

The choice of yarn can define a pattern and how it looks. I used James C Brett Dk (click here). Below are a few example of my testers work and what they produced. I love them all!!!

Top Left: Blanket by Hannah Schmaker, made from scrap yarn and achieving a boho look.

Bottom Left: Blanket by Sharon C Coys Elderton, very pretty in Robin Paintbox.

Centre: Blanket by Leslie Hanson, gorgeous in blue.

Right: Blanket by Kathy Mant, in soft grey using Patons Big Baby 4 Ply and 3.5mm hook.  Pram size

L

eft: Blanket by Jane Wynne made from Kartopu Love Cotton Prints. Right: Blanket by Amy Elizabeth Peterson made from Bernat Baby Softee. Both came out looking fabulous!

Clematis shawl available on Love Crochet (click here), Ravelry (click here) and on Etsy (click here). Lion Brand Shawl in a Ball available (click here).

clem-shawl-collage-mindful-1024x537.png

Clematis Shawl made from Lion Brand Shawl in a Cake in Mindful Mauve

Vintage Clematis Shawl available on Love Crochet (click here), Ravelry (click here) and on Etsy (click here). Lion Brand Shawl in a Ball available (click here).

fleur-shawl-1-wm3.jpg

Vintage Clematis Shawl made from Cleckheaton Fleur

This post contains affiliate links. These links help to keep my blog open.

Just a Little Bit Batik, Shawl, Capelet, Shrug, Wrap.

Pattern available on Ravelry (Click here for link), Etsy(Click here for link) and Love Crochet.

This uses simple stitches and surface slip stitch to create an interesting textured look. Stylecraft Batik is used for best results. This is available on Love Crochet.

For me the design process is a journey!

Yes, I know. You are now thinking 'Oh she used the journey word, I'm out of here'. Can't say I like sentences that begin that way myself!

I mean it in almost a literal kind of way. I start with one idea in my head and end up taking a few turns along the way. I headed down the motorway of crochet, decided to take one of the exits and ended up in the side streets in a very cute little boho town.

My mind just kicks into overdrive and what I began to make, morphs into something else.

This was the case with this beauty! I find myself looking at it and making mmmmmmmmm noises.

Just a Little Bit Batik began its life thinking it was going to be a basic shawl. Somewhere along the way, the gremlins that keep the cogs in my brain moving, decided to go rogue and it ended up something a little bit more and I would like to think, a little bit more special.

It is now a Shawl/Shrug/Capelet/Wrap (to be honest I have no idea how to classify it) and rather puffed up with itself for being special. It is designed to be worn with the top edge rolled back to form a collar and a button closure to hold it in place.

It's a really unique fashion accessory that I would wear! And while I do tend to have a bit of an 'out there' style of dress sense (or so I have been told), I hope that this pattern will be loved by many.

It is colourful! And I love colour! It is also an easy crochet project and beginner friendly!

When I design something, I don't really think about it in the sense of what may, or may not be a popular item for people to want to purchase. I think about what I like and what appeals to my ideas of what colour, and shape should be. I like original things and will always be the crazy person wearing the tie dye leggings, or the over the top sunglasses. I don't care if they are in fashion. I wear what makes me happy! I design what makes me happy! And if it makes others happy too, all the better!

I can see a blanket in this same style in the near future!!!

This post may contain affiliate links. These help to keep my blog open.

Checking Gauge. Does it Really Matter?

I speak to so many people about their crochet projects, and the question of gauge comes up often. Many will admit that they NEVER check gauge. I know, I often don't bother.


Sure at times you can just pick up your magic wand (hook) and start hooking away and everything will turn out wonderful.

This won't always be the case. The necessity to check gauge, can very much depend upon the type of project you are making. Things like blankets, scarves and dishclothes will give you a free pass, as it really doesn't matter if they are a little bigger or smaller.

Clothing is one area that can end in disaster if gauge is not checked.

Checking gauge may be a pain, but it is much better to do so, than to find out half way through that gorgeous vest/coat/top etc pattern, that you spent a fortune on yarn for and fell in love with, could fit half your family inside it and still have room, when sadly you were making a size small.

Or that cute baby hat you wanted to gift to a newborn actually fits you. You could wait to this baby is a teenager to gift it, cross your fingers the newborn is blessed with a huge head or resolve the issue by checking gauge.

If gauge is not checked you can also find yourself running out of yarn. Yarn quantities stated in a pattern, will be dependant on your project turning out the same size as the designers. This can then make that blanket ( yes, the one that gauge didn't really matter on) unfinished. You ran out of yarn on the last few rows, as yours is several inches larger than the designers, so you need an extra Skein or two. Then you find yourself in panic mode, as maybe you can't get this yarn any longer, or perhaps you can but the dye lot is SO different, that extra skein stands out like a neon light.

How to Check Gauge:

  1. Using the yarn your project requires, and the stitch used in the pattern, make a 4"/10cm x 4"/10cm square.
  2. Place your square on a flat surface and lay a tape measure horizontally over the stitches.
  3. Count how many stitches you have in 4"/10cm.
  4. Now turn the tape measure vertical and count how many rows you have in 4"/10cm.
  5. If your measurements show that you have less stitches than the designers, you need to go up a hook size till you have the same.
  6. If your measurements show that you have more stitches than the designers, you need to go down a hook size till you have the same.


Altering your hook size and yarn choice can often fix many gauge issues, but not all.

In many crochet articles, you will see them mention Lifters, Riders, and Yankers.

  • Lifters pull up on the loops, making them higher than the working row.
  • Yankers pull their work tight, making it very snug
  • Riders keep stitches closer to the working row.

I know my own stitches tend to be shorter in height and tighter, or closer to other stitches, than most peoples.

This was really evident during the testing process of my Billy Thunder Tote. My testers were having cupping issues (circle would not lay flat) with the mandala type bag. It took a lot of work, but we finally got the pattern through testing. Many of my USA Treble stitches were the same height as the testers USA Double crochet. A few adjustments had to be made, and stitch heights for each row, added to the pattern to make it user friendly and suit most.

If after you have tried adjusting hook size, and still cannot meet gauge, it may be your stitch heights causing the problem. Fixing this is possible, and best tutorial I have found to address the stitch height issue is by Crochet Ever After (click name).

Billy Thunder Tote. Beaded both sides.

So, next time you are itching to start that new project, stop for a minute and think about gauge. It may save you a lot of trouble later.

Vintage Clematis Shawl

Pattern just released this week. This is a simplified version of my Clematis Shawl. The flowers appear at the edge only. The pattern is available on Love Crochet, Ravelry and Etsy.

*Ravelry Discount . For two weeks only (till 26th Aug 19) buy both the Clematis Shawl and the Vintage Clematis Shawl using the code 'Clematis' and get both for $6. *

Vintage Clematis Shawl made from Vintage Cleckheaton Fleur 8Ply

This was made from Vintage Cleckheaton Fleur, found in a local Opportunity/Thrift Store. It was just begging to come home with me, and so I granted its wish! I enjoy finding treasures (like this yarn)in these shops. When you spot a find like this, it kind of makes you want to do an arm pump in the middle of the store and yell, 'Yes, score!' Maybe I did do that or maybe I didn't, you just had to be there!!!

Kelly Thompson Shoemaker's test shawl. Bernat Baby Sport yarn used.

My testers did a steller job of testing this. One of my testers used Lion Brand Pound of Love (available here). Another chose Bernat Baby Sport (available here) and an adjusted hook size.

I love anything refurbished. There is nothing like taking something that has been discarded and turning it into something useful.

I have quite a habit of improvising, instead of spending money on items or tools for a specific job, it is much more satisfying to use an everyday item you have on hand and adapt it.

One of the items I repurposed is a broken mini fridge. My delivery man was getting a bit snippy as the letterbox was too small for the many parcels (most likely yarn) that were arriving. So hubby and I went to the re-cycling centre attached to the local tip. We found this mini fridge and so home it came. I spent a few dollars on paints and set about turning it into a unique parcel container.

Fridge refurbished into a parcel fridge.

I think my delivery guy was quite impressed, and now has tons of room to shove all those parcels of yarn arriving at my place.

This post may contain affiliate links. If you click on a yarn link on my page and purchase yarn, I get a small commission. This does not affect you in any way but helps me to keep my blog going.

Help! I'm addicted to W.I.P.S and Yarn!

If you were to fill a room with serious Knitters and Crocheters and ask those who do not have a HUGE stash to step forward, what do you think the outcome would be?

Sure there may be one, or two who step forward as their stash is small and controlled. But maybe they have only just stepped into the dark side of Crocheting/Knitting and are yet to succumb to the lure of those soft, squishy skeins of beauty!!!

The rest of the room would be either trying to avert their gaze, as they know they have more yarn than they can ever possibly use in one lifetime Or they would be standing tall and defiant as it's their yarn, and the world can go suck a big one if they think they are going to change their ways!

I have too much yarn. I do know this. But then how much is too much? Like really!! I have sorted through my skeins of beauty and considered downsizing. I even got rid of a few balls of really cheap acrylic that I was never going to use. It went to someone who does crochet for charity.

But as for the rest, I need them!! What happens if an idea jumps into my head, and I have to wait weeks for an order to arrive? That would just never do!

W.I.P.S, I have them everywhere. I really don't make things from other peoples patterns now. I have way too many ideas careering around in my head to even think about doing other peoples patterns.

If I am being honest I would have over 20 W.I.P.S at least. I do a bit, move on to another one and repeat. Sooner or later I finish most of them, but not always. There is that Ruana that I started well over a year ago, and I am just not feeling it any more.

I am very proud of myself at the moment though! I had an idea leap into my head yesterday and I was itching to place an order for some really lovely yarn I saw. It looks so NICE! It wanted me to buy it!!! I was so close to pressing that order BUTTON. It was begging me to press it!

Go on, you know you want to.

I looked at my stash and pondered it for a bit. Then I remember all that Stylecraft Batik Dk (here), that I had left over from my own Leadlight Afghan (here) and also from many years back where I made Sue Pinners beautiful Carousel Blanket. I had some lovely purples (my favourite) left from that one. This would work! It would look wonderful with what I had in mind. I dragged my hand away from that nasy order button. It was of course still begging me to press it. The order button did not get pressed, and I am using up my stash. Someone please give me a medal or two!!

Leadlight Afghan Made from Stylecraft Batik Dk.

What a superior feeling! I dug through my stash and found all those bits and pieces of Stylecraft Batik (which turned out to be quite a bit). I am just loving the colours and this is going to be really lovely. The stitches will be easy and very beginner friendly. It is the colours that will make this special. Excitement Plus!!!

Sneaky Peek of 'Just a Little Bit Batik Shawl'.

So stay tuned for my 'Just a Little Bit Batik Shawl'. Pattern coming soon!!! (That is if I don't decided to start another W.I.P. or even finish something I started ages ago, I really should do that). I can also feel a vest or jacket in this same style is going to be in order.

I may even gift this shawl to a very special relative of mine who loves to follow my crochet with EXTREME interest. I am sure they will love it!!!

This post may contain affiliate links. If you click on a yarn link on my page and purchase yarn, I get a small commission. This does not affect you in any way but helps me to keep my blog going.

Clematis Crochet Shawl Pattern

*Ravelry Discount Link in post . For two weeks only (till 26th Aug 19) buy both the Clematis Shawl and the Vintage Clematis Shawl using the code 'Clematis' and get both for $6. *

I have a few favourite things in life!

Flowers! I love flowers! Many of the things I crochet incorporate flowers in them as flowers make me happy! The Clematis flower is supposed to be part of the Buttercup family and if this is so, then it must be the cool Aunt, due to its beautiful colours (usually purples, pinks and creams).

Clematis Flower!

I love Purple! Purple makes me happy!

Chances are if I am looking at yarn, my hands will automatically be drawn to the purples. I have always had a love of purple. When I got my own bedroom as a child, my father was silly enough to ask me what colours I wanted in my room. While he didn't let me paint the walls purple, I did get purple curtains and a purple chest of drawers.

So while shopping for some unnecessary yarn (haven't we all been there?), I spotted the Lion Brand Shawl in a Cake (which also comes in a ball). They had a few different colours on offer but of course that Mindful Mauve was just calling to me.

The result is the Clematis Shawl. Pattern available on Ravelry, Love Crochet and Etsy.

Made from Lion Brand Shawl in a Cake. Mindful Mauve.

My long suffering pattern testers were outstanding during the test process. They produced some really beautiful shawls, each with their own individual yarn choices and colours.

Top left: Shawl by Nikki Barker made from Cascade Sateen.
Top Centre: Shawl by Simone Howes made from Stenli Candy.
Top Right: Shawl by Amy Elizabeth Peterson made from Lion Brand Shawl in a Ball, Community Coral.
Bottom Left: Shawl by Opal Pickard made from Lion Brand Mandala in Gnome.
Bottom Right: Shawl by Shaunna Hallon made from Lion Brand Shawl in a Cake.


This post may contain affiliate links. If you click on a yarn link on my page and purchase yarn, I get a small commission. This does not affect you in any way but helps me to keep my blog going.

My Very Own Daisy Hat.

This is a paid pattern but will be available on ravelry free for 2 days, ending 27th June Midday Australian Time. The code to use on ravelry is at the bottom of this post. PLEASE GIVE THIS POST A LIKE AND PERHAPS CONSIDER FOLLOWING MY BLOG. This helps me to keep offering free patterns and discounts. So please do not just grab the code and run as this is a small request. The like button for this post is at the bottom of the page.

I love different things!

I especially love things that are colourful and unique! Yes, I would wear this hat if I had made it in Adult size, but this time I decided to stick with just the three sizes. Babies, Toddlers and Children, have all the fun!

My Very Own Daisy Hat

This is a fun hat for Babies, Toddlers and Children.

The pattern is available in Uk and USA Terms.

Sizing available:

  • Baby – 17-inch circumference
  • Toddler -18-inch circumference
  •  Child -19.5-inch circumference

Materials:

4mm hook (Mytension is firm)

1 Ball Stylecraft Special Dk Greengage = C1.

1 Stylecraft Special Dk Cream = C2.

1 Stylecraft Special Dk Sunshine = C3.

1 Stylecraft Special Dk in Gold or a small amount of black yarn in Dk = C4.

1 (very small amount) Stylecraft Batik Gold = C5.

1 (very small amount) Stylecraft Black = C6.

2 x 6mm beads. (Hand sewn eyes).

Cottonthread to sew beads on.

Tapestry Needle.

Sewing Needle.

Code for use on Ravelry 'blogdiscount3'

Please give this post a like and follow my blog for future promotions.

This post may contain affiliate links.

Filigree Flowers Crochet Shawl

If you are looking for a delicate, lightweight shawl then look no further!

The pattern is available on Ravelry, Etsy and Love Crochet (HERE).

Filigree Flowers in Alize Angora gold Simli

Filigree Flowers is a delicate shawl comprised of simple shells for the border and for the main body of the shawl, Solomons/Lovers Knots.

Nestled in between the knots are 4 petal flowers. These are constructed of chains all grouped together. Photo tutorials show how to create these delicate flowers.

If you are looking at this shawl and thinking 'Oh, I can't do that stitch, it looks too difficult,' then you would be wrong!

Lovers/Solomons knot may look a difficult stitch, but it is in fact a simple stitch and works up quickly. Combined together with a shell border and simple flowers the result is quite satisfying.

This is a written pattern in Uk and USA terms, with pictures and graphs to help along the way.

The pattern is a four row repeat and best results are achieved with a light fingering weight yarn. I used Alize Angora Gold Simli for mine.

Success has been achieved with this pattern in several other yarns including Lion Brand Shawl in a ball (available here), Lion Brand Summer Nights and Lion Brand Shawl in a cake (available here).

I love both yarns and while the shawl looks great in the Alize, this is often a little harder to source than the Lion Brand yarn.

I am extremely fortunate to have some fabulous testers and they produced some really lovely shawls.

As for the naming of this shawl....Yes! most of us know what the word Filigree means, but for me it is a little more. I had a gorgeous pure bred Appaloosa Horse with the name Filigree. Her full name was TTT Bar Filigree. I lost her at the age of 23 due to Cushings disease.

She was a character, and was known to push our shed roller door up with her nose, to get at the feed barrels inside.

My husband often had his lunch stolen by her. If he left his esky in the back of his ute and she happened to be in the yard, she would get the lid off with her nose and take his sandwiches.

The birdseed in the bird feeder was a favourite snack of hers, when she was not eating the heads off my dahlia flowers. My kids loved her, and would stop to pat her when they walked down our drive after school! She had a delicate white pattern over her rump and so I named this delicate shawl after her.

Some of my testers shawls. 1. Kim Carlos. 2. Natishia M Curry. 3. Kathy Mant. They all came out beautiful.

This post may contain affliliate links. Clicking on these links does not cost you anything but can help me to keep my blog open. Thank you.

Diamonds Everywhere!

My Diamonds crochet blanket pattern is available in Butterfly Diamonds, Dragonfly Diamonds and Flower Diamonds.

Simple stitches are used making this a beginner friendly pattern. This works up quickly.

Dk yarn is used, although a larger blanket could be achieved with the use of an Aran weight yarn. I used Sirdar Snuggly (available here) which is a lovely soft nylon-acrylic yarn, very suitable for babies.

3.5mm hook 
4mm hook for borders and surface slip stitch 

Flower Diamonds, Butterfly Diamonds and Dragonfly Diamonds crochet patterns are available on Love Crochet (click on blanket names for link).

Flower Diamonds

Butterfly Diamonds

This post may contain affiliate links.

Poppy Meadow Crochet Bag

This is a fun hippy/boho purse with an inner pocket. Self lined with an inner dc/tr circle.

I used Dk cotton for this beauty available here.

Four separate pieces come together to make this a sturdy little purse. The inner circle adds a feature of its own, with colour peeping through the outer mandala. The flowers are made as you go and not sewn on later.

Instructions are also included in the pattern to make your own polymer clay beads and button. This is quite easy. I don't use any fancy tools to make these as I am always one to improvise and use what you have on hand. Items such as a crochet hook and a lipstick lid are used to get the holes and shapes.

This purse works up quickly and I know several of my testers had family members claiming their finished purses the minute they were finished. Definately a popular item for teenagers.

My testers made this purse in a variety of yarns and colours, each one unique to them. The results were stunning!

A few of my testers bags. 1. By Christy Schuler. In navy and cream and looking fabulous with a two-tone fringe. 2. By Jane Wynne. I love this in the cream with just a hint of blue. 3. By Sharon C. Coys Elderton. I joked with Sharon as anyone who knows me, knows I really don't like green, but Sharon won me over with her beautifully neat stitches. She also made her own polymer clay beads and button (instructions for this are in the pattern ).

This is an advanced beginner to intermediate level project. Instructions include how to make your own polymer clay button and beads if you choose to. 
Materials: 
3.5mm/E hook 
5mm/H hook for I-cord 
3 x balls Lincraft Dk cotton in black. 100m/109yd per ball. 
3 x balls Lincraft Dk cotton in Red. 100m/109yd per ball. 
7 x Beads 10mm/0.38-inch or larger.
1 x 40mm button 
2 x d-rings or bead circles. 
2 x Metal necklace caps/tassel ends. 
Tapestry Needle. 
Craft Glue (optional). 
Polymer Clay (optional if making your button and beads). 
Acrylic Varnish for craft (optional if making your button and beads.

Find the pattern on Ravelry. Etsy and Love Crochet (click on place name)

This post may contain affiliate links! By using them it costs you nothing but can help me to keep my blog going. Thank you.

When you forget to pack your crochet and life happens!

Most people have probably seen the ads for the American Express card in which the motto is, 'Don't leave home without it'.

Yes, a few of you are nodding as you know the ads I mean!

Well for us die-hard crochet maniacs, while a credit card is a very important thing to have on hand, say for if you need to duck into a yarn store or two. Michaels could be having a flash sale and then that card will be your best friend............but I think for most of us, the top of the list of what to take on leaving home, would be an emergency crochet WIP.

You know how it is! You are going about your day and the unexpected happens and you get stuck somewhere. I had one of those days this morning.

I was leaving the gym after a rather strenuous pump class and got to my car, my car must have been in a rather selfish mood as it had a flat tyre. Surely it knew I was actually a bit tired and would rather not have this delay. I did plead with it to not have a flat tyre, but it was refusing to listen. As I stated, SELFISH!

I looked at the tyre and thought about it for a bit. My dad ensured that I knew how to change a tyre and I am pretty darn good at it. Mind you I have told my long-suffering husband that we really need a better jack than what is in the car. It takes longer to get the car up on the jack, than it does to change the tyre. So with this in mind I considered just how much air was left in this tyre, how tired I was, and I made the sensible decision to drive the 200 metres to the tyre shop down the road.

Now they were great and got stuck into changing that tyre right away. But as I sat there, waiting I was also kicking myself. This was prime crochet time. Sitting there, hands idle, nothing to do. I had left all approximately 30 WIPS at home.

I thought about the Girl Guides we have in Australia (for anyone in the USA this is sort of like a Scout) and their Motto "Be Prepared". Well I was not! I guess I can excuse my lack of preparedness due to the fact that I was never a Girl Guide, although I was a Brownie, which is sort of an understudy to Girl Guides. Once initiated into this group you get put into a sub group, some of which were Pixies, Elfs, Leprechauns and I forget what else. As an added incentive to becoming a Brownie you get to wear a hideous poo brown pinafore. I wanted to be a Pixie, but of all the sections to be put in, I got Leprechaun. No wonder I hate green!

Well being a Brownie was obviously a waste of time. Don't think I paid a lot of attention to the Brownie code at all as none of it helped me today. I was not prepared!!

So lesson learnt. I won't make that mistake again! What a boring 15 MINUTES that was! Imagine how many rows I could have done in that time!

Time to pack the car with an emergency WIP!

SO, DON'T FORGET TO TAKE YOUR CROCHET WHEN YOU LEAVE HOME!!!

Crochet! Go big, or go home!

Sounds great in theory! And I always have grand ideas that seem to take forever from idea to completion.

Last huge idea I had took over two years to complete, and I think I am sizing myself up for a similar experience.

I bought yarn for a large size Afghan approximately a year ago. For this one I am using Stylecraft Aran with wool. (available here). These are fabulous for a larger project as they come in these huge 400g balls.

Then I spent many hours designing a graph for it. In my head the Afghan has two picture panels. These panels have cats on them.

Sounds easy doesn't it? I got as far as putting the cats on the crochet panel via cross stitch and found I was a stitch out somewhere.

Cross-stitch on crochet is not hard. At least it isn't till you make a boo, boo and have to frog back several hours work. These cats were staring at me with their yellow eyes in a mocking manner. Something wasn't right! The cats refused to tell me what the issue was, selfish things!!!

So this has been one of those projects that gets taken out of the naughty corner for a bit, stared at, glared at, and I even begged it to show me what I was doing wrong.

For ages this horrid thing refused to answer and lay despondent in the naughty corner, cats, half done and sulking.

I worked my way through several million WIPS that had been piling up and decided it was time to take another look. It was as if a light bulb went off and all of a sudden it was clear. Why didn't I see that ages ago? After all it is pretty darn obvious!!!

I am now happily working on my Cat Afghan again and while this is going to take a bit of time to complete, it is going to be A-MAZ-ING!!!

Cross-stitch cats.

Daffodil Crochet Bookmark.

I had been playing around with Daffodils for a new bag design and decided to turn one of them into a bookmark. If you are looking for a quick and easy make, or maybe you need an end of year teachers gift, these work up fast and look great!

The free version of the pattern is below. A PDF copy is available for a small purchase amount on my ravelry page.

Daffodil Bookmark

USA terms are used.

Materials:

3.5mm/E hook

This is a perfect scrap buster project as only a small amount of each ball is used.

1 ball Cotton Dk in Orange = C1

1 ball Cotton Dk in Yellow = C2

1 ball Cotton Dk in Green = C3

Tapestry needle.

To cater for different size books, adjust the stem chain length.

2large beads with wide holes. I made mine from Polymer clay. Instructions aregiven if you wish to make your own.

Jewellery cap.

Small amount of craft glue.

Abbreviations:

Sc- Single crochet

Dc- Double crochet

Tr- Treble crochet

Slst- Slip stitch

Blsc- Back loop single crochet

Fl- Front loop

Lp- Loop

Ch- Chain

Measurements: 15 ½ inches/39.37cm from top of flower to endof tassel.

Notes:

  • Chains count as a stitch unless otherwisestated.
  • Gauge is not a necessity for this project.Size will be determined by hook and yarn selection.
  • Keep the orange yarn and stitch marker to thefront of your flower when working round 2.
  • Stitch counts and hints appear in purple.
  • Making your own polymer beads is optional. Ifpurchasing beads, be sure to buy ones with large holes.
  • This bookmark is sized for a medium book.Reduce the stem chains if you wish for a shorter bookmark. Increase the stemchains for a larger bookmark.

Flower head:

Round 1:  With C1 make a magic circle. Ch1 into a magiccircle (does not count as a st). Sc15 intocircle. Slst to ch1. Remove hook and insert a st marker. Do not fasten off.  [15]

Round 2:With C2. Attach yarn with a slst into any back loop of round 1 .*( Ch2, dc1,tr1) into same back lp.  Ch3, slst intofirst ch (picot made).  (Tr1, dc1,ch2, slst) into next back loop. Slst across next 2 back loop of sc* Rep from *to * 5 times in total. Slst to first ch2 to close round.  Fasten off and cut yarn. [5 petals]

Round 3:Remove st marker from C1. Ch1. Sc into each Fl of round 1. Slst to ch1 toclose. [15]

Round 4:Ch1.  Sc into each st around. Slst to ch1to close. [15]

Round 5:Ch1 does not count as a st. Place next sc into same sp). * Sc. Ch2, slst backinto first ch of ch2. Sc2tog over next 2 sts.*  Rep from * to * around.  Closewith a slst. Fasten off and cut yarn.

Stem:

With C3. Ch50. Scinto 2nd ch from hk.  Sc acrossto last ch.  Work 3sc into the lastch.  Turn and work sc along the otherside of the ch. Work 2sc into the last ch. Fasten off and cut yarn leaving a long tail to sew to flower head.  Using a tapestry needle sew one end securelyto the back of your flower. [48sc + 3sc + 48sc + 2sc]

Stem

Leaves: (make2)

Leaf make 2.

Using C3. Ch16.Slst into 2nd ch from hook. Sc into next ch. Hdc into next 2chs.  Dc across to last 3 chs. Hdc intonext ch. Sc into next ch. Slst into last ch. Fasten off and cut yarn (leave a long tail for sewing).  Sew the leaves to the stem, just above thebeads. [2sc,3hdc, 10dc]

Polymer Beads (optional):

Materials Needed

  • Polymerclay in any colours (available at most craft outlets: I used red for thisproject).
  • A rollingpin
  • 5mmcrochet hook.
  • Acrylicgloss varnish.
  • Paintbrush

Step 1: If using more than one colour ofclay, combine these by working them together. Roll balls approx 10 to 15mm indiameter.


Step 2: Push ahole through the centre of each ball with a 5mm crochet hook end. Push the hookthrough several times from each end of the hole.  This ensures the hole is even.

Step 3:  Place your beads on an oven tray and bake in a slow oven for approximately 10 to 15 minutes. Allow to cool. Note: It is a good idea to place foil over your beads and tray, prior to baking. This helps keep any smell from the clay contained.

Step 4: Paint with Acrylic Gloss varnishmaking sure to brush out any bubbles. Allow to dry.

Adding Beads and Jewellery cap:

Thread your beads onto the stem end, not attached to the flower.  Place a small amount of craft glue inside thejewellery cap and push the stem end onto it. Allow to dry.

Tassel: 

1. Wrap yarn 10times around an iPhone or a piece of cardboard approx 3 inches/7.5cm wide.

2. Thread adarning needle with 15cm/5.90inches of yarn and tie the top of the tasseltightly, leaving the tail to tie to your jewellery cap.

3. Remove the yarn from the iPhone/cardboard.

Diagram showing the making of the tassel (above) is from another project. The same technique applies. Wrap yarn around iPhone or cardboard 10 times as per the instructions.

4. Thread adarning needle with approx 20cm/7.87inches of yarn and wrap around the tassel6-8 times tightly. Knot and push the needle down through the wrapping so it canbecome part of the ends.

5. Tie the Tassel to the Stringing Jewellerycap.

6. Cut the ends of the Tassel and trim evenly.

 
Thank you to my wonderful testers:

 Agnès Arcarons, Kathy Dodge, Bethany Colhoff, Amy Belanger Dreffs, Heather Greene, Patsy Breaux Cantor

One of my fabulous tester's bookmarks. Agnès Arcarons.

Kathy Dodge's test bookmark.

This page may contain affiliate links.

Leadlight Crochet Afghan/Blanket

You know that moment, that very special moment when you have worked really hard at something so it is unique, one of a kind? You press the publish button on the pattern and fingers crossed, people will like it and want to make it.

Today has been a button pressing and publishing day for me! My Leadlight Afghan decided to become an idea in my head in 2016. And today it has finally found its way to being published.

The pattern can be found on Ravelry, Etsy and Love Crochet. (click on place name)

It took my testers around four months to work their way through the 96 pages of pattern. They did a fantastic job. So Thank you to Carrie Skach, Kathy Mant, Bethany Colhoff and Corlia Van Zyl. This was a LOT of work to test!

The Leadlight is made from Stylecraft Batik Dk (available here)in the following quantities:

Materials 

5mm hook 

5 Stylecraft Batik Teal 138m/151yrd= C1 

3 Stylecraft Special dk Black = C2 

5 Stylecraft Batik Storm 138m/151yrd = C3 

5 Stylecraft Batik Biscuit 138m/151yrd = C4 

3 Stylecraft Batik Sage 138m/151yrd = C5 

4 Stylecraft Batik Indigo 138m/151yrd = C6 

5 Stylecraft Batik Lupin 138m/151yrd = C7 

This post may contain affiliate links. By clicking on these links it costs you nothing but will be helping me to keep my blog going.

Crochet Bags, bags and more bags!

Lately, I have been making bags!

I made the 'Billy Thunder' Tote and was pleased with that (and I got to play with beads, which is always a good thing.)!

Billy Thunder Tote

Next was my Re-mojonation purse/bag and I was super happy with that one.

Re-mojonation bag

Then I moved on to 'Field of Flowers' (which is a mess of flowers on a bag and a fantastic stash buster). I do love flowers! I also got to play with polymer clay with this one. Clay is fun to play with, as long as you remember to keep the oven to a slow temperature. Not a lot of fun if you forget. Toxic fumes are not fun!

Field of Flowers is at present in the hands of my long-suffering testers and will hopefully be listed early next month. I am forcing them to work day and night to get it done, so it should be good!

Field of Flowers Tote

I showed Field of Flowers to one of my non-crocheting friends (Yes, I do have one!). This friend is mad, crazy, obsessed with the colour 'RED'. Red is not a colour that I am totally drawn to. I prefer purples and oranges. Anything on the spectrum of those colours and I'm drawn like a moth to a flame.

If I was asked to get rid of a couple of colours in the world, never to be seen again. I would probably get rid of GREEN first, as I hate green. I told my red obsessed friend the other day that green should only ever be seen on a plant or grass. She did agree!

There I would be acting as colour designer to the world and banishing Red and Green. I can imagine them both sulking and refusing to leave! Begging me to let them stay. But I would be firm in my decision as they headed for the exit door offering excuses as to why they should stay! Although I guess Red Roses would be missed! Maybe I could be generous and make a dispensation for Valentines day!

I could make a proclamation: Here yee, here yee. I hereby declare that there may be Red (and I guess Green too) on Valentines Day! But only on Valentines Day!

The world could do without green for sure. Imagine a world full of Purple and orange trees and plants! Throw in a bit of pink and this is a world I could dance in! That would rock!

We could do without red! Couldn't we? My red obsessed friend would vehemently disagree with me and I do have to admit it would seem rather odd not seeing this person dressed in red and driving her red car.

And I guess it could be an issue, due to the fact that I am a redhead.


Yes, yes, this sounds like a contradiction as I love my hair colour, but red hair is totally different to the actual primary colour red, so don't start there! I guess if I ended up with purple hair it would not be the end of the world. Look at how many nannas rock the purple dyed look!

My father would have hated a world without red in it. Red was his favourite colour and he loved his red truck. But this is my imaginary world and RED has to go!!!

I wonder where my dislike of Green and Red comes from. Red is just such an, in your face colour and doesn't go with that many other colours all that well. And always having people suggest I should wear green, probably didn't help the colour green. 'It will go with your hair' they say. Yeah sure, if you want me to look like a potplant! Yes, I love flowers, but I don't want to look like a potplant! Every time I put on something green I just hated it.


But bags, back to the subject of bags! After showing off my Field of Flowers Tote, I decided (after talking to the red obsessed friend) that I did need to produce one with red flowers in purse size. I added a red lining inside so the red peeps through from the back, adding an extra touch to the design. This little beauty is in the capable hands of my testers!

Poppy Meadow Bag

I have two other bags in the works. One is part done, and the other is just stewing around as an idea in my head (and no, in my head it is not red or green in colour, but a lovely shade of lilacs and blues).

I have a ton of ideas for different crochet bags! And I have the stash to do them all (insert evil laugh here)!!! I will take over the world one crochet bag at a time!

Keep an eye out for my latest two coming soon to a ravelry/etsy/love crochet pattern store near you (well at least a computer click away).

Technicolour Yawn Freeform Vest!

I love colour! I love flowers! I love crochet! What a great mix of things!

They just had to be combined together. So I started this Freeform Vest around an aeon ago!

Freeform can be challenging and I thought this one had got the better of me. It got thrown into the naughty corner as I was not happy with it. I refused to even look at it for quite a while. I had darts in the back and they were just not working.

I dragged it out from the depths of the cupboard two weeks ago. I took to it with the scissors in a mad frenzy and removed the darts. Of course this left gaping holes where they were. So I slowly started to repair the damage. I would do a bit, undo a bit more, repeat, repeat, repeat!

The armholes were a pain! They were too small! The wrong shape! The wrong colour! Just not right and blatantly mocking me! So out came the scissors again!

I love purple!

Once I had the vest together and was happy with it, I then had to face the ends and sewing them in.

The ends! Oh the ends! So many ends! I did despair that I would never get them all sewn in. But last night I sewed the very last one in. This was followed by happy dancing! No humans were around, so I shared my excitment with my best friend and constant companion, Stella (cocker spaniel). Needless to say she was impressed. Not only with the vest, but with my dancing too!

This is made from pure wool, so is rather heavy. The buttons I made from polymer clay and there is a 'how to' on my blog about making them.

I intended to do sleeves on this, but decided I may actually get to wear it here in QLD if I made it sleeveless. Who knows I may even add sleeves at a later date. Although I did run out of purple yarn in the final stages, and had to join several pieces to finish the armholes.

Funky Buttons! Make Your Own to Add Flair to Crochet!

Below I outline how to make the spiral buttons and the flower button.

Spiral Button:

I am on the home stretch of a freeform crochet masterpiece (in my own mind) that I have been working on for ever! It is a hodge, podge mess of flowers and anything else I think of at the time. Made from pure wool and quite heavy to work on.

I started this possibly 18 months or 2 years ago. It has been in and out of the naughty corner quite a bit. I have frogged (unpulled), redone, frogged again, changed my mind multiple times, and I even took to it with the scissors recently. The heading picture is of my coat in progress.

Despite all this frustration, it is now starting to look like a coat, or vest. I am yet to decide if I can tolerate doing sleeves on it.

My mind is now turning to buttons. I need unique buttons for this unique jacket. They must be a statement of epic proportions! Something that reflexs the hours of frustration this coat has brought me. I have looked high and low for these gems but with no success. Nothing has yelled 'these are the ones' at me. I had to find something that I feel is unique enough to do justice to this piece of freeform.

Last night I had a light bulb moment and today I created my own buttons using polymer clay. I want to share this easy way of making your own unique buttons with you:

Materials:

  • Polymer clay in two colours (available at most craft outlets).

  • A rolling pin

  • A wooden kebab skewer (or a darning needle will do)

  • Acrylic gloss varnish

  • Paint brush

  • Knife

Step 1:

Roll your clay out into two thin sausages, no more than 5mm thick.

button-poly-5.jpg

Step 2:

Put the two pieces together with one length slightly longer to begin the curving. Slowly roll your pieces together. When you are at the size of button you require, cut the clay on an angle.

button-poly-6.jpg

Step 3:

Gently rub at the ends you cut to work them into the rounded shape you need. Squash the button flat and gently rub to make certain the pieces grab together. I wanted an oval shape so I squashed my circle a little.

button-poly-4.jpg

Step 4:

Using your wooden kebab skewer or darning needle, push holes into the top of the button. If making more than one button, place the first button with holes on top of any following buttons to find exact placement.

button-poly-3.jpg

Step 5:

Place your buttons on an oven tray and cover with foil. Bake in a slow oven for approximately 15 minutes. Allow to cool.

Step 6:

Paint with Acrylic Gloss varnish making sure to brush out an bubbles. Allow to dry.

button-poly.jpg

My buttons are roughly 40mm in size. Enjoy your unique handmade buttons!

buttons-poly-fin-1.jpg

Flower Button

This little button is for a new Tote bag I am working on 'Field of Flower', which will hopefully be in the testing stage soon.

Like many of my other projects it is a unique bag and the name says it all. I wanted a button that would reflex that. I decided to make a flower this time!

I have mentioned before that I don't have a huge array of tools for specific things. I tend to use what I have at hand. You will see what I mean below with my use of an old lipstick lid.

Materials:

  • Polymer clay in two colours (available at most craft outlets).

  • A rolling pin

  • A wooden kebab skewer (or a darning needle will do)

  • Small round object to make petal shapes (I used an old lipstick lid).

  • Acrylic gloss varnish

  • Paint brush

  • Knife

Step 1: With colour 1 of your polymer clay, roll a piece into the a ball about the size of a walnut.

Step 2: Flatten the ball with your rolling pin.

Step 3: Using your lipstick lid, mark the petals by pressing this into the clay.

Step 4: With a sharp knife, gently cut away between the petals.

Step 5: Smooth the edges with your finger.

Step 6: With colour 2 of your polymer clay, roll a piece smaller than your first colour into a ball.

Step 7: Flatten the ball with your rolling pin. Using your lipstick lid, cut a neat circle. Smooth the edges up with your finger.

Step 8: Place the colour 2 circle on top of your flower.

Step 9: Using your wooden kebab skewer or darning needle, push holes into the top of the button. If making more than one button, place the first button with holes on top of any following buttons to find exact placement.

Step 10: Place your buttons on an oven tray and cover with foil. Bake in a slow oven for approximately 15 minutes. Allow to cool.

Step 11: Paint with Acrylic Gloss varnish making sure to brush out an bubbles. Allow to dry.

My Flower button measures approx 50mm

Mended Fences Crochet Shawl

Put your hand up if you think Solomons/Lovers knot looks scary!

Yeah, I bet you considered putting your hand up. Most people do look at the stitch and think that it must be really difficult. It isn't!

I thoroughly enjoyed designing this little shawl. It is comprised of a simple two row repeat. Testers with all levels of ability have made this, with success.

I used Alize Angora Gold for mine, but my testers used various yarns. Light fingering works best and Lion Brand Shawl in a ball works up beautifully.

Amanda Corniello's Mended Fences made using Lion Brand Shawl in a ball

The shawl is worked on a 5mm/H hook and is a simple rectangle shape. It works up quickly, and would be beautiful addition to wear for any special occasion, lightly draped across your shoulders.

The pattern is available in my Auburncraft store on Ravelry.

Please give the pattern some love on Ravelry and pop it in your favourites.

Also please remember that my patterns are copyrighted.

SueStapleton/Auburncraft—Please do not copy/sell pattern as your own work ordistribute without my permission.  Pleaseshare a link to my blog or ravelry, NOT MY PDF.   You may sell finished items but pleasecredit me as the designer.  Read more aboutAustralian copyright laws here: http://copyright.org.au/ACC_Prod/ACC/ 

Filet Crochet. Adding Flowers. So you want to know HOW!

I enjoy a bit of Filet crochet and have done my fair share over the past few years. while Filet crochet is fabulous on its own, it can be so much more than just blocks and spaces.

I have to say I love flowers! Flowers make me happy!

I have a couple of patterns in the design stage that incorporate 3D flowers into the filet or hole spaces of the work. This may look harder than it actually is. In reality it is a simple technique and can be done in two different ways. It does not remain exclusive to just filet crochet, but can be done on any crochet by adding in a filet hole where you want the flower.

The two methods are:

As you go, using the same colour yarn or, after completion of your filet piece and using a different colour.

Here I outline these methods:

Method one: Worked in different colour yarn:

Adding that 3D look to filet work. It's easy!

USA TERMS:

  • Step 1: Attach yarn with a slip stitch into the top chain space of your Filet hole. Into this space work (sc, dc, tr, tr, dc, sc) one petal made.

  • Step 2: Rotate your work to the right. Around the side of your dc filet stitch work

  • (sc, dc, tr, tr, dc, sc).

  • Step 3: Rotate your work to the right. Around the chain space of the previous row work (sc, dc, tr, tr, dc, sc).

  • Step 4: Rotate your work to the right. Around the side of your dc filet stitch work

  • (sc, dc, tr, tr, dc, sc). Slip stitch to top of first petal sc to close. Fasten off and cut yarn. Sew in any ends.

field-of-flower-one-side-2.jpg-wm.jpg

My latest design 'Field of Flowers'

Method two: Worked as you go, using the same yarn.

  • Step 1: Working on a wrong side row, complete your Filet hole. Turn your work so you now have right side facing.

  • Step 2: Work (sc, dc, tr, tr, dc, sc) into the chain space just created. One petal made.

  • Step 3: Rotate your work to the right. Around the side of your dc filet stitch, work (sc, dc, tr, tr, dc, sc).

  • Step 4: Rotate your work to the right. Around the chain space of the previous row work (sc, dc, tr, tr, dc, sc).

  • Step 5: Rotate your work to the right. Around the side of your dc filet stitch (last stitch created) work (sc, dc, tr, tr, dc, sc). Slip stitch to top of first petal sc to close. Turn your work and continue on with your project.

3D Flowers. As you go method!

So go on! Now you know how to add a bit of flare or colour to your filet work. Colour the world with Flowers!

A flower doesn't love or hate you, it just exists. Mike White.